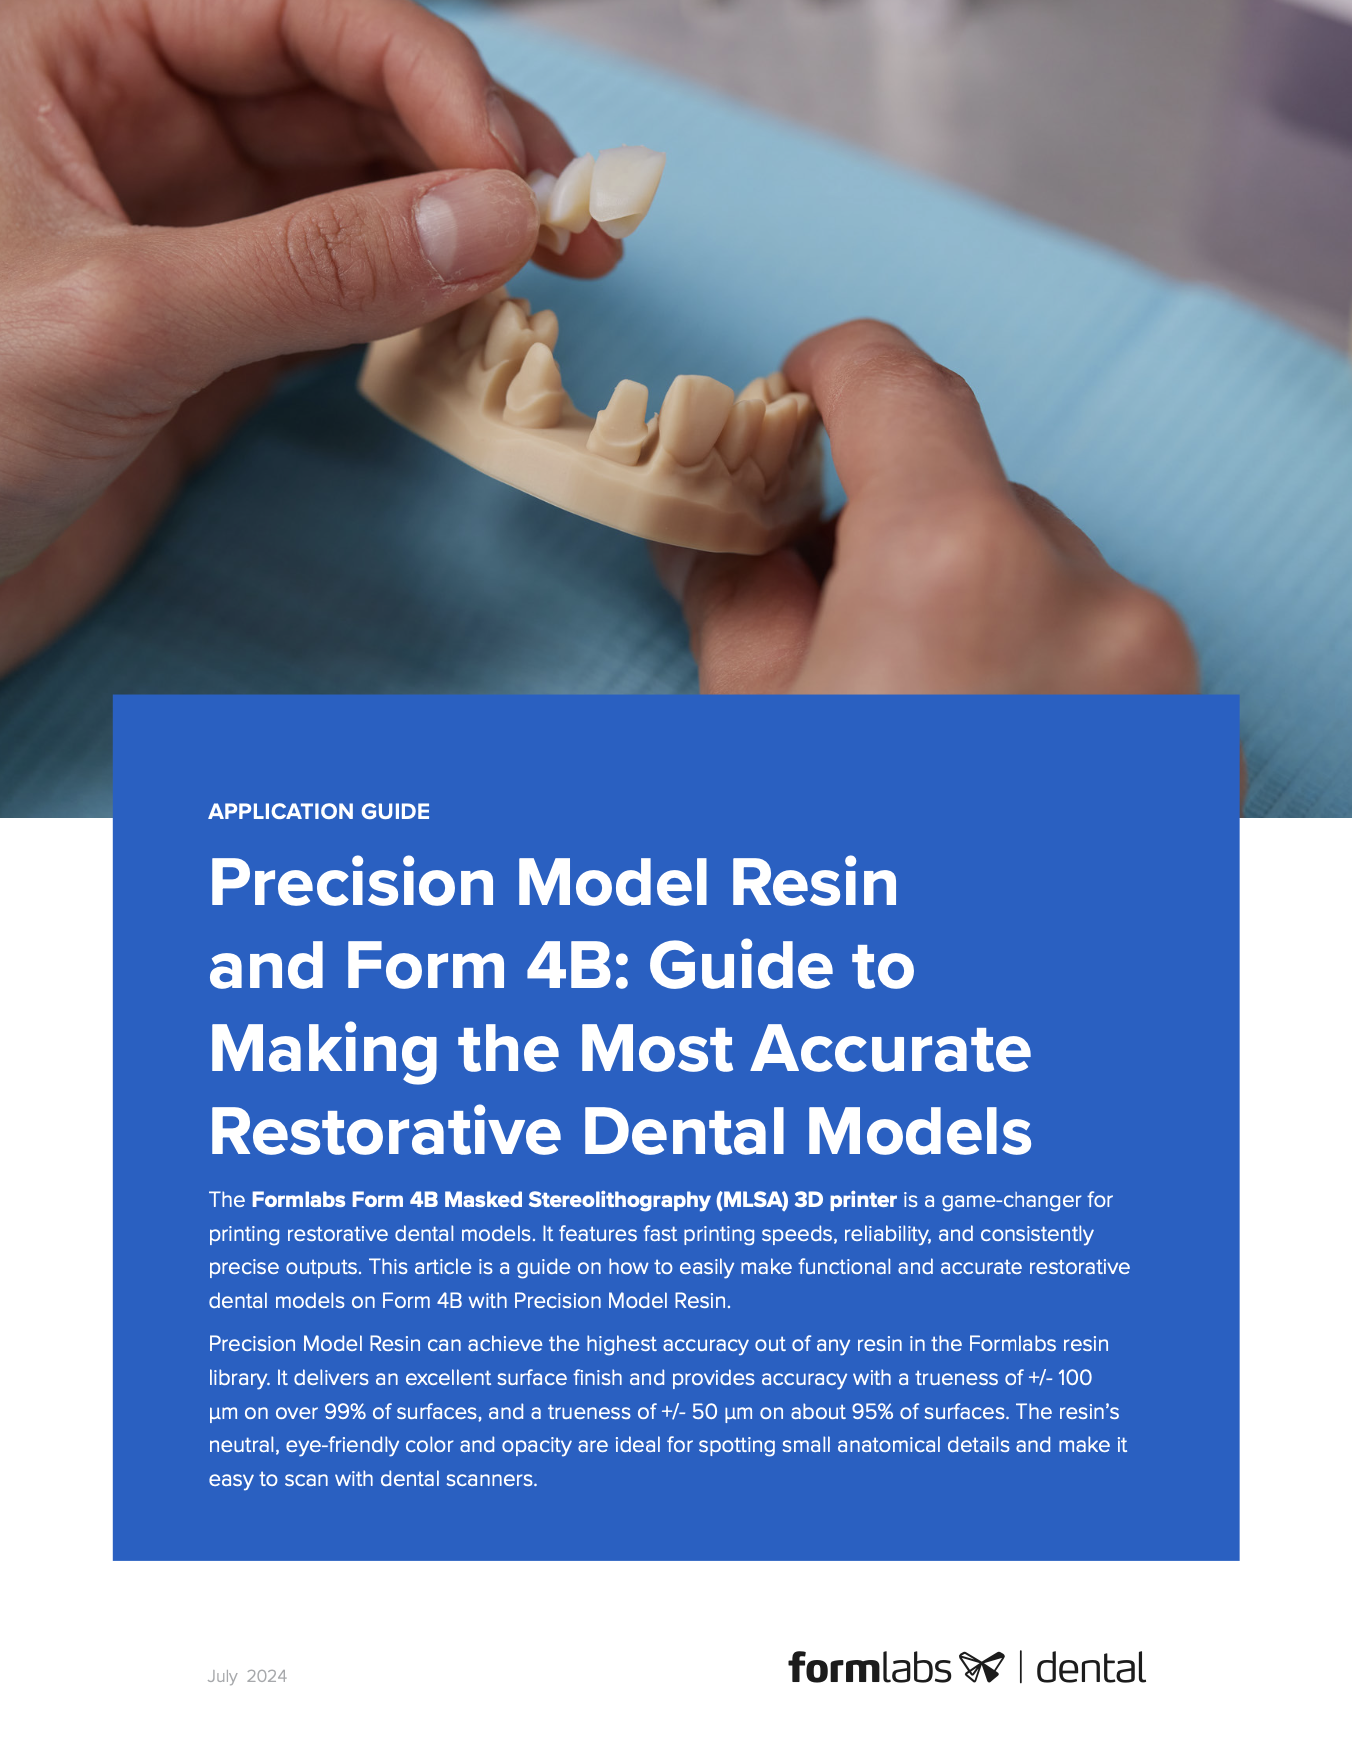
Precision Model Resin et la Form 4B : guide pour réaliser les modèles dentaires de restauration les plus précis
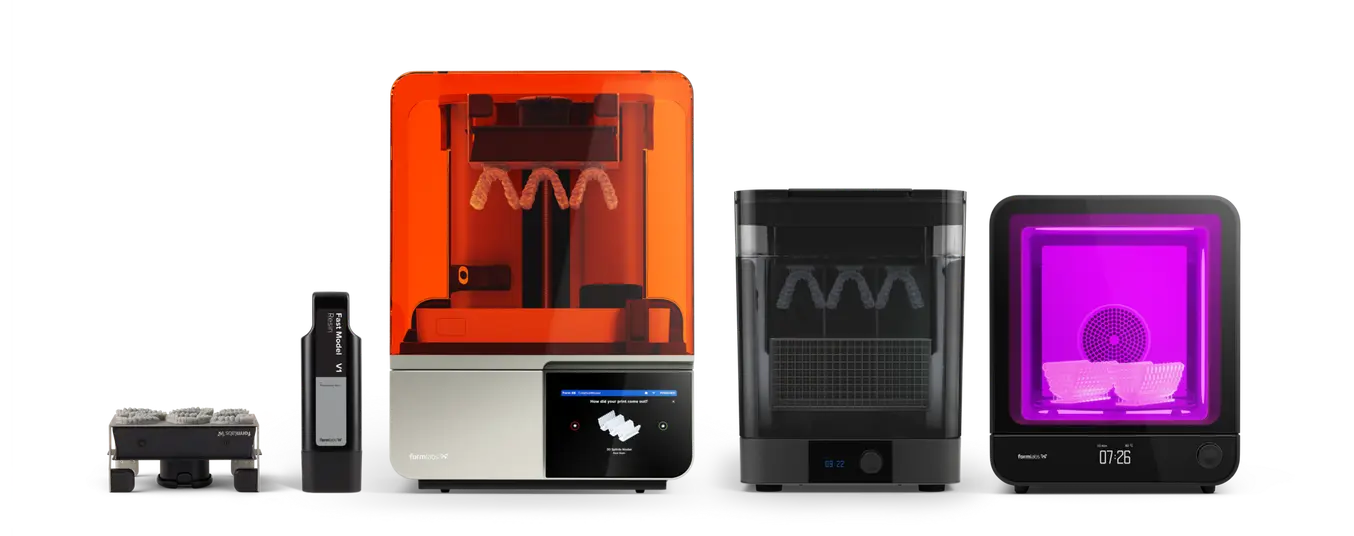
La Form 4B de Formlabs change la donne pour l'impression de modèles dentaires de restauration. Elle se distingue par des vitesses d'impression rapides, une grande fiabilité et des pièces extrêmement précises. Cet article est un guide sur la façon de réaliser facilement des modèles dentaires fonctionnels et précis sur la Form 4B avec Precision Model Resin.
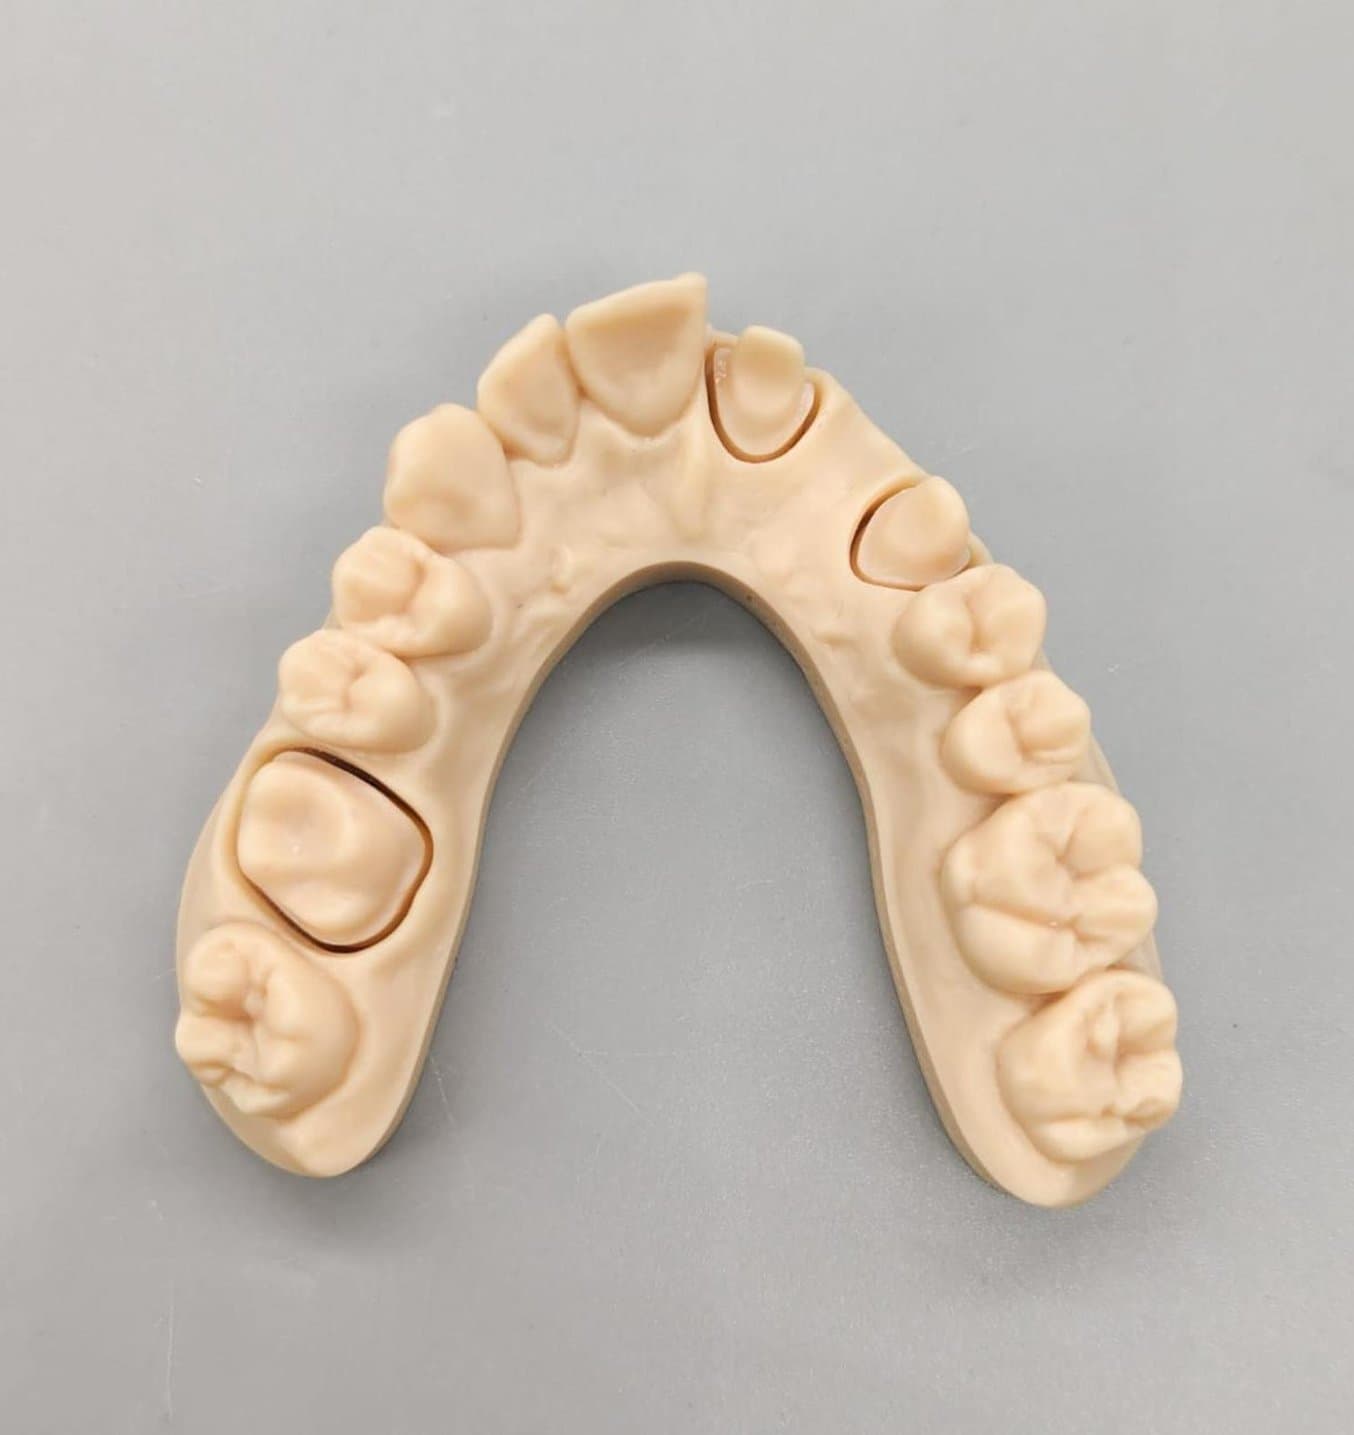
Precision Model Resin permet d'obtenir la plus grande précision de toutes les résines de la gamme Formlabs. Elle permet d'obtenir un excellent état de surface et une précision de +/- 100 µm sur plus de 99 % des surfaces et de +/- 50 µm sur environ 95 % des surfaces. Sa couleur neutre, agréable à l'œil, et son opacité sont idéales pour repérer les petits détails anatomiques et facilitent la numérisation avec les scanners dentaires.
Table des matières


Precision Model Resin et la Form 4B : guide pour réaliser les modèles dentaires de restauration les plus précis
Équipement et matériaux nécessaires
Fabriqué par Formlabs :
- Imprimante 3D Form 4B Bac à résine de la Form 4 et mélangeur de la Form 4
- Form 4 Build Platform ou Form 4 Build Platform Flex
- Precision Model Resin
- Form Wash Unité de polymérisation validée par Formlabs : Form Cure, Form Cure L ou Fast Cure
- Form 4 Finishing Kit ou station de lavage secondaire
Fabriqué par des tiers :
- Outils de coupe et de finition :
- Poudre lubrifiante sèche (talc / poudre pour bébé / poudre PTFE) (fortement recommandé)
- Papier de verre (recommandé)
- Brosse douce (recommandée)
- Outil pour faire sortir la die (recommandé)
- Diverses fraises pour enlever l'excès de résine et les points de contact des supports (à adapter selon vos préférences)
- Papier d'occlusion (facultatif)
- Scanner de bureau (en cas de modèle ou d’empreinte physique)
Logiciels nécessaires
Fabriqué par Formlabs :
-
Logiciel PreForm Dental (gratuit) 3.37 ou plus récent
-
Firmware de l'imprimante 3D Form 4B 1.4.0 ou supérieur - En savoir plus
Fabriqué par des tiers :
Logiciel de conception dentaire tel que 3Shape ou exocad
1. Les modèles dentaires imprimés en 3D avec Precision Model Resin répondent aux exigences des applications de restauration
La précision des modèles imprimés est cruciale pour les tâches de restauration ultérieures, car toute erreur peut avoir un impact direct sur la précision des restaurations.
Les modèles de restauration, en particulier, exigent le plus haut niveau de précision, contrairement aux modèles utilisés pour le thermoformage ou des applications similaires. La précision est largement reconnue comme étant plus importante que la vitesse et la fiabilité. L'imprimante 3D Form 4B de Formlabs excelle par sa précision, sa vitesse et sa fiabilité lorsqu'elle utilise Precision Model Resin, et répond efficacement à ces trois exigences.
Dans une évaluation détaillée comparant la précision des modèles en plâtre et des modèles imprimés en 3D avec Precision Model Resin, nous avons constaté que les modèles imprimés en 3D sont comparables à ceux réalisés avec des méthodes traditionnelles en raison de la précision de la Form 4B et de Precision Model Resin. Découvrez comment ce calcul de précision a été effectué pour Precision Model Resin ici.
Précision de Precision Model Resin
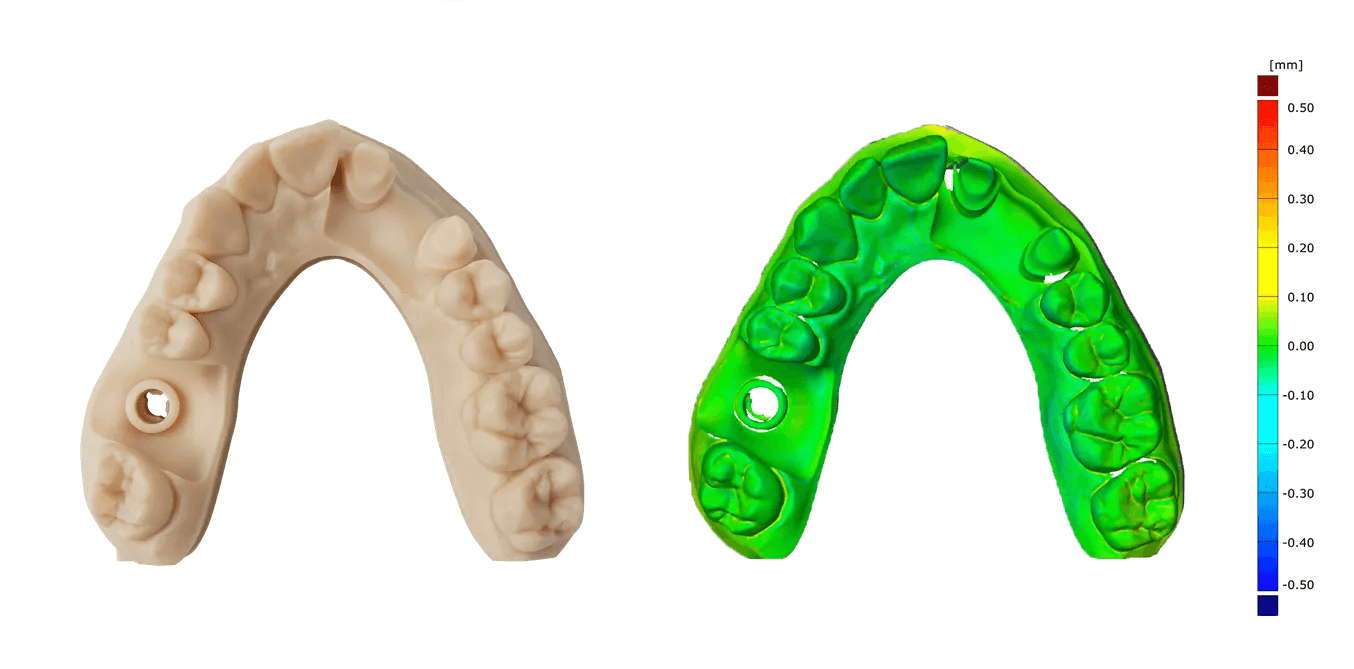
| Formlabs Precision Model Resin imprimée sur la Form 4B | Comparateur n° 1 DentaModel imprimé sur Asiga UV Max | Comparateur n° 2 Die et Modèle 2 imprimés sur SprintRay | |
|---|---|---|---|
| Tolérance de +/- 100 μm | 99,9 | 99,7 | 90,4 |
| Tolérance de +/- 50 μm | 97,4 | 91,3 | 62,0 |
| Tolérance +/- 25 μm | 75,7 | 62,8 | - |
Remarque : pièces imprimées à une hauteur de couche de 50 μm.
Considérations relatives à la conception CAO
Dans le flux de travail traditionnel, l'un des types de modèles les plus courants est le Splitcast, où un arc est couplé à une plaque de base et coupé en sections pour permettre au technicien de retirer la die pour des ajustements manuels. Plus rares sont les modèles sans coupe, où les dies sont insérées dans une fente du modèle en plâtre. Ces modèles sont souvent appelés « modèles alvéolaires » et exigent plus de travail et des compétences supplémentaires.
Ce deuxième type de modèle, le « modèle alvéolaire », étant beaucoup plus facile à concevoir dans un logiciel de CAO, c'est lui qui représente la majorité des modèles imprimés en 3D. Les lignes directrices suivantes s'appliquent à ce type de modèle. Formlabs propose des préréglages pour l'impression de ce type de modèle de restauration.
Après avoir obtenu un modèle numérique de la dentition d'un patient, sur la base d'un modèle en plâtre ou d'un scanner intraoral, ces fichiers (STL, PLY, OBJ) peuvent être importés dans un logiciel de CAO dentaire pour la conception.
Options de configuration disponibles pour les modèles sans plateau* dans le logiciel de modélisation CAO :
-
Structure : les modèles peuvent être pleins ou creux.
-
Dies : les options comprennent des modèles avec des dies amovibles ou des préparations fixes, avec la possibilité d'ajouter des dies supplémentaires si nécessaire. Voir ci-dessous les directives de Formlabs concernant les dies amovibles.
-
Géométrie :
-
3Shape : Les dies sont généralement de forme carrée avec une légère conicité et des barres de frottement, ce qui améliore l'ajustement et la mise en place par défaut.
-
exocad: Utilise par défaut des dies à parois parallèles qui suivent de près la ligne de marge pour un ajustement cohérent.
-
-
Options supplémentaires :
-
3Shape et exocad prennent tous deux en charge les broches d'éjection et les trous de contrôle, qui sont utilisés pour confirmer visuellement la bonne mise en place.
-
3Shape et exocad prennent tous deux en charge les formes coniques pour faciliter l'insertion.
-
*On distingue les modèles sans plaque (similaires au « modèle alvéolaire » mentionné ci-dessus) et les modèles avec plaques et sections coupées. Les modèles de plaques ne sont pas bien adaptés à l'impression 3D en raison de leur géométrie de positionnement sur le fond de la base du modèle.
Imprimer des arcades directement sur la plateforme de fabrication
Nous recommandons d'imprimer directement sur la plateforme de fabrication pour profiter de ses avantages :
-
Supportset précision: la plateforme de fabrication offre la meilleure structure de support disponible dans le domaine de l'impression 3D, ce qui permet d'obtenir la plus grande précision grâce à des conditions d'impression stables.
-
Efficacité : le modèle étant parallèle à la plateforme de fabrication, il n'est pas nécessaire d'utiliser une base ou des structures de soutien supplémentaires. Il y a donc moins de couches à imprimer, ce qui permet non seulement d'accélérer le processus d'impression, mais aussi de réduire la consommation de résine.
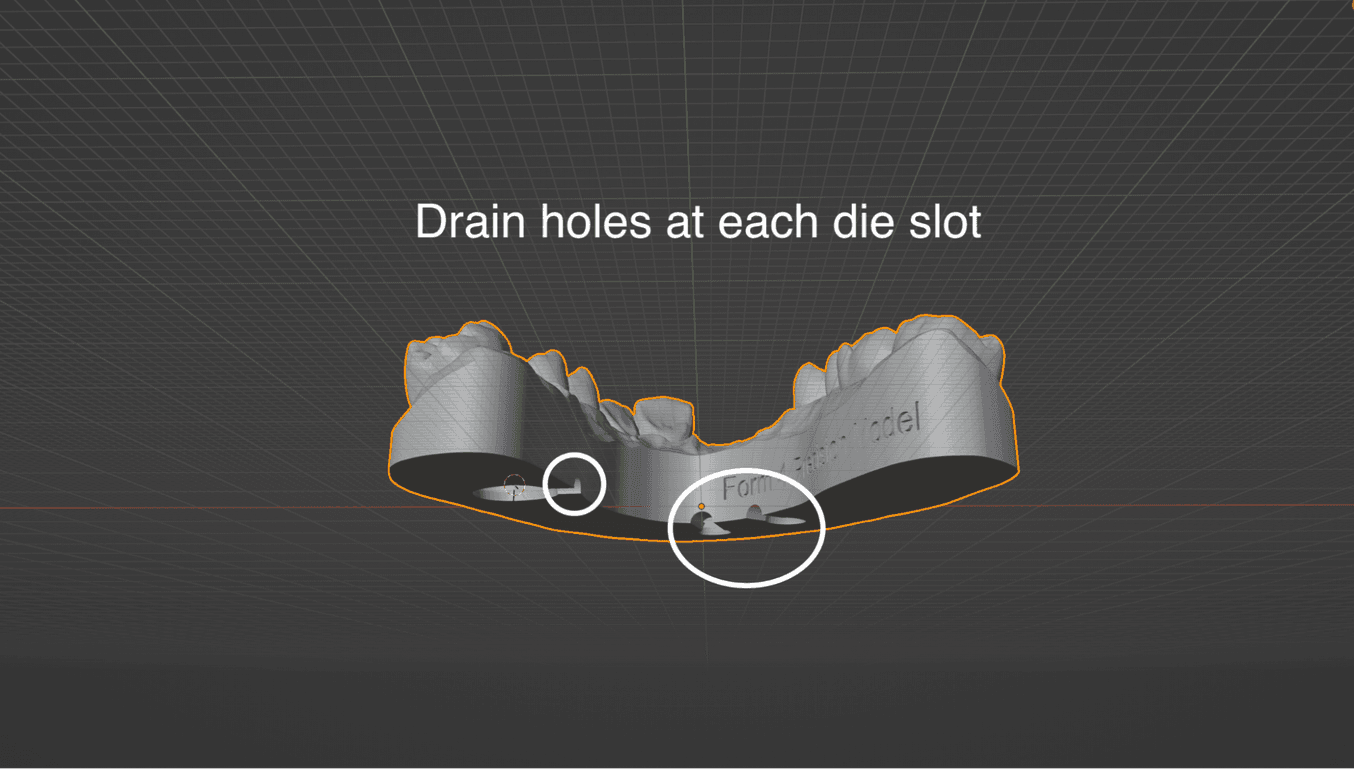
L'impression d'un modèle directement sur la plateforme de fabrication est recommandée, mais pour les modèles comprenant des dies amovibles ou des fentes d'analogues d'implants, elle peut générer des cavités d'aspiration.
Comment éviter les cavités d'aspiration grâce à des orifices d'évacuation
En impression 3D, une cavité d'aspiration est une zone où la résine ne peut pas s'écouler librement parce qu'elle est emprisonnée dans les parois du modèle. Ce phénomène se produit dans les modèles comprenant des dies amovibles, des fentes d'analogues d'implants ou présentant une forme particulière.* Le mouvement de la plateforme de fabrication pendant l'impression crée un effet de pompe, pressurisant et dépressurisant la résine piégée, ce qui peut avoir un impact négatif sur la précision.
L'ajout d'orifices d'évacuation permet d'éliminer cet effet de pressurisation et d'améliorer la précision de l'impression. Bien que la Form 4B soit moins sujette à des pertes de précision ou à de graves problèmes d'impression, l'ajout d'orifices à chaque fente au niveau de la base du modèle reste la meilleure pratique. Les logiciels de modélisation 3Shape et exocad proposent tous deux des options pour les orifices d'évacuation. Des instructions détaillées sont disponibles ici.
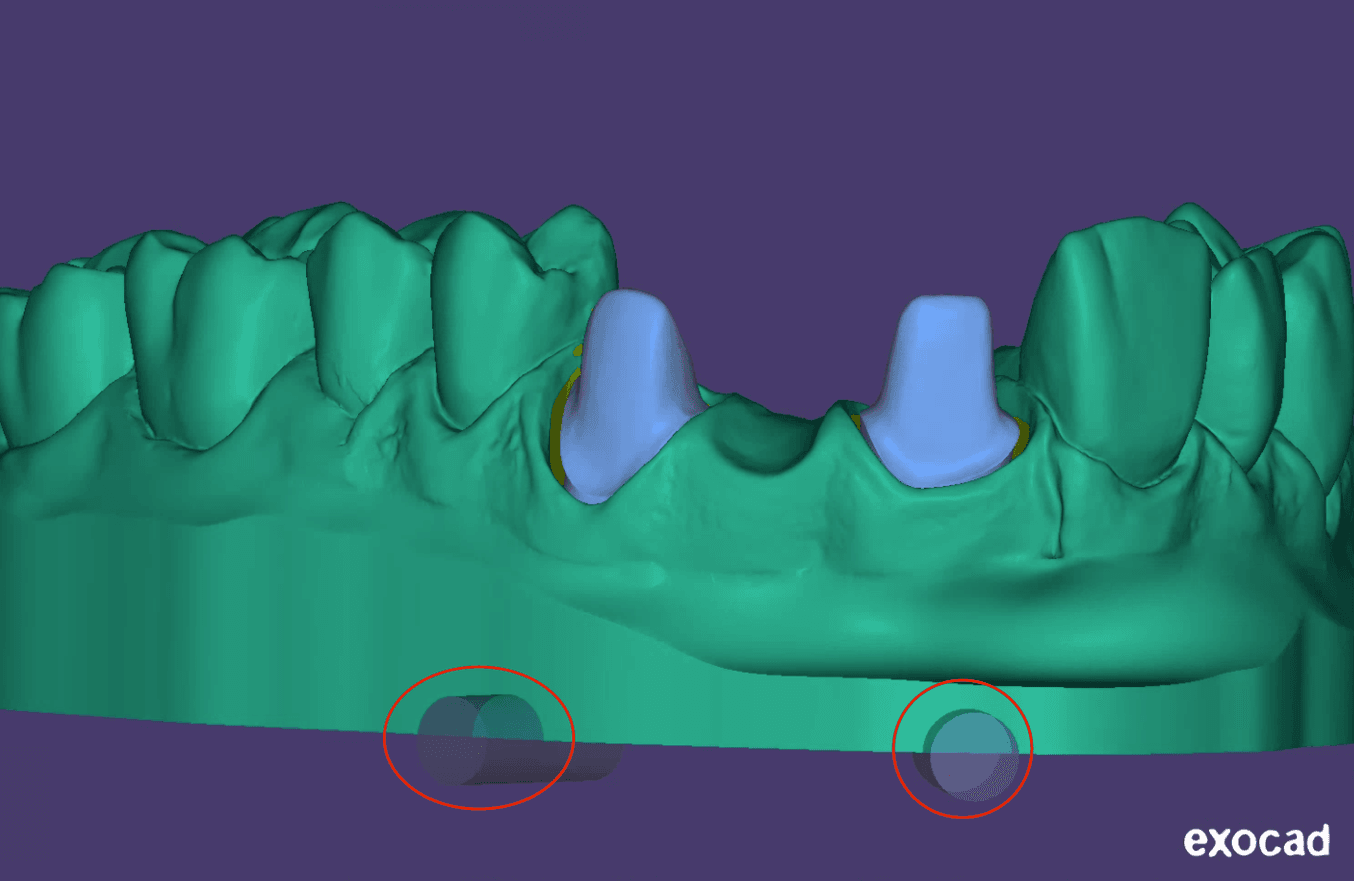
Pour les fentes d'analoguesd'implants, nous recommandons vivement d'ajouter des trous de drainage. En plus d'éliminer les cavités d'aspiration, un orifice au niveau de la fente d'analogue d'implant vous permettra de contrôler visuellement la bonne mise en place de l'analogue. Dans ce cas, ces orifices doivent être dessinés manuellement tant pour exocad que pour 3Shape.
*Les modèles creux ne sont pas recommandés si l'on veut conserver une précision maximale. Toutefois, lors du moulage de formes creuses, des orifices de drainage sont essentiels pour éviter l'effet de succion et minimiser les déformations.
Lignes directrices sur les dies amovibles
Dans cette section, nous donnons des indications sur les conceptions de dies amovibles disponibles dans les logiciels de conception CAO et sur la compatibilité avec Precision Model Resin de Formlabs.
-
Nous recommandons que les dies amovibles soient imprimées sur des supports.
-
Une procédure détaillée est disponible dans ce guide.
-
Formlabs propose des préréglages testés et fonctionnels pour les logiciels de conception exocad et 3Shape.
L'image à droite représente les préréglages fournis par Formlabs, chacun dépourvu d'une broche et présentant une forme organique et légèrement conique pour faciliter l'insertion.
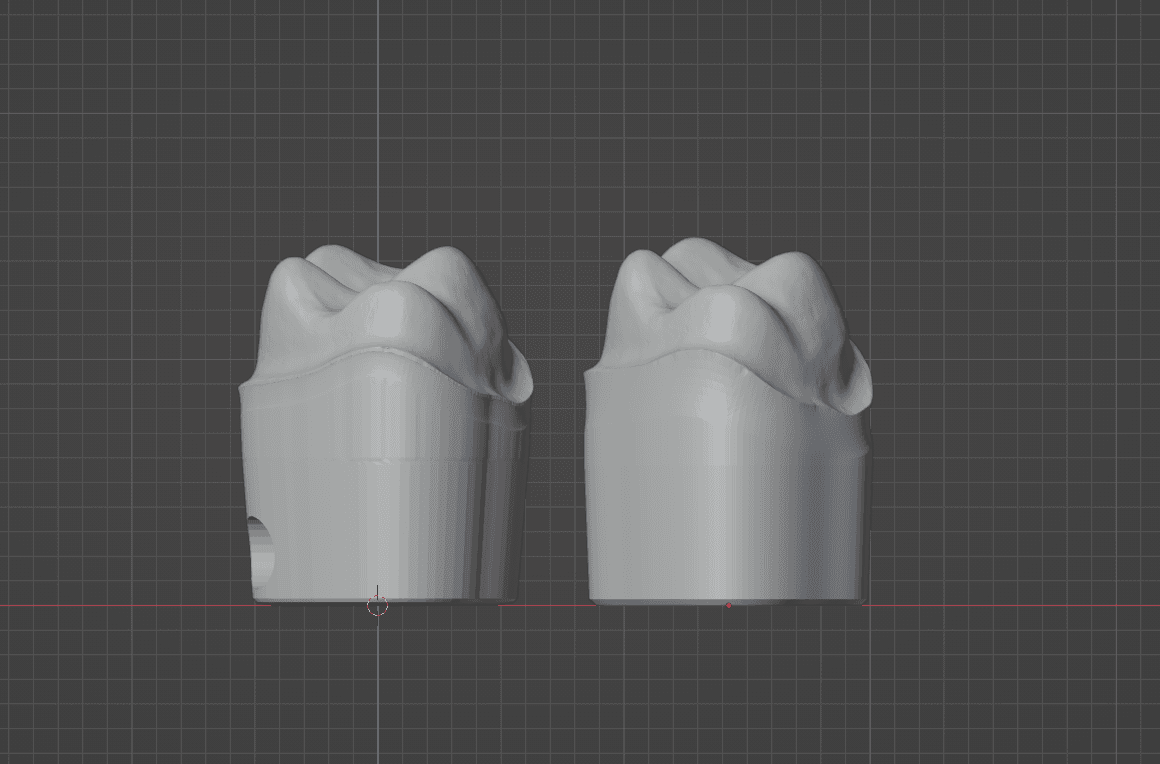
Dies produites avec les préréglages de Formlabs côte à côte. Die 3Shape à gauche, die exocad à droite.
Comparaison des dies à parois coniques et parallèles
-
Les dies coniques sont plus faciles à insérer et à utiliser, bien qu'elles puissent présenter des difficultés pour obtenir un ajustement serré.
- Les parois parallèles assurent un frottement uniforme le long de la die, ce qui améliore la stabilité, mais elles peuvent être plus difficiles à insérer et présentent un risque de désalignement.
Avec ou sans broche
De nombreux logiciels de modélisation dentaire incluent généralement une option permettant d'ajouter une broche d'éjection au bas de la die. Si nécessaire, cette broche aide à pousser la die hors du modèle. Bien qu'elles puissent être très utiles, les broches peuvent avoir un impact sur les paramètres d'impression :
-
L'orientation sur la plateforme de fabrication
-
Nécessite des structures de support appropriées (instructions détaillées dans le guide étape par étape)
En outre, dans le cas de petites dies, telles que les dies centrales inférieures, la broche peut devenir aussi fine qu'une aiguille.
Lespréréglages Formlabs n'incluent pas la broche par défaut. Vous aurez la possibilité d'ajouter des broches d'éjection dans vos paramètres si vous le souhaitez. Si vous utilisez des broches d'éjection, nous recommandons une hauteur de 1 mm. Des broches plus hautes peuvent réduire la longueur de la zone de frottement.
Fixer la taille idéale du modèle
Si la réduction de la hauteur du modèle permet d'économiser de la résine et de raccourcir le temps d'impression, elle peut compromettre l'ajustement optimal des dies amovibles. Nous recommandons une hauteur de base de 15 à 18 mm au niveau de la partie la plus basse des tissus mous, à l'exclusion des dents, pour une meilleure adaptation.
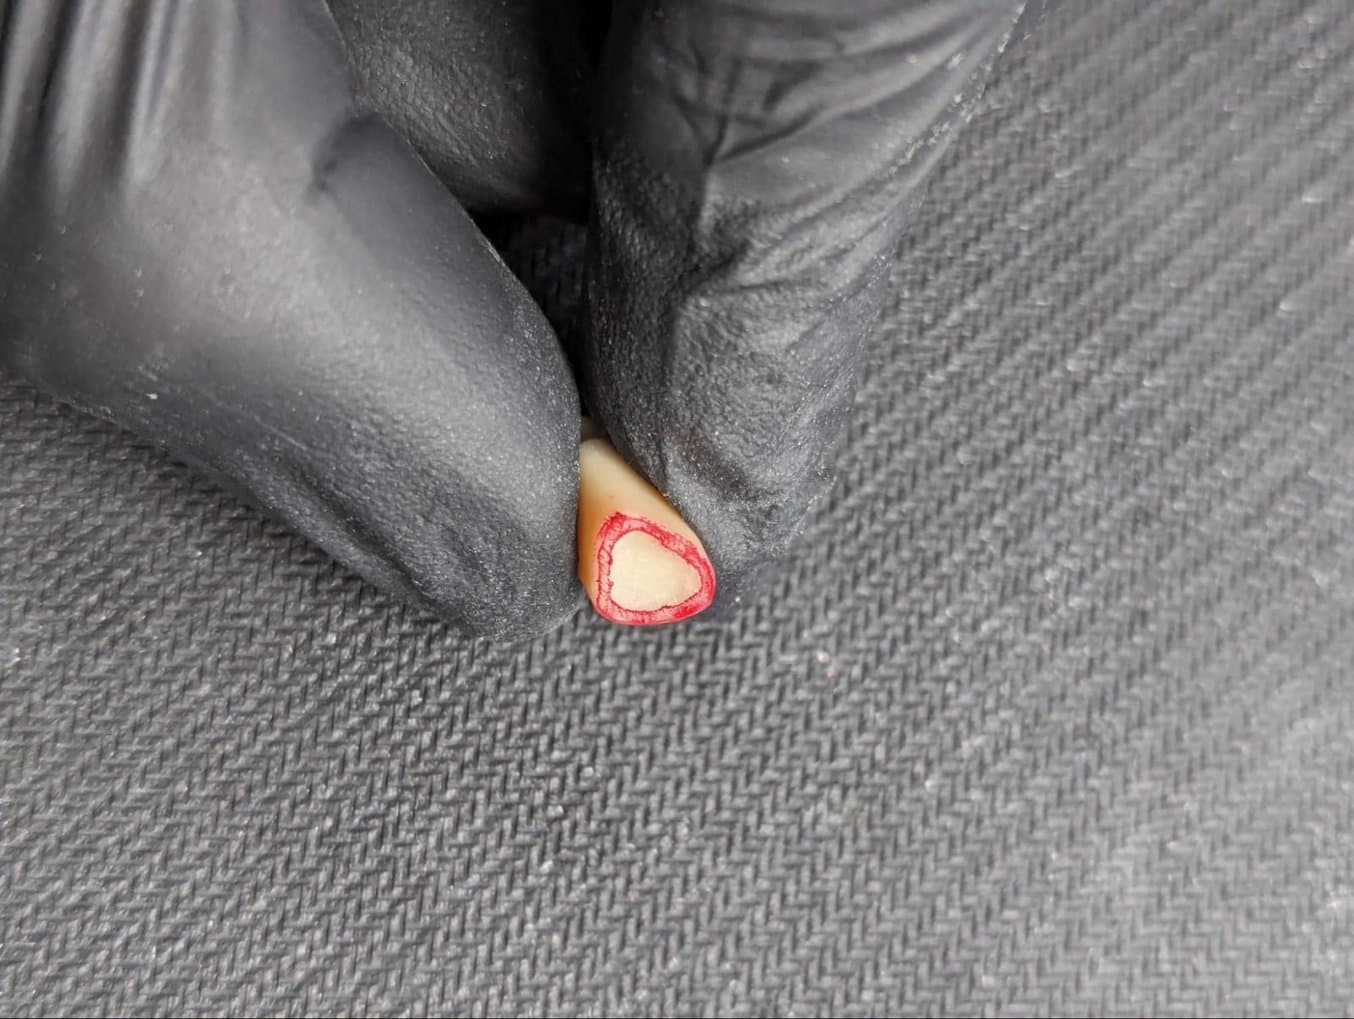
Le frottement entre la die et le modèle est un facteur primordial dans l'obtention d'un ajustement serré et sûr des dies amovibles. Étant donné que la surface de contact, ou surface de frottement, entre les dies et le modèle commence sous le point le plus bas de la ligne de marge, la hauteur du modèle devient importante pour déterminer la surface de frottement disponible. Ceci est particulièrement important pour les dents antérieures, où la ligne de marge est souvent plus basse du côté vestibulaire que du côté lingual, par rapport à la base du modèle. Il en résulte une surface de frottement plus petite.
Si les dies sont trop lâches ou ne sont pas fermement verrouillées, il peut être utile d'augmenter la hauteur du modèle et donc la longueur de la trajectoire d'insertion des dies.
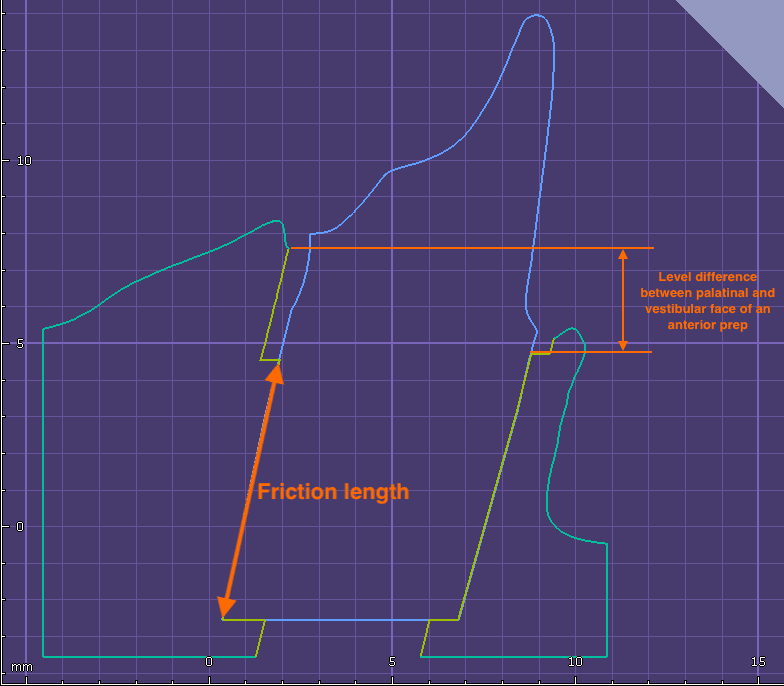
Coupe transversale d'une die antérieure.
Dies inclinées
L'axe d'insertion d'une die amovible peut être limité par l'anatomie du patient. Idéalement, la die doit être perpendiculaire à la base du modèle, ce qui permet d'obtenir une surface lisse et une friction optimale. Cependant, l'anatomie du patient peut nécessiter un ajustement de l'axe d'insertion par rapport à l'axe Z du modèle.
Nous recommandons de limiter l'angle à 15° si possible. Des angles plus importants créeront des irrégularités plus prononcées dans l'espace entre les couches, ce qui augmentera les frottements.
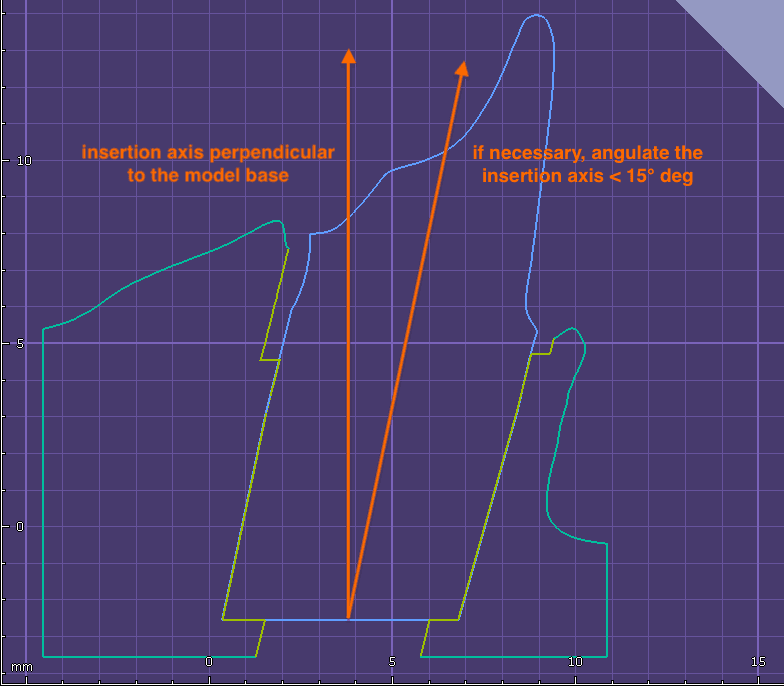
Die inclinée
Lignes directrices pour la conception de modèles d'implants
Les modèles d'implants sont un cas particulier de conception de modèles nécessitant une grande précision et un haut degré d'adaptation.
Vous trouverez ci-dessous des conseils pour optimiser l'ajustement lors de la conception de modèles d'implants pour l'impression 3D avec Precision Model Resin.
Types d'analogues d'implants
Les analogues d'implants pour les modèles imprimés en 3D sont différents des analogues pour les modèles en plâtre. Dans le cas des modèles en plâtre, le plâtre est coulé autour de l'analogue, tandis que dans le cas des modèles imprimés en 3D, l'analogue est inséré dans le modèle après son impression. À cette fin, les fabricants d'implants et les fabricants tiers fournissent des analogues de deux types. L'exigence la plus importante pour le modèle d'implant est que l'analogue puisse être inséré et verrouillé dans la bonne position.
Analogues à vis
Ce type d'analogue est doté d'un filetage en bas, ce qui permet de fixer l'analogue dans le modèle à l'aide d'une contre-vis/écrou accessible par le dessous du modèle, par exemple, les analogues NT-Trading, les analogues DESS.
Analogues encliquetables
Ce type d'analogue doit être poussé dans son emplacement et encliqueté sur un élément de rétention positif ou négatif pour le fixer en position, par exemple les analogues Camlog OEM, ou les analogues Medentika.
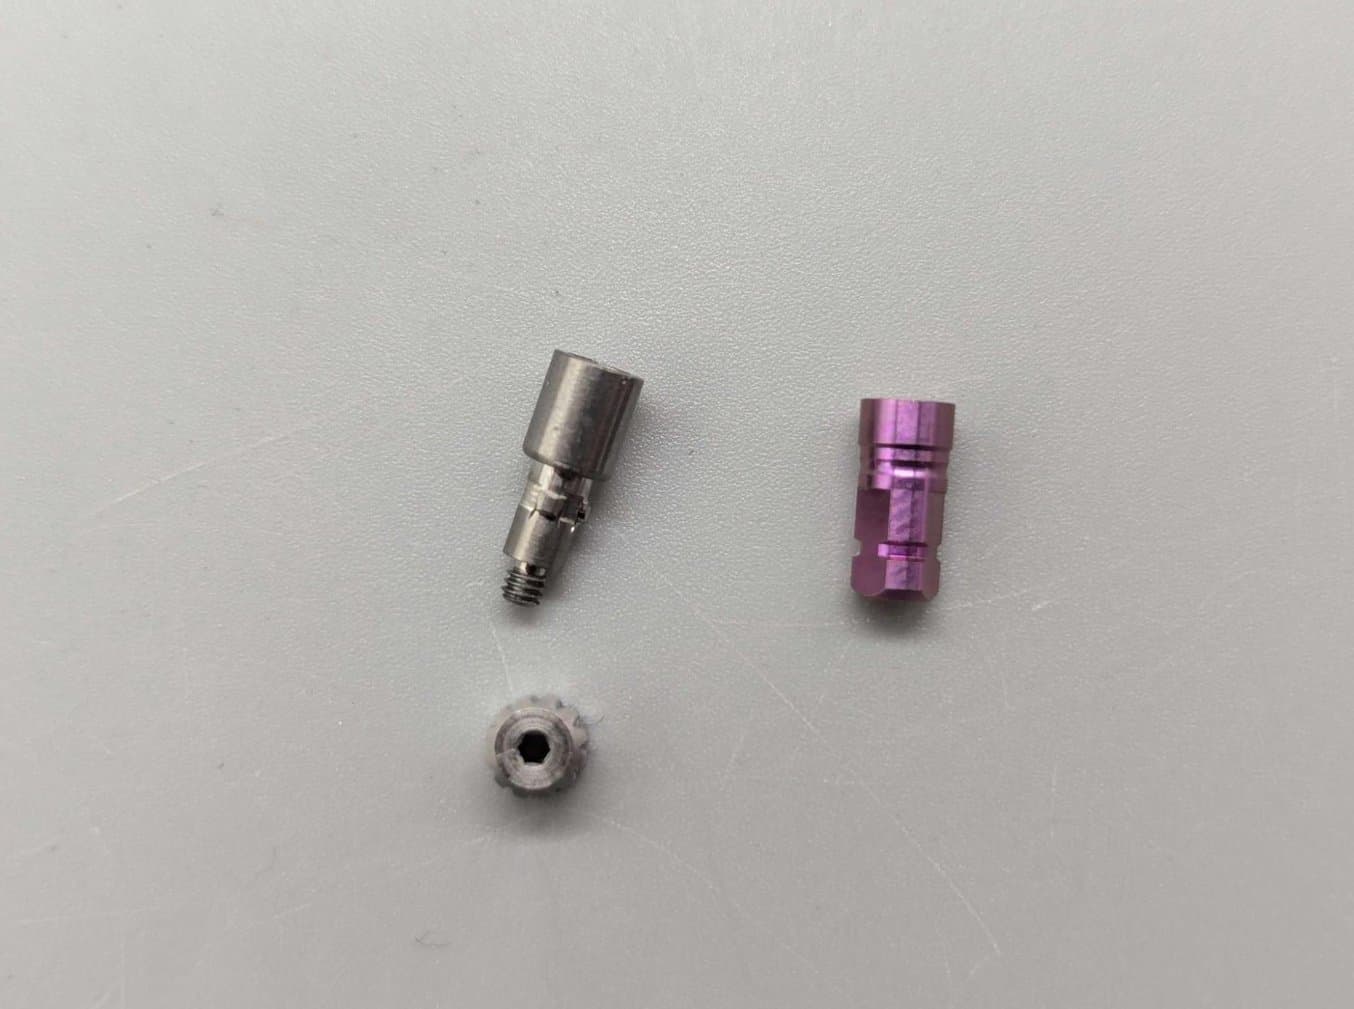
Analogue à vis de NT Trading (à gauche) et analogue encliquetable de Camlog (à droite).
Décalages entre l'analogue et le modèle
Formlabs fournit des décalages pour les analogues encliquetables dans le cadre des bibliothèques Precision Model Resin pour exocad et 3Shape.
| Décalage | Chevauchement de la barre de friction | ||
|---|---|---|---|
| exocad | Type d'encliquetage | 0,060 mm | N/A |
| Type de vis | 0,010 mm | N/A | |
| 3Shape | Type d'encliquetage | 0,060 mm | 0,010 mm |
| Type de vis | 0,010 mm | 0,010 mm |
Notez que le décalage des analogues à vis est différent de celui des analogues encliquetables. Cela peut nécessiter un ajustement dans votre logiciel de CAO.
Les ajustements des décalages entre l'analogue et le modèle sont disponibles dans 3Shape Model Builder et dans exocad Model Creator.
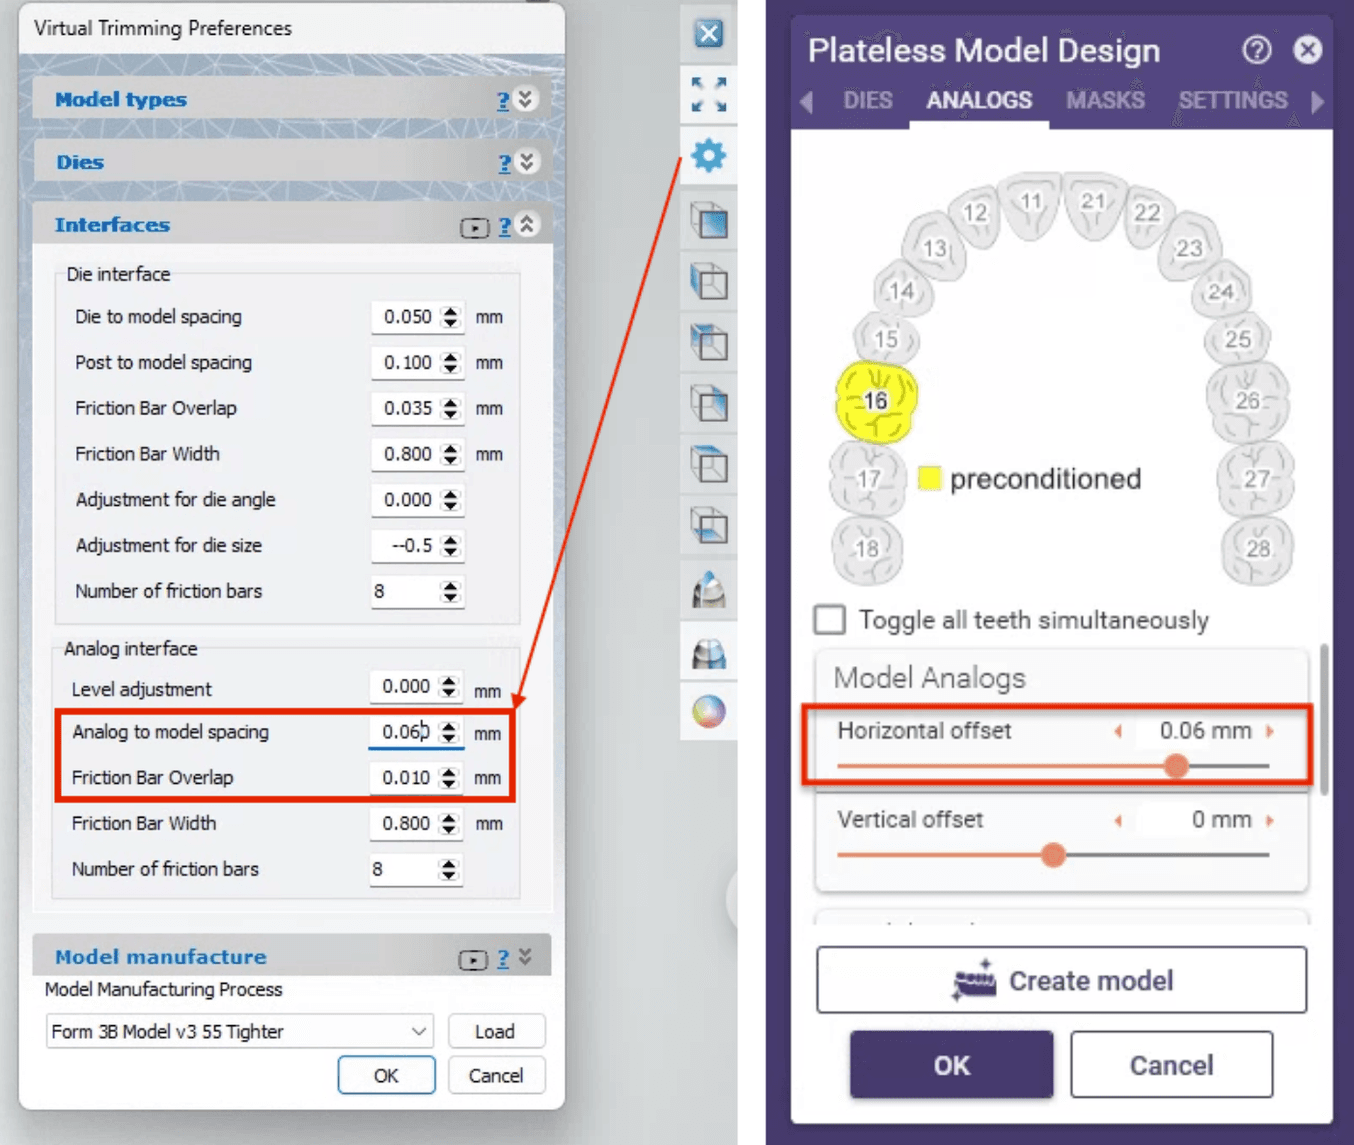
À gauche : Ajustement du décalage analogue-modèle dans 3Shape Model Builder À droite : Décalage horizontal des analogues de modèles dans exocad Model Creator
2. Bibliothèques CAO et comment les installer
Télécharger la bibliothèque pour exocad et 3Shape
Comment installer
exocad
1. Le fichier exocad est livré dans un dossier zippé. Extrayez les fichiers du dossier zippé.
2. Placez le fichier de configuration « FORMLABS Form 4B Precision Model.XML » dans [votre chemin d'installation exocad]/DentalCADApp/library/production
3. Placez le dossier de paramètres « FORMLABS Form 4 Plateless Model » dans [votre chemin d'installation exocad]/DentalCADApp/library/modelcreator/plates
3Shape
Le fichier 3Shape DME doit être importé dans votre système à l'aide de l'application du panneau de configuration.
Autres logiciels
Les recommandations générales de conception peuvent être facilement adaptées à d'autres logiciels de conception de modèles pour lesquels nous ne fournissons pas de bibliothèques spécifiques. Voici un résumé des principaux paramètres des dies amovibles qui devraient fonctionner avec Precision Model Resin :
| Résumé des réglages des dies amovibles | |
|---|---|
| Modèle / décalage de la die | 0,000 à - 0,015 mm |
| Profondeur recommandée de la fente de la die | ≥ 15 mm |
| Angle maximal recommandé | +/- 15° par rapport à l'axe Z |
| Réduction, le cas échéant | 2° |
| Décalage entre l'analogue d'implant et le modèle | Voir la section « Décalages entre l'analogue et le modèle » |

3. Pas à pas : Impressions de modèles de restauration dans PreForm
3.1 Configuration de l'impression
Pour savoir comment commencer à utiliser PreForm Dental, cliquez ici.
-
Nous recommandons d'imprimer les modèles directement sur la plateforme de fabrication et de veiller à ce que chaque fente de die amovible ou d'analogue d'implant soit dotée d'un orifice d'évacuation.
-
Pour obtenir les meilleurs résultats, les dies doivent être orientées et supportées manuellement. Pour savoir comment configurer manuellement les impressions dans PreForm Dental, cliquez ici.

Configuration idéale pour une die (avec ou sans broche) :
-
Alignez le moule sur l'axe Z, en veillant à ce qu'il soit perpendiculaire à la plateforme de fabrication pour obtenir des parois de moule lisses et cohérentes.
-
Modifier les supports manuellement :
-
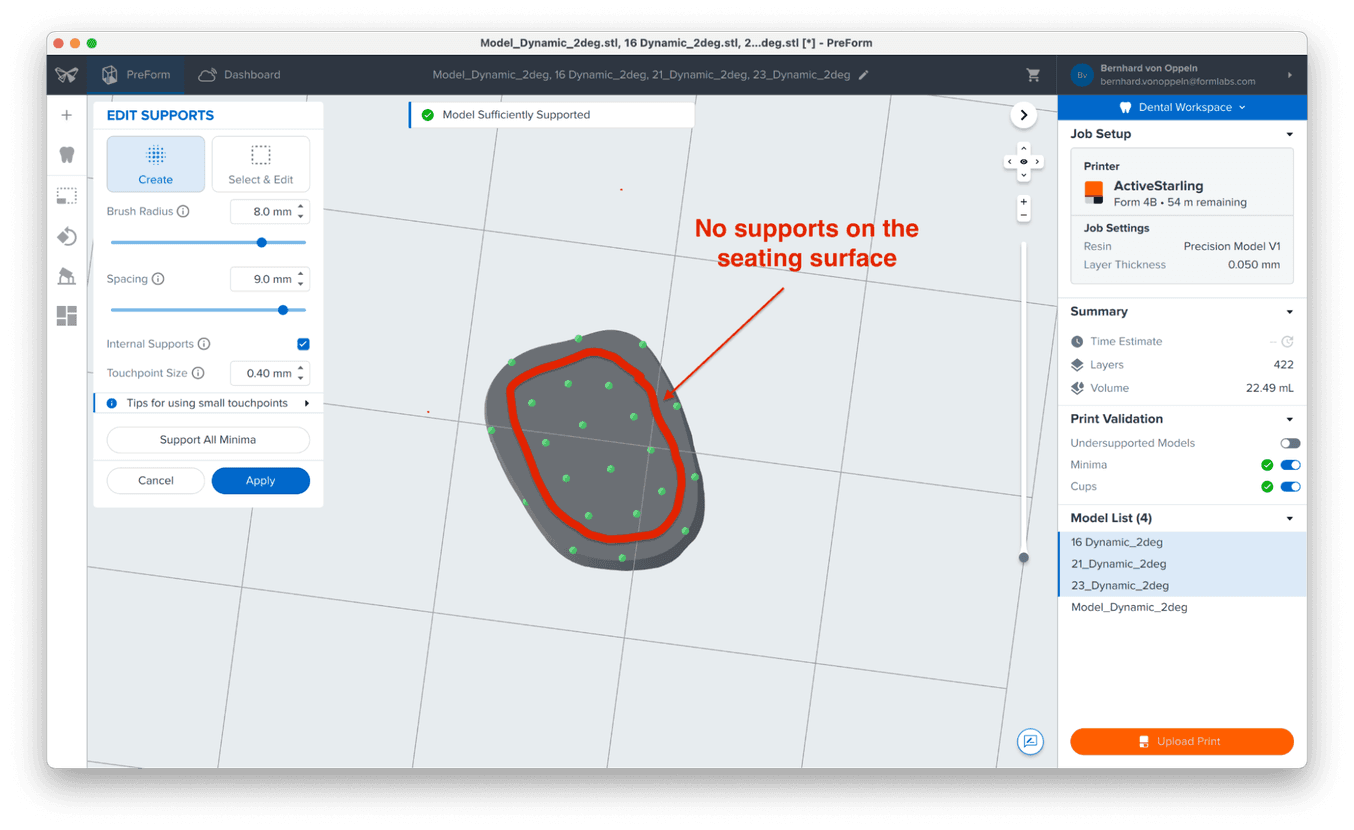
Réduire la taille du point de contact à 0,4 mm pour une finition plus facile.
-
Diminuer la hauteur au-dessus de la base à 3 mm pour une meilleure stabilité.
-
Évitez de placer des supports sur la surface d'assise. Maintenez les supports à environ 1 mm de la limite extérieure du fond de la die. Voir l'image ci-dessous.
-

3.2 Après l'impression : comment post-traiter vos modèles
Les recommandations de post-traitement pour Precision Model Resin sont les suivantes :
| Lavage | 5 min dans la Form Wash |
|---|---|
| Séchage | 30 min dry time on the bench or blow dry with compressed air after taking parts out of the wash and then let dry for an additional 15 min |
| Polymérisation | 5 min à 35 °C dans la Form Cure ou 30 secondes avec une intensité 2 dans la Fast Cure |
Ce qu'il faut faire et ne pas faire lors du post-traitement
-
Ne jamais utiliser de brosses ou d'autres outils pour le nettoyage. Immédiatement après le lavage dans la Form Wash, les pièces sont encore souples, de sorte que vous pourriez nuire à la précision du modèle et surtout à l'ajustement des dies.
-
Si vous avez accès à de l'air comprimé pour sécher les pièces après le lavage, séchez-les immédiatement après les avoir sorties de la Form Wash, quand elles sont encore humides. Cela évite que des résidus de résine dissoute dans l'IPA ne se déposent sur les objets et n'affectent la précision.
Pour de meilleurs résultats : recourez à une procédure de lavage en deux étapes
-
Chaque cycle de lavage dissout davantage de résidus de résine dans l'IPA. Ces résidus peuvent affecter la précision des pièces critiques telles que les dies, les fentes de dies et les fentes d'analogues.
-
Pour éviter cela, vous pouvez utiliser un cycle de lavage en deux étapes :
-
Lavage n° 1 avec de l'IPA usagé pendant 3 minutes
-
Laver n° 2 avec de l'IPA frais pendant 2 min, ou 2 min dans un bain ultrasonique avec de l'IPA propre
-
Air sec ou air comprimé ?
L'utilisation d'air comprimé immédiatement après avoir sorti les pièces du Form Wash permet d'éviter que des résidus de résine ne se déposent sur les pièces critiques et de raccourcir le temps de séchage nécessaire avant la polymérisation.
3.3 Finition des pièces imprimées
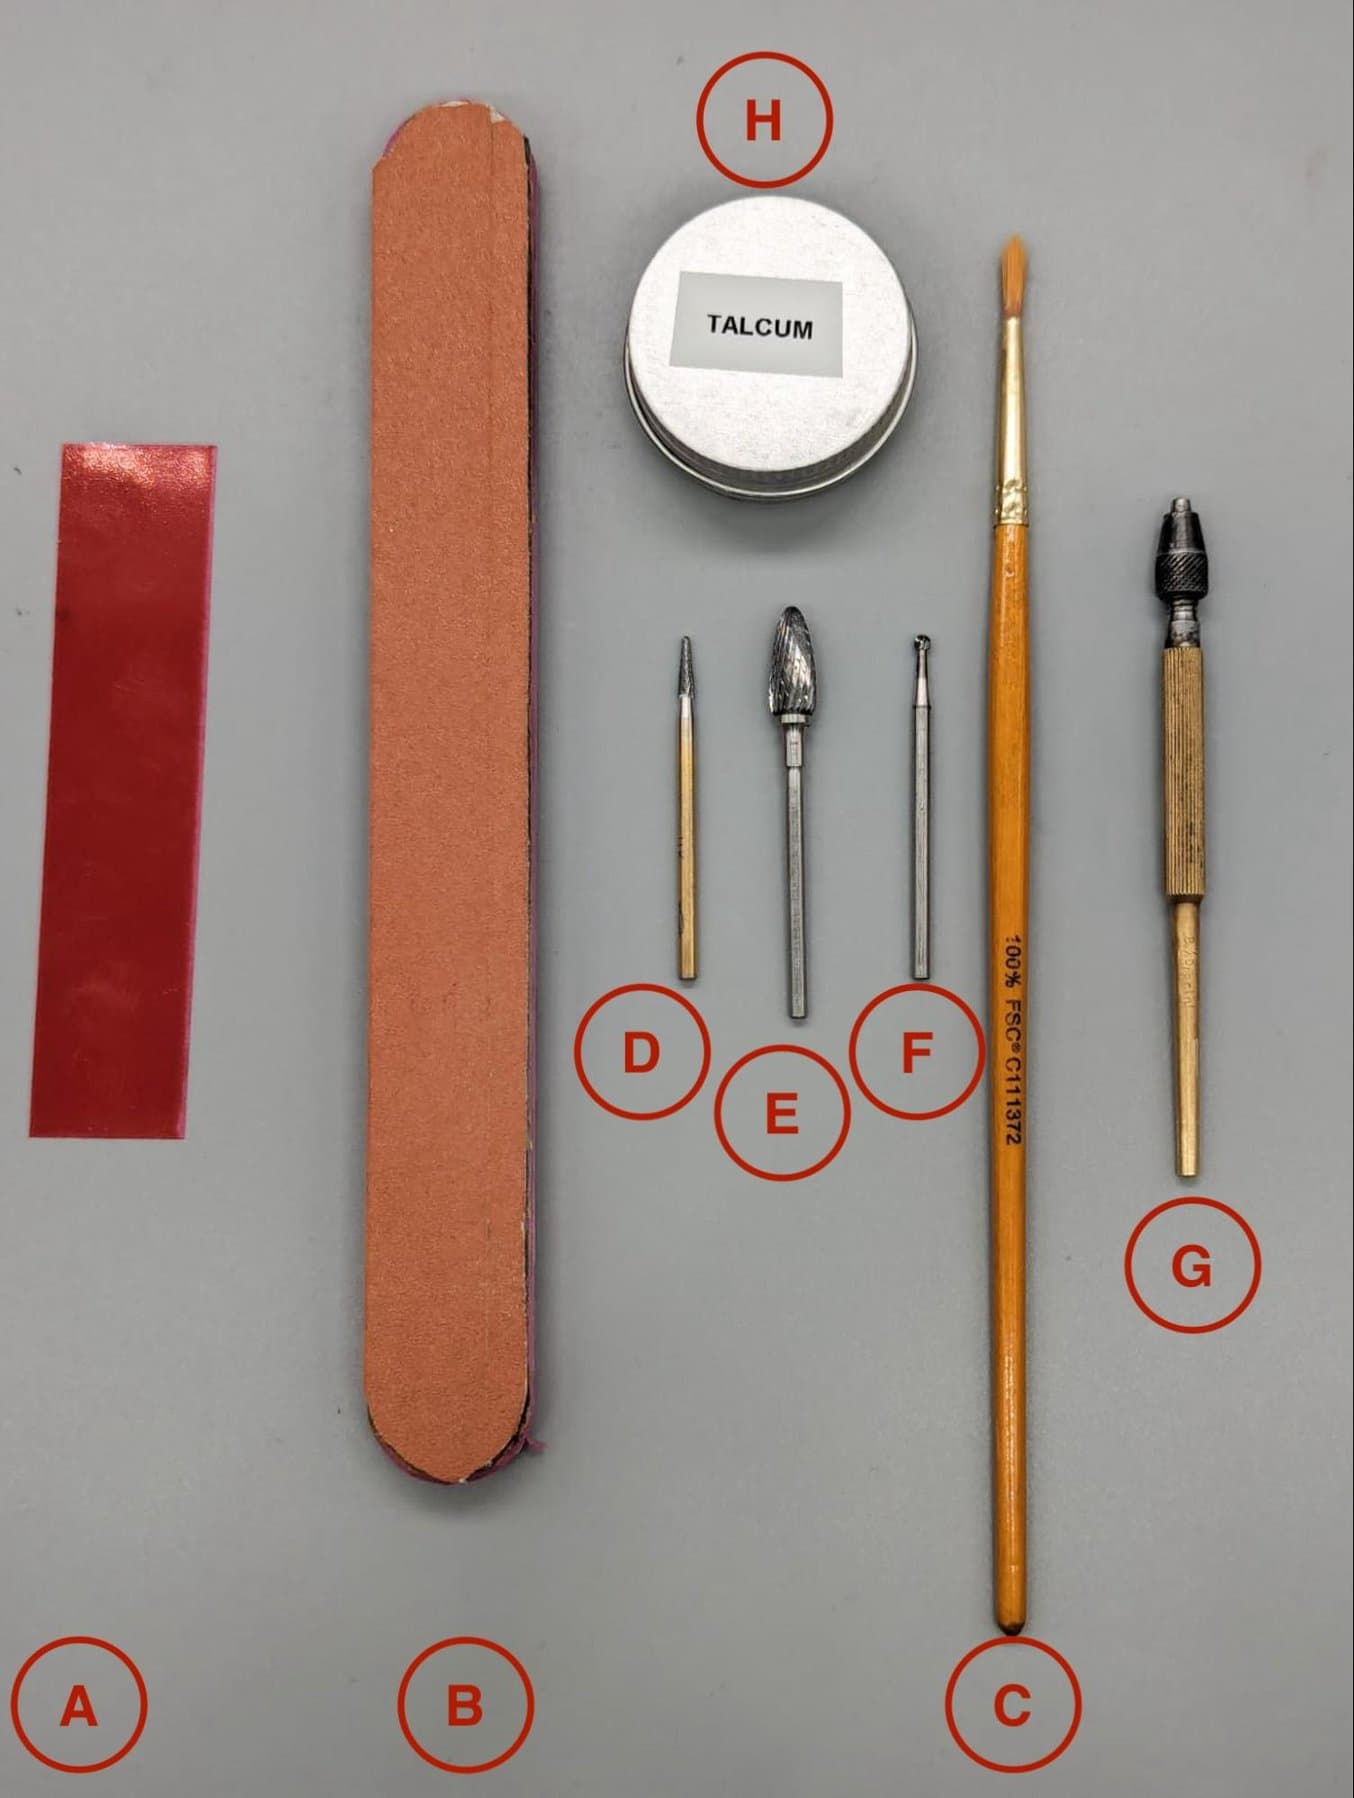
Outils recommandés
| A | Papier d'occlusion (facultatif) |
|---|---|
| B | Papier de verre (recommandé) |
| C | Brosse douce (recommandée) |
| D, E, F | Diverses fraises pour enlever l'excès de résine et les points de contact des supports (à adapter selon vos préférences) |
| G | Outil pour faire sortir la die (recommandé) |
| H | Poudre lubrifiante sèche (talc / poudre pour bébé / poudre PTFE) (fortement recommandé) |
Meilleures pratiques
Supprimer les points de contact. Ne pas toucher le zone d'assise. Dans 3Shape ou exocad, la zone d'assise a une largeur moyenne de 1 mm. Vous pouvez être plus agressif en enlevant de la matière de la zone intérieure non assise pour un meilleur ajustement de la die, mais essayez d'être très délicat sur le bord extérieur car il est directement relié à la zone d'assise.
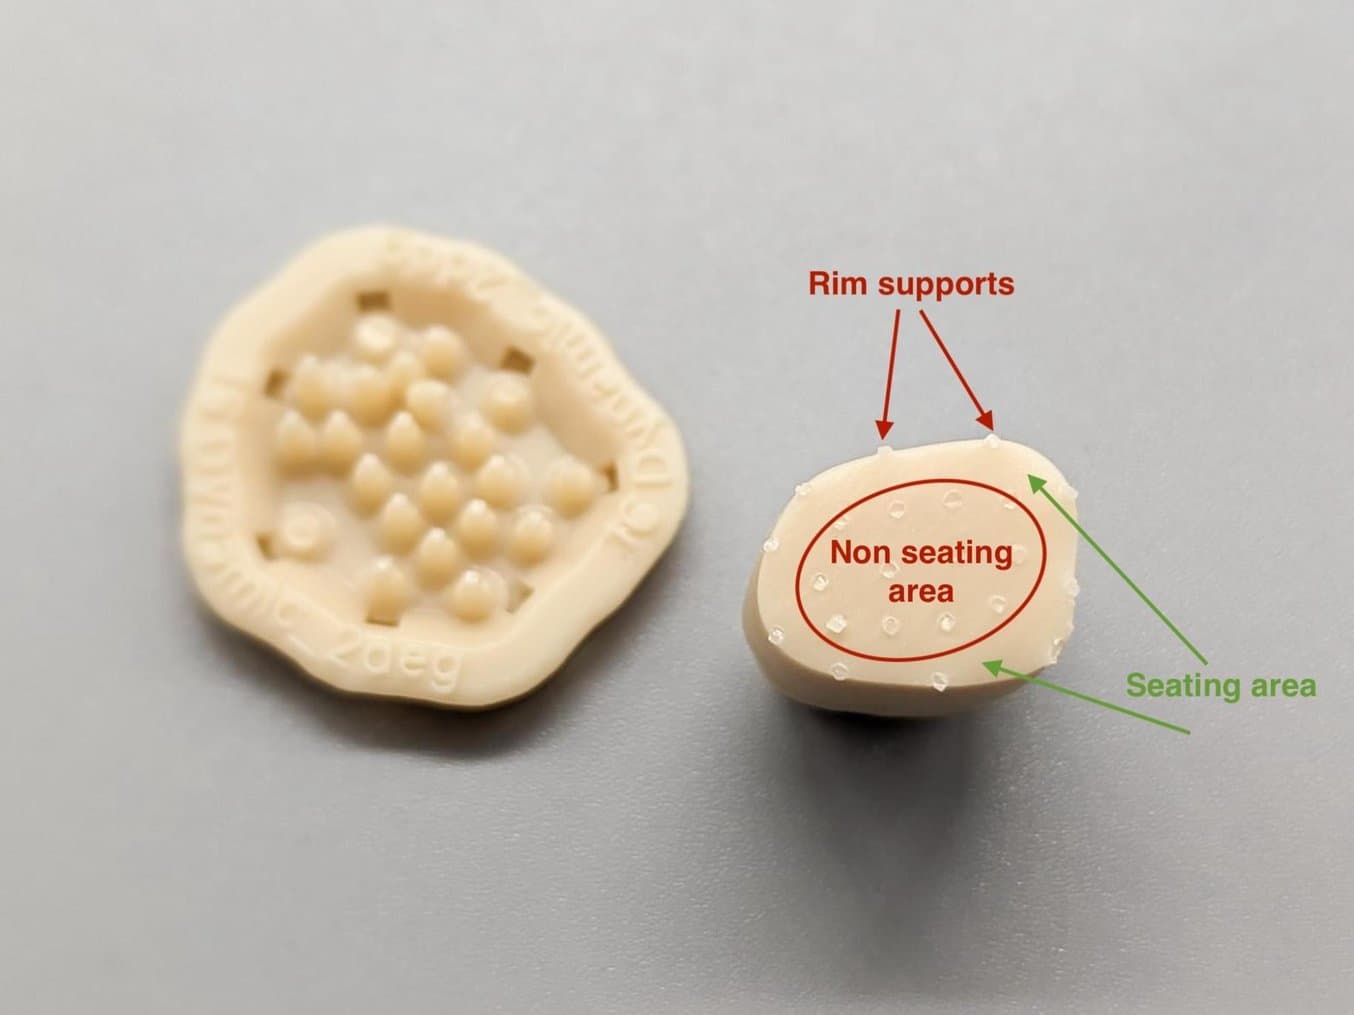
Illustration d'un fond de die ajusté pour une adaptation optimale. Remarquez que la zone intérieure non assise a été creusée pour améliorer l'assise. Nous avons utilisé du papier d'occlusion pour illustrer la zone de sièges intacte. Cette technique peut s'avérer très utile pour apprendre à créer des dies amovibles.
Assemblage
L'assemblage des dies et du modèle doit être effectué avec soin. Trouvez la position exacte, la rotation et l'axe d'insertion avant de commencer à enfoncer la die. Nos préréglages sont relativement serrés pour obtenir un bon verrouillage de la position.
Nous recommandons vivement l'utilisation d'un lubrifiant sec pour réduire les frottements et protéger les surfaces des dies de l'usure et de l'abrasion. Le lubrifiant sec le plus abordable est le talc / la poudre pour bébé. Évitez les lubrifiants secs en spray, car le gaz propulseur des bombes aérosols peut ramollir la résine.
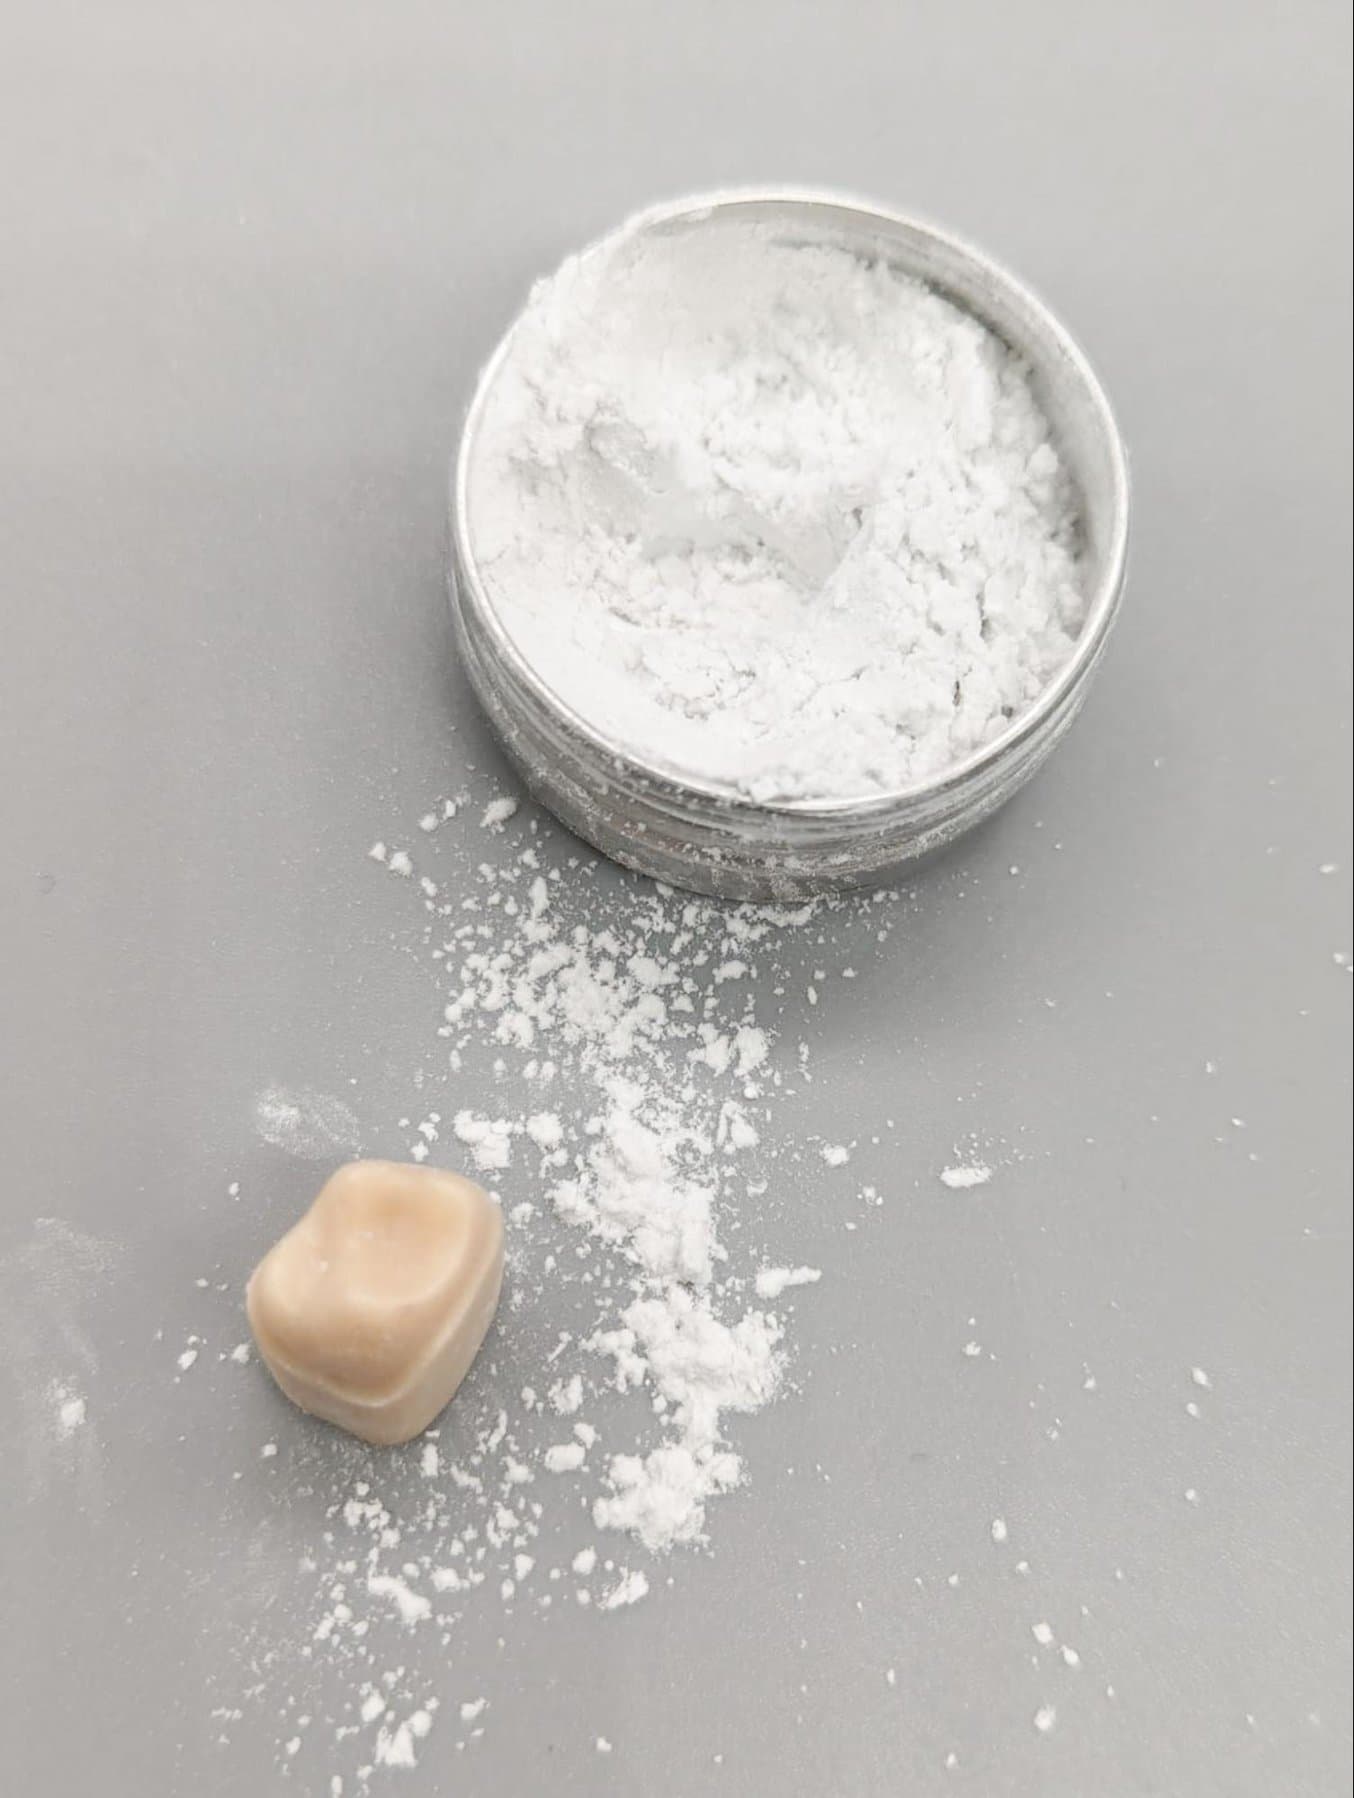
Utilisez du talc pour faciliter l'insertion et protéger la die.
3,4 Que se passe-t-il si ma die est trop serrée ou trop lâche ?
Formlabs fournit un ensemble validé de paramètres de travail pour les dies amovibles afin de faciliter l'utilisation et la cohérence. Cependant, il est également possible d'ajuster ces paramètres afin de personnaliser l'adaptation à votre application. Voyez ci-dessous comment modifier les paramètres :
| La die est trop lâche | Diminuez de 10 µm l'espace horizontal dans votre modèle. Exemple : Espace réel entre les dies = 0,000 mm Nouvel écart entre les dies = -0,010 mm |
| La die est trop serrée | Augmentez de 10 µm l'espace horizontal dans votre modèle. Exemple : Espace réel entre les dies = 0,000 mm Nouvel écart entre les dies = 0,010 mm |
Félicitations, vous avez réalisé un modèle de restauration dentaire magnifique et précis !
4. Ressources supplémentaires sur la conception de modèles dentaires
3Shape
Veuillez consulter la documentation de 3Shape Dental System qui a été installée avec Dental System, ou regarder le tutoriel vidéo.
Ajout d'orifices de drainage dans 3Shape :
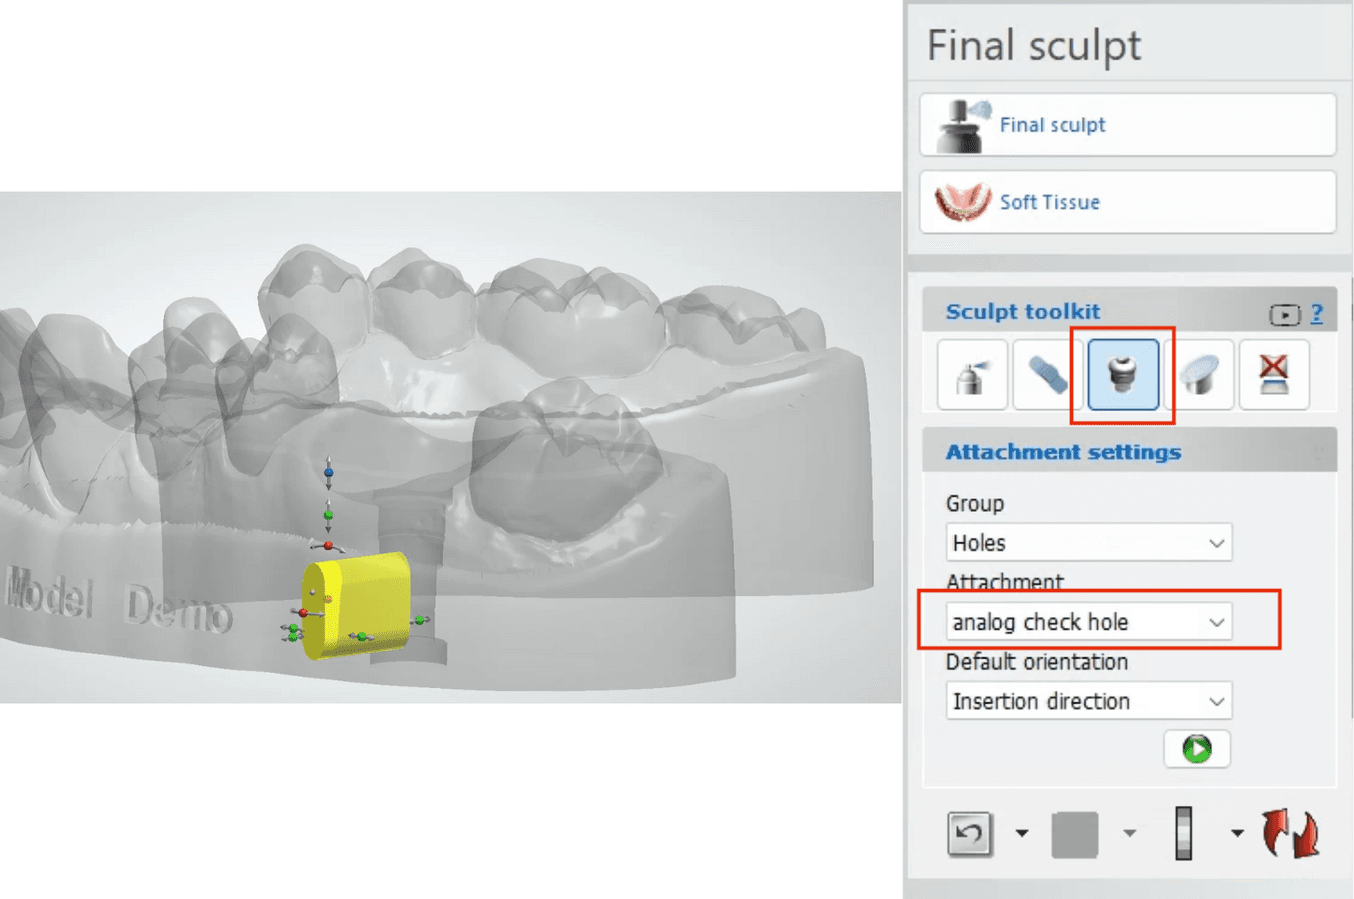
Pour les dies amovibles, 3Shape ajoute automatiquement des orifices de contrôle d'ajustement à la fente de la die. Ces trous servent également d'orifices d'évacuation pour la fente de la die.
Pour les analogues d'implants, Formlabs propose une bibliothèque d'éléments qui s'installe avec le Precision Model Resin DME.
-
Sélectionnez l'élément « Analog Check Hole ».
-
Placez le trou dans le modèle. Le trou doit être appliqué à un endroit qui permette de visualiser le positionnement de l'analogue sans compromettre la sécurité de sa position.
exocad
Veuillez consulter le Wiki du créateur de modèles exocad ici, ou regarder le tutoriel vidéo.
Ajout d'orifices d'évacuation dans exocad :
Pour les orifices d'évacuation, exocad demande aux utilisateurs de les ajouter manuellement au modèle. Le logiciel est livré avec un modèle d'accessoire conçu à cet effet.
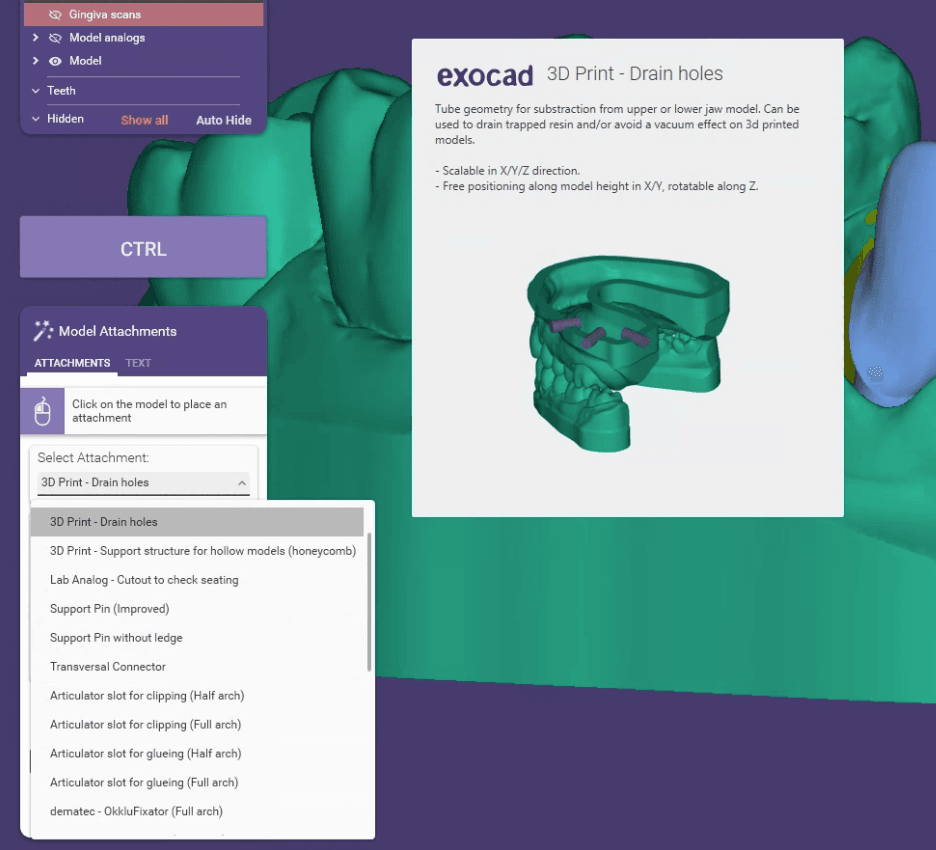
Pour les trous de drainage des analogues d'implants, exocad fournit une bibliothèque à cet effet, qui peut être trouvée lors de l'étape d'attachement dans Model Creator :
-
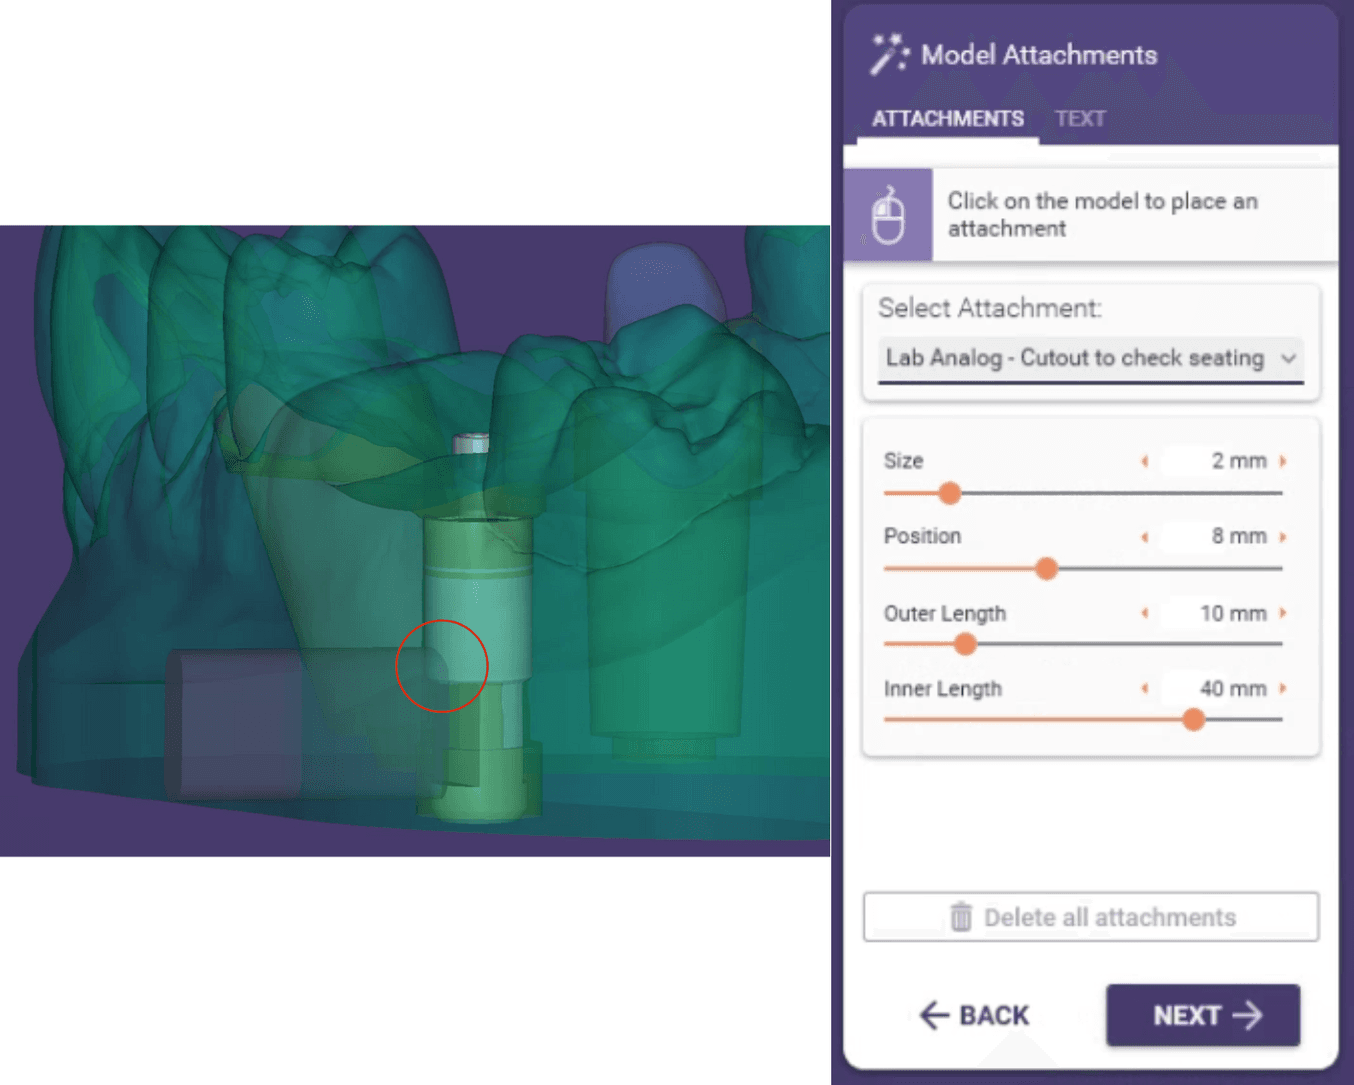
Sélectionnez la pièce jointe « Lab Analog - Cutout to check seating ».
-
Placez le trou dans le modèle. Le trou doit être appliqué à un endroit qui permette de visualiser le positionnement de l'analogue sans compromettre la sécurité de sa position.
Ressources supplémentaires
Explorez les ressources dentaires de Formlabs pour consulter des guides détaillés, des tutoriels pas-à-pas, des livres blancs, des webinaires, etc.
La dentisterie rendue plus simple
La Form 4B est une imprimante 3D dentaire ultra-rapide qui offre la gamme de matériaux la plus complète pour la dentisterie et l'orthodontie. Créez des modèles dentaires et des applications biocompatibles de haute qualité en un temps record, avec un flux de travail simple, une fiabilité à la pointe du secteur et une qualité de pièces imprimées impressionnante, grâce à l'écosystème de la Form 4B.