Precision Model Resin e Form 4B: guida alla creazione di modelli accurati di protesi dentali
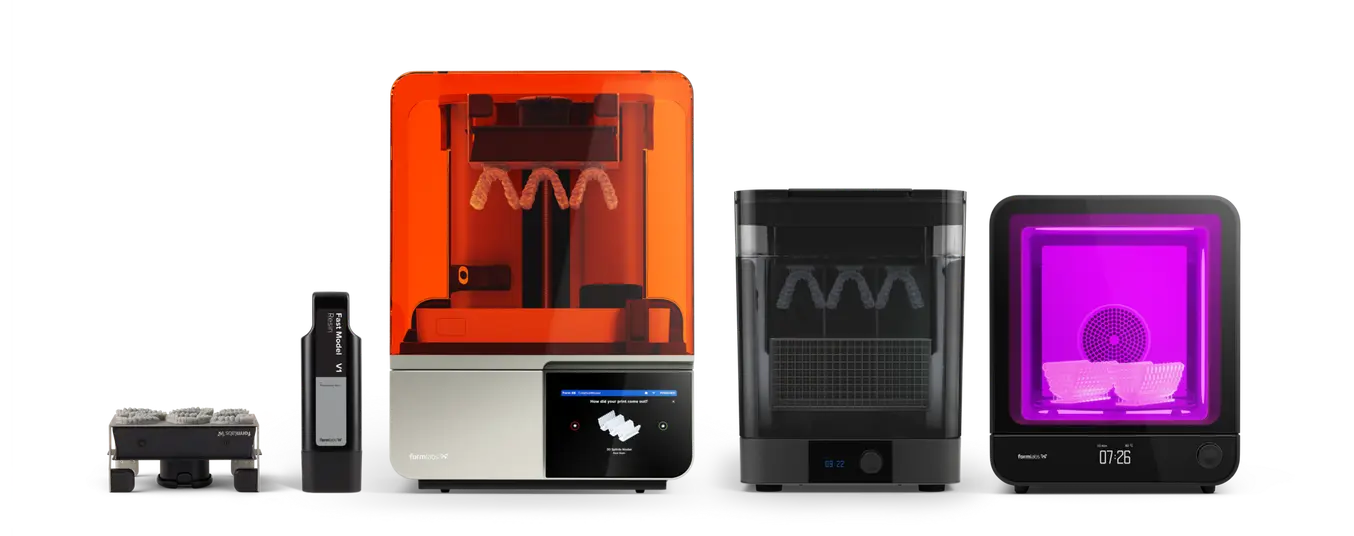
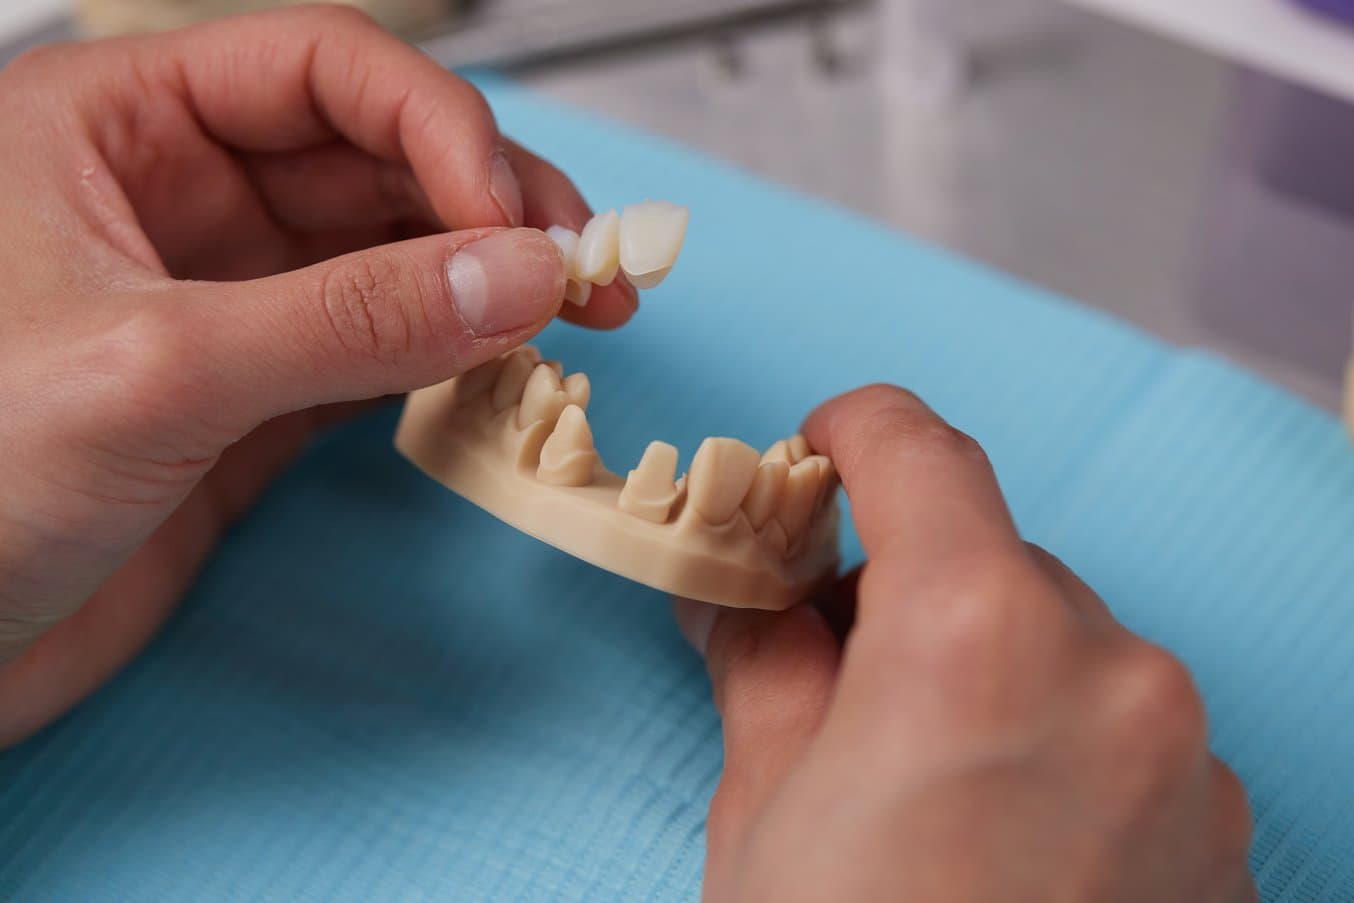
La stampante 3D odontoiatrica Form 4B di Formlabs è una macchina rivoluzionaria per la stampa di modelli di protesi dentali. Offre velocità di stampa elevata, affidabilità e risultati sempre precisi. Questo articolo è una guida su come realizzare facilmente modelli di protesi dentali funzionali e accurati con la Form 4B e la Precision Model Resin.
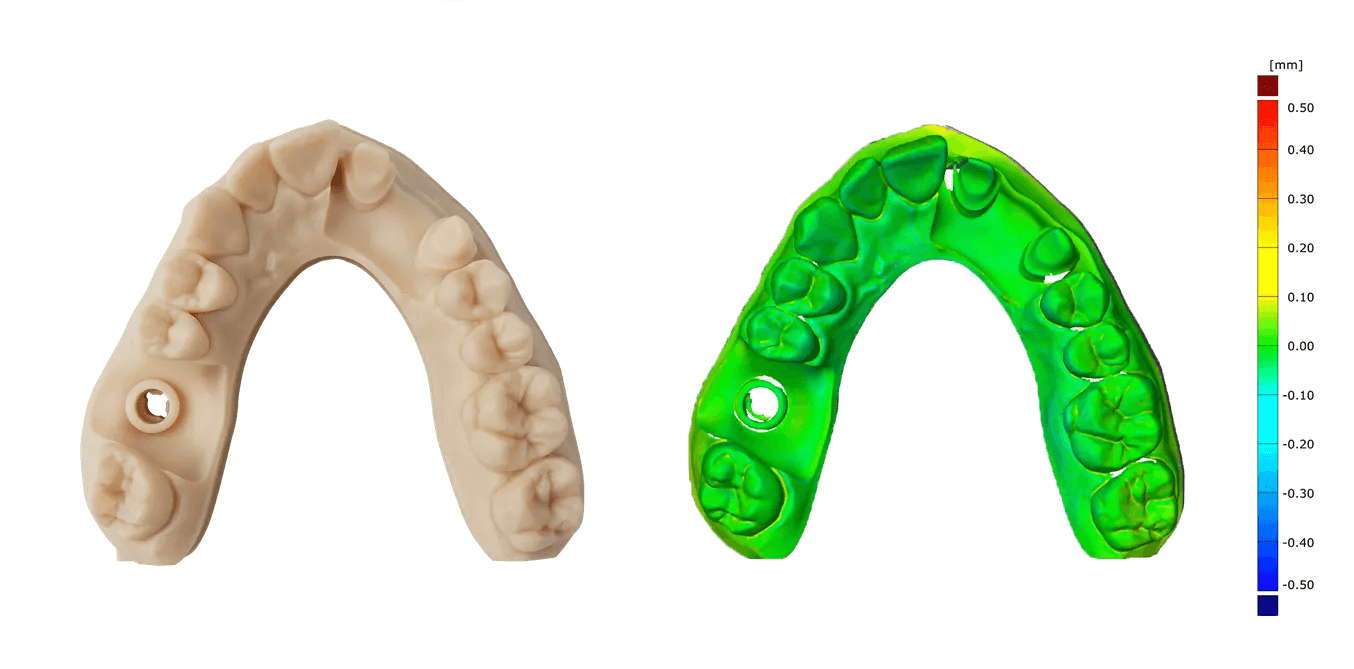
La Precision Model Resin è in grado di raggiungere la massima accuratezza rispetto a qualsiasi altra resina del catalogo Formlabs. Garantisce una finitura superficiale eccellente e un'accuratezza di +/- 100 µm su oltre il 99% delle superfici e di +/- 50 µm su circa il 95% delle superfici. Il colore neutro e delicato e l'opacità di questa resina sono ideali per individuare i piccoli dettagli anatomici e facilitano la scansione con gli scanner odontoiatrici.
Precision Model Resin e Form 4B: guida alla creazione di modelli accurati di protesi dentali
Macchine e materiali necessari
Prodotti da Formlabs:
- Stampante 3D Form 4B
- Form 4 Resin Tank e Form 4 Mixer
- Form 4 Build Platform o Form 4 Build Platform Flex
- Precision Model Resin
- Form Wash
- Unità di polimerizzazione convalidata Formlabs: Form Cure, Form Cure L o Fast Cure
- Form 4 Finish Kit o stazione di lavaggio supplementare
Prodotti da terzi:
- Strumenti per il taglio e la finitura:
- Lubrificante in polvere (talco/polvere di PTFE) (fortemente consigliato)
- Carta abrasiva (consigliata)
- Spazzola morbida (consigliata)
- Strumento per l'estrazione del moncone (consigliato)
- Diverse frese per la rimozione della resina in eccesso e dei punti di contatto dei supporti (in base alle necessità)
- Carta per articolazione (facoltativa)
- Scanner desktop (in caso di impronta o modello fisico)
Software necessari
Prodotti da Formlabs:
-
Software PreForm Odontoiatria (gratuito) versione 3.37 o successiva
-
Firmware della stampante 3D Form 4B versione 1.4.0 o successiva. Scopri di più
Prodotti da terzi:
Software per il design di modelli dentali come 3Shape o exocad
1. I modelli dentali stampati in 3D con la Precision Model Resin soddisfano i requisiti delle applicazioni di restauro
L'accuratezza dei modelli stampati è fondamentale per il successivo lavoro di restauro, in quanto eventuali errori possono avere un impatto diretto sulla precisione dei restauri.
In particolare, i modelli di protesi richiedono la massima accuratezza, a differenza dei modelli utilizzati per la termoformatura o applicazioni simili. L'accuratezza è considerata molto più importante di velocità e affidabilità. La stampante 3D Form 4B di Formlabs, utilizzata con la Precision Model Resin, si distingue per il suo alto livello di accuratezza, velocità e affidabilità e offre risultati eccellenti.
Confrontando l'accuratezza dei modelli in gesso realizzati con metodi tradizionali con quella dei modelli stampati in 3D utilizzando la Precision Model Resin, è emerso che la stampa 3D con la Form 4B e la Precision Model Resin permette di ottenere risultati comparabili a quelli dei metodi tradizionali. Scopri come è stata calcolata l'accuratezza per la Precision Model Resin.
Accuratezza della Precision Model Resin
| Formlabs Parte stampata con la Precision Model Resin sulla Form 4B | Comparatore n. 1 Modello dentale stampato con l'UV Max di Asiga | Comparatore n. 2 Moncone e modello 2 stampati con la SprintRay | |
|---|---|---|---|
| Tolleranza di +/- 100 μm | 99,9 | 99,7 | 90,4 |
| Tolleranza di +/- 50 μm | 97,4 | 91,3 | 62,0 |
| Tolleranza di +/- 25 μm | 75,7 | 62,8 | - |
Nota: parti stampate con uno spessore dello strato di 50 μm.
Considerazioni sulla progettazione CAD
Nel workflow tradizionale, uno dei modelli più comuni è lo split-cast, in cui un'arcata viene accoppiata a una piastra di base e tagliata in sezioni per consentire al personale tecnico di rimuovere il moncone per eventuali correzioni manuali. Meno comuni sono i modelli senza tagli in sezioni, in cui i monconi vengono inseriti in una fessura del modello in gesso. Questi ultimi sono noti come "modelli alveolari" e richiedono una notevole quantità di lavoro e competenze aggiuntive.
I modelli alveolari sono più semplici da progettare con i software CAD e rappresentano la maggior parte dei modelli stampati in 3D. Le seguenti linee guida si applicano a questo tipo di modello. Formlabs fornisce impostazioni predefinite per la stampa di questo tipo di modello di protesi.
Dopo aver ottenuto un modello digitale della dentatura del paziente, basato su un modello in gesso o su una scansione intraorale, i file (STL, PLY, OBJ) possono essere importati in un software CAD per modelli dentali per procedere alla progettazione.
Opzioni di configurazione disponibili per i modelli senza piastra* nel software CAD:
-
Struttura: i modelli possono essere sia pieni che cavi.
-
Monconi: è possibile scegliere tra design con monconi sfilabili o preparazioni fisse, con la possibilità di aggiungere ulteriori monconi in base alle esigenze. Di seguito sono riportate le linee guida di Formlabs sui monconi sfilabili.
-
Geometria:
-
3Shape: in genere prevede monconi di forma quadrata con una leggera conicità e barre di frizione, che migliorano l'aderenza e il posizionamento per impostazione predefinita.
-
exocad: per impostazione predefinita, i monconi a pareti parallele seguono fedelmente la linea di margine per un'aderenza uniforme.
-
-
Opzioni supplementari:
-
Sia 3Shape che exocad permettono l'uso di perni di espulsione e fori di controllo, utili per la verifica visiva del corretto posizionamento.
-
Entrambi i software supportano forme coniche per facilitare l'inserimento.
-
*Distinguiamo tra modelli senza piastra (simili al modello alveolare menzionato in precedenza) e modelli con piastra con sezioni tagliate. I modelli con piastra non sono adatti alla stampa 3D a causa della loro geometria di posizionamento sul fondo della base del modello.
Stampa di arcate direttamente sulla piattaforma di stampa
Consigliamo di stampare direttamente sulla piattaforma di stampa per sfruttare i seguenti vantaggi:
-
Supporto e accuratezza: la piattaforma di stampa offre la migliore struttura di supporto disponibile per la stampa 3D, garantendo la massima accuratezza grazie a condizioni di stampa stabili.
-
Efficienza: quando il modello è parallelo alla piattaforma di stampa, non c'è bisogno di una base o di strutture di supporto aggiuntive. In questo modo gli strati da stampare sono ridotti, il che non solo accelera il processo di stampa, ma riduce anche il consumo di resina.
La stampa di un modello direttamente sulla piattaforma di stampa è considerata una buona pratica; tuttavia, se abbinata a monconi sfilabili o fessure di analoghi di impianto, può causare l'effetto ventosa.
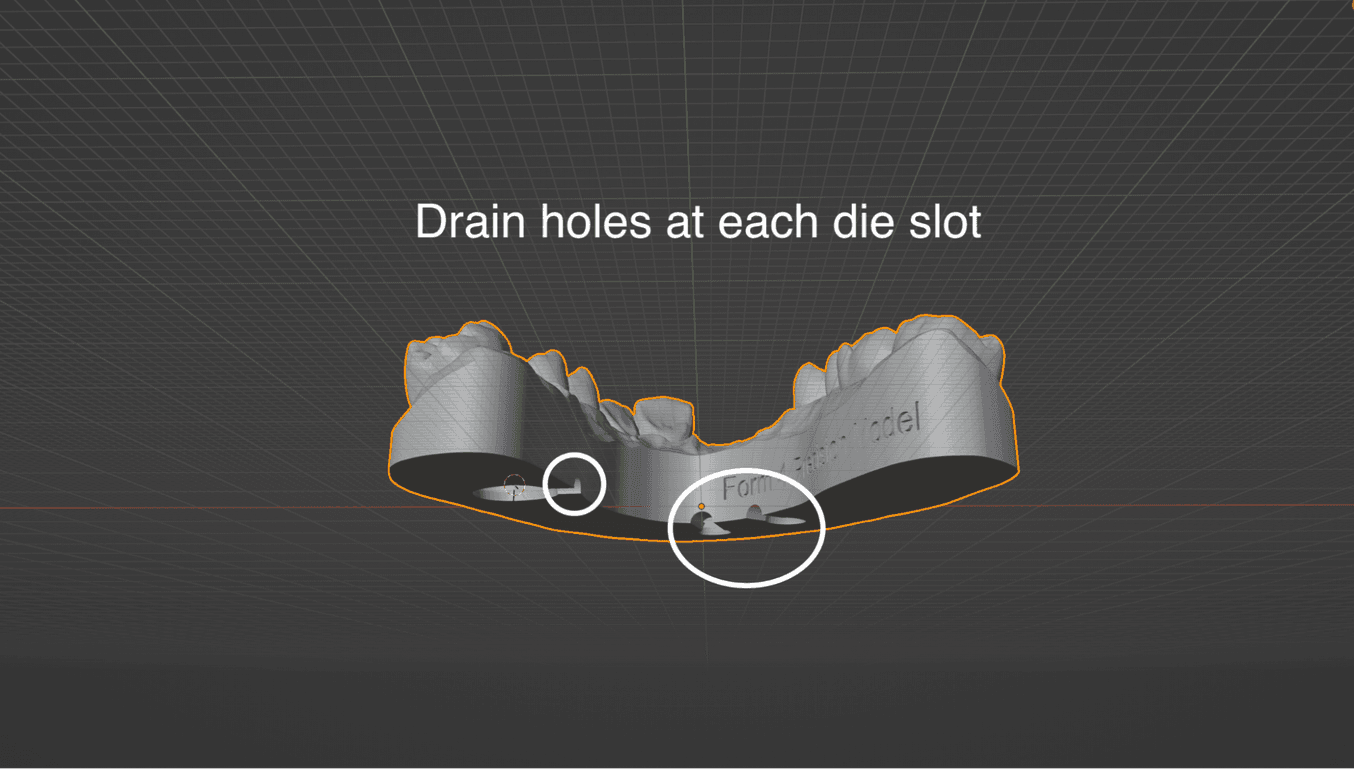
Come evitare l'effetto ventosa con i fori di drenaggio
L'effetto ventosa nella stampa 3D riguarda le aree in cui la resina non può fluire liberamente perché è racchiusa dalle pareti del modello. Questo fenomeno si verifica in particolari come fessure di monconi sfilabili e fessure di analoghi di impianto o a causa della forma del modello.* Il movimento della piattaforma di stampa crea un effetto pompa che sottopone a pressione e depressurizzazione la resina intrappolata, incidendo negativamente sull'accuratezza.
Inserendo dei fori di drenaggio, l'effetto di pressurizzazione viene neutralizzato, con un conseguente aumento dell'accuratezza della stampa. Sebbene la Form 4B sia meno soggetta a perdita di accuratezza o gravi errori di stampa, l'aggiunta di fori di drenaggio in corrispondenza di ogni fessura alla base del modello rimane una buona pratica. Sia 3Shape che exocad offrono opzioni per la creazione dei fori di drenaggio nei loro software di modellazione. Leggi le istruzioni dettagliate.
Consigliamo fortemente di aggiungere fori di drenaggio alle fessure degli analoghi di impianto. Oltre a evitare l'effetto ventosa, un foro in corrispondenza della fessura di un analogo di impianto consente di controllare visivamente il corretto posizionamento dell'analogo. In questo caso, i fori devono essere progettati manualmente sia per exocad che per 3Shape.
*I modelli cavi non sono consigliati se si vuole mantenere la massima accuratezza. Tuttavia, quando si stampano forme cave, i fori di drenaggio sono fondamentali per evitare l'effetto ventosa e ridurre al minimo la distorsione.
Linee guida sui monconi sfilabili
In questa sezione vengono fornite linee guida sulle configurazioni di design dei monconi sfilabili disponibili nei software di progettazione CAD e sulla compatibilità con la Precision Model Resin di Formlabs.
-
Consigliamo di stampare i monconi sfilabili su supporti.
-
In questa guida è disponibile una procedura dettagliata.
-
Formlabs offre impostazioni predefinite testate e perfettamente funzionanti per i software di progettazione exocad e 3Shape.
L'immagine a destra rappresenta le impostazioni predefinite fornite da Formlabs, ognuna delle quali è priva di un perno e presenta una forma organica e leggermente conica per facilitarne l'inserimento.
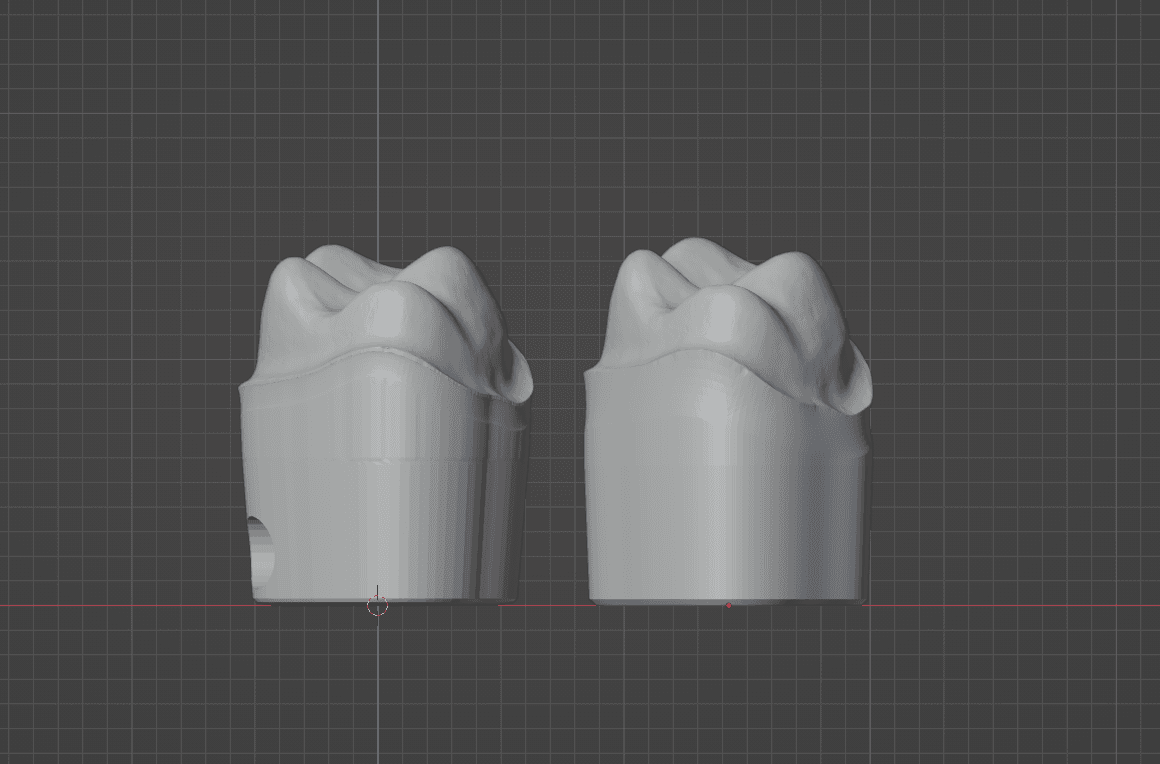
Due monconi realizzati utilizzando le impostazioni predefinite di Formlabs: quello a sinistra è stato creato con 3Shape, mentre quello a destra è stato creato con exocad.
Confronto tra monconi conici e monconi a pareti parallele
-
I monconi conici sono più semplici da inserire e pratici, sebbene possano presentare difficoltà nel garantire un'aderenza perfetta.
- Le pareti parallele garantiscono una frizione uniforme lungo il moncone, migliorando la stabilità, ma possono essere più difficili da inserire e comportano un rischio di disallineamento.
Con o senza perno?
Molti pacchetti software per modelli dentali includono un'opzione per aggiungere un perno di espulsione nella parte inferiore del moncone. Se necessario, questo perno aiuta a rimuovere il moncone dal modello. Sebbene possano essere molto utili, l'uso di perni può avere un impatto sulle impostazioni di stampa, che comprendono:
-
L'orientamento sulla piattaforma di stampa
-
La necessità di strutture di supporto adeguate (istruzioni dettagliate nella sezione con la procedura dettagliata)
Inoltre, nel caso di monconi piccoli, come quelli centrali inferiori, il perno può essere sottile come un ago.
Nelle impostazioni predefinite di Formlabs i perni di espulsione non sono inclusi. Tuttavia, è possibile aggiungerli nelle impostazioni se necessario. Consigliamo perni di espulsione con un'altezza di 1 mm. Perni più alti possono ridurre la lunghezza dell'area di frizione.
Impostazione dell'altezza ideale del modello
Se da un lato ridurre l'altezza del modello consente di risparmiare resina e diminuire il tempo di stampa, dall'altro potrebbe compromettere l'aderenza ottimale dei monconi sfilabili. Per garantire una migliore aderenza, consigliamo un'altezza della base di 15-18 mm nella sezione più bassa della parte di tessuto molle, escludendo i denti.
La frizione tra il moncone e il modello è essenziale per ottenere un'aderenza stretta e sicura dei monconi sfilabili. Dato che la superficie di contatto, o superficie di frizione, tra i monconi e il modello inizia al di sotto del punto più basso della linea di margine, l'altezza del modello diventa un fattore importante per determinare la quantità di superficie di frizione disponibile. Questo aspetto è particolarmente rilevante per i denti anteriori, in cui la linea di margine tende a essere più bassa sulla parte vestibolare rispetto a quella linguale, in rapporto alla base del modello. Il risultato è una superficie di frizione di dimensioni inferiori.
Se i monconi sono troppo allentati o non sono saldamente bloccati, può essere utile aumentare l'altezza del modello e quindi la lunghezza del percorso di inserimento dei monconi.
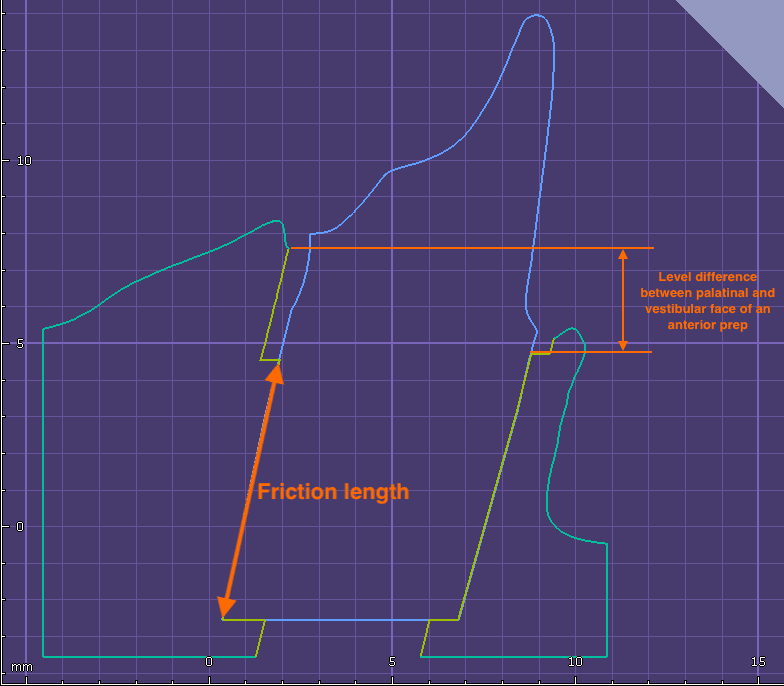
Sezione trasversale di un moncone anteriore.
Monconi angolati
L'asse di inserimento di un moncone sfilabile può essere limitato dall'anatomia del paziente. Idealmente, il moncone dovrebbe essere perpendicolare alla base del modello per garantire una superficie più liscia e una frizione ottimale. Tuttavia, l'anatomia del paziente può richiedere che l'asse di inserimento sia allontanato dall'asse Z del modello.
Consigliamo di limitare l'angolazione a 15°, se possibile. Angoli maggiori creeranno dei dislivelli più marcati nella fessura del moncone, aumentando la frizione.
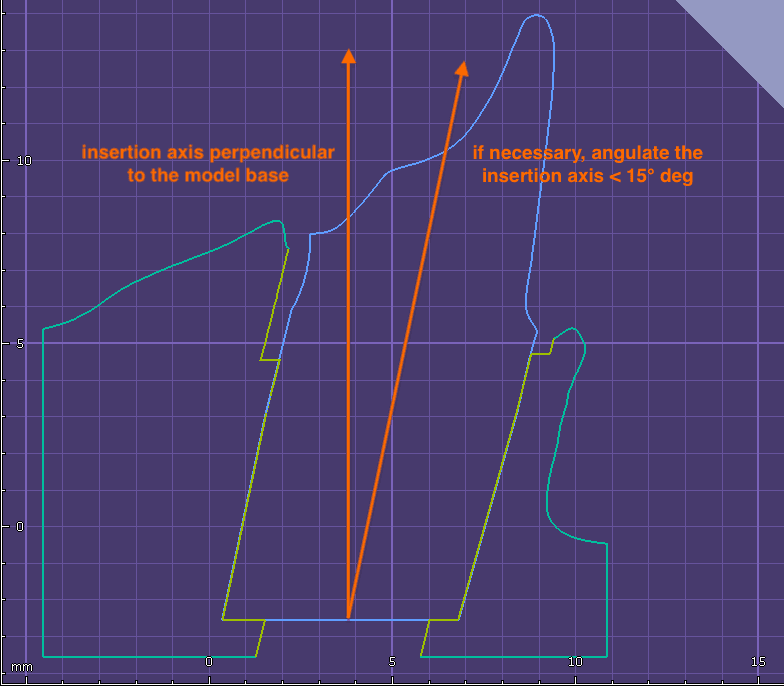
Moncone angolato
Linee guida per la progettazione di modelli di impianto
I modelli di impianto rappresentano un caso particolare nel design dei modelli per cui è necessario un alto grado di accuratezza e aderenza.
Di seguito sono riportate le linee guida per massimizzare l'aderenza durante la progettazione di modelli di impianto per la stampa 3D con la Precision Model Resin di Formlabs.
Tipi di analoghi di impianto
Gli analoghi di impianto per i modelli stampati in 3D differiscono da quelli per i modelli in gesso. In questi ultimi, il gesso viene versato intorno all'analogo, mentre nei modelli stampati in 3D l'analogo viene inserito nel modello dopo la stampa. Per questo motivo, le aziende produttrici di impianti di terze parti offrono due tipi di analoghi. Il requisito più importante per il modello di impianto è che l'analogo possa essere inserito e fissato nella posizione corretta.
Analoghi con vite
Questo tipo di analogo, prodotto da aziende come NT-Trading e DESS, presenta una filettatura nella parte inferiore, che permette di fissarlo nel modello mediante una controvite o un dado accessibile dalla parte inferiore del modello.
Analoghi a scatto
Questo tipo di analogo, prodotto da aziende come Camlog e Medentika, deve essere inserito nel suo alloggiamento e fatto scattare su un elemento di ritenzione positivo o negativo per fissarlo in posizione.
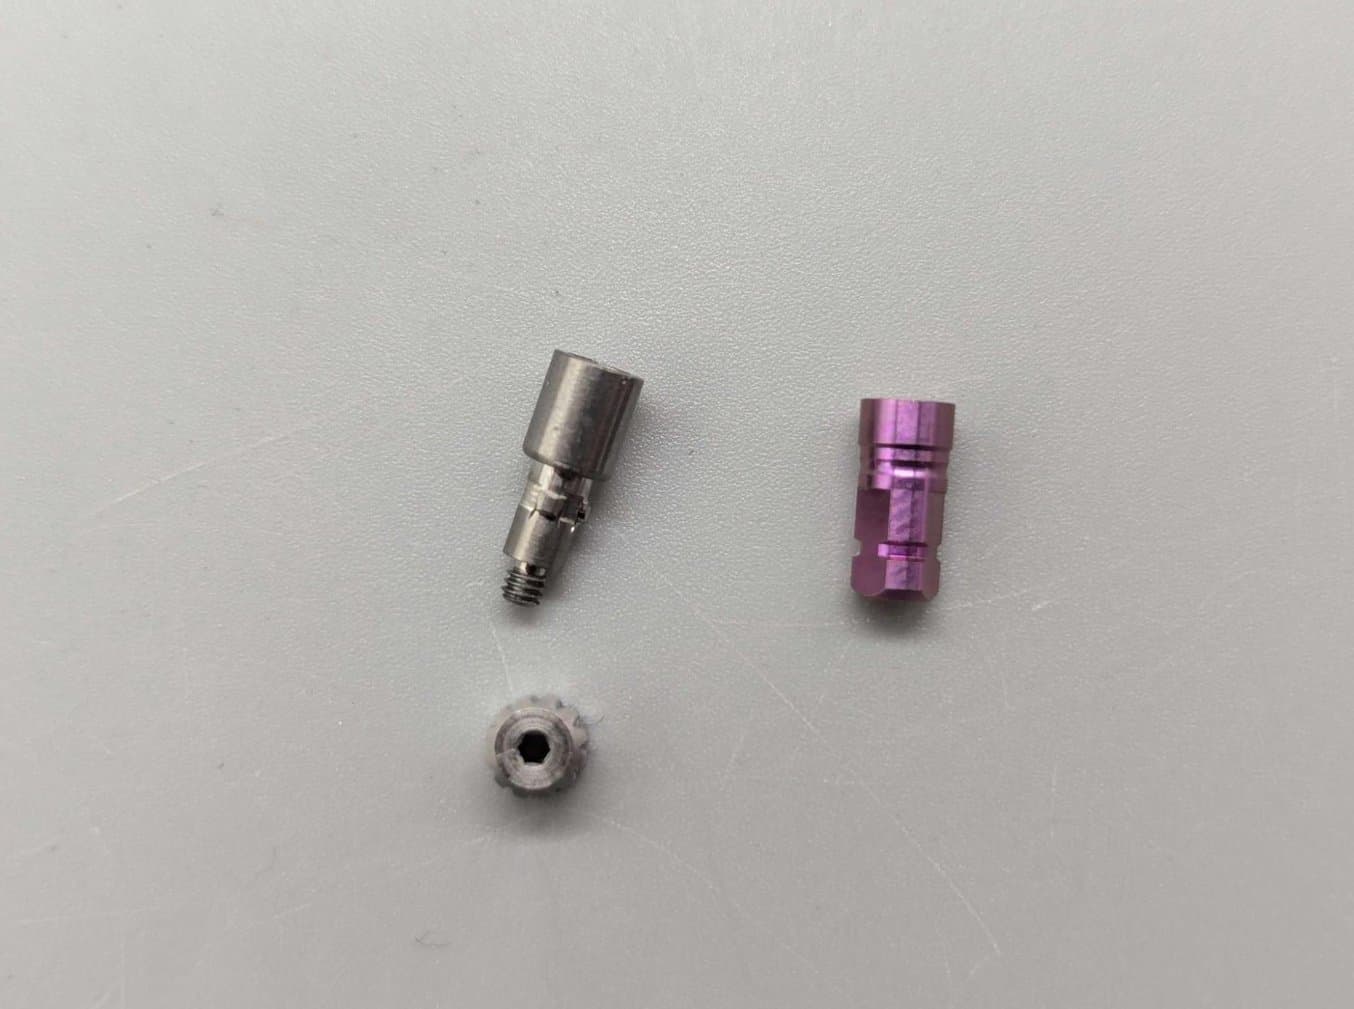
Un analogo con vite di NT-Trading (a sinistra) e un analogo a scatto di Camlog (a destra).
Offset da analogo a modello consigliati
Formlabs mette a disposizione nei cataloghi della Precision Model Resin offset per exocad e 3Shape per gli analoghi a scatto.
| Offset | Sovrapposizione barra di frizione | ||
|---|---|---|---|
| exocad | A scatto | 0,060 mm | N/D |
| Con vite | 0,010 mm | N/D | |
| 3Shape | A scatto | 0,060 mm | 0,010 mm |
| Con vite | 0,010 mm | 0,010 mm |
Occorre ricordare che gli offset per gli analoghi con vite sono differenti da quelli per gli analoghi a scatto. In questo caso potrebbe essere necessaria una regolazione nel software CAD.
Le regolazioni degli offset da analogo a modello sono disponibili nel Model Builder di 3Shape e nel Model Creator di exocad.
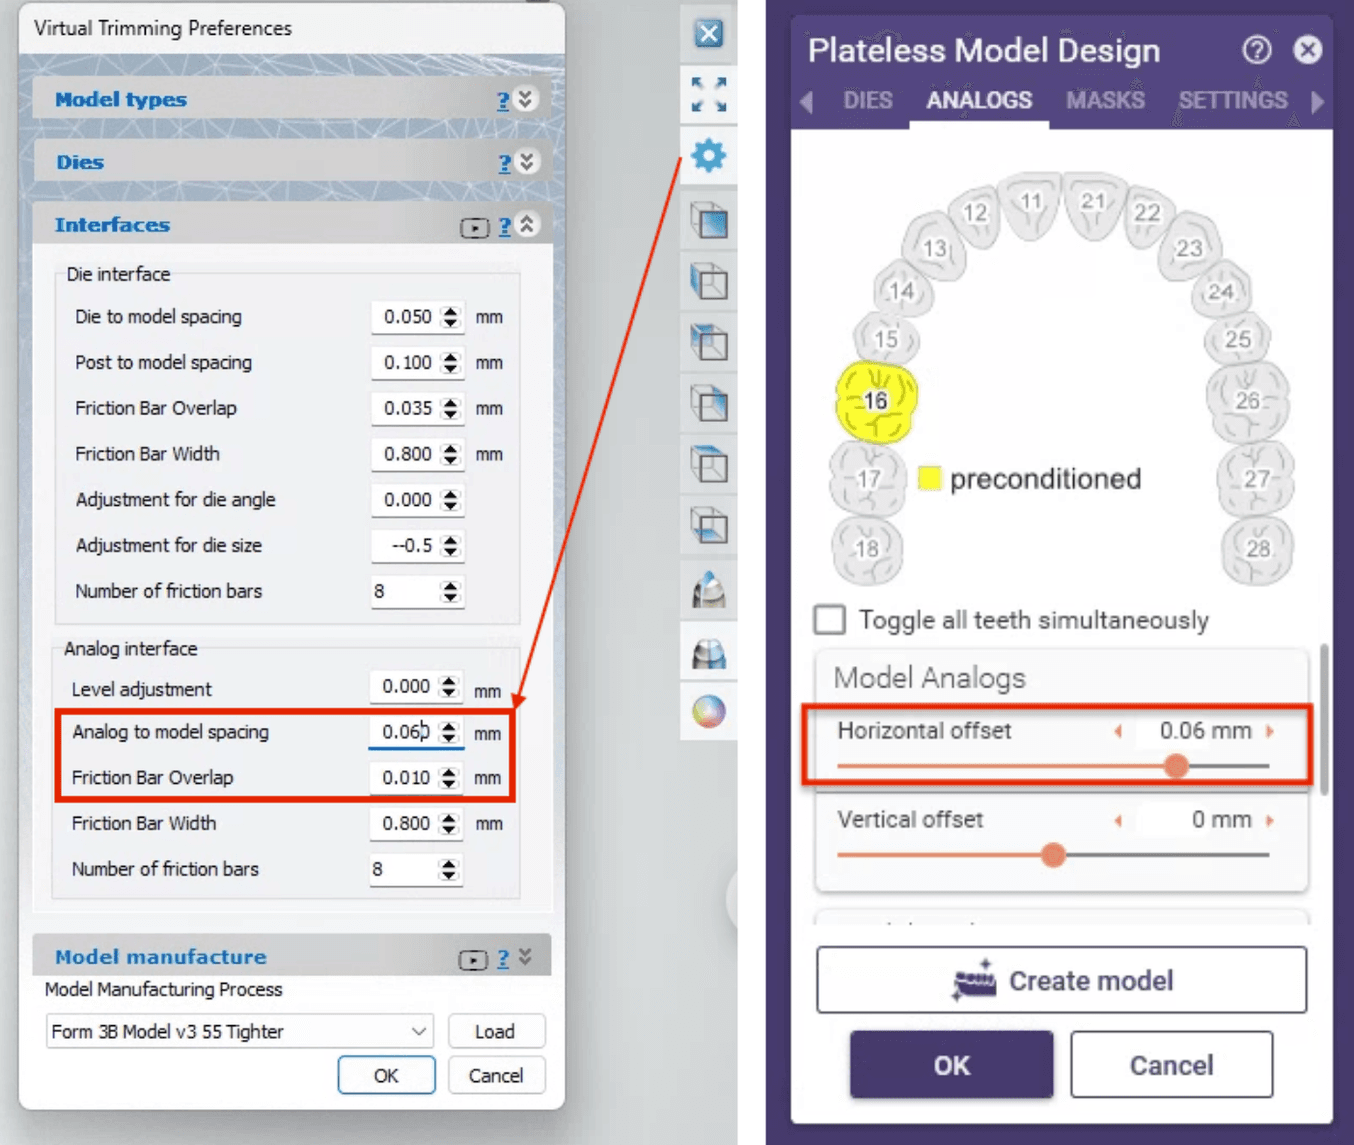
A sinistra: regolazione dell'offset da analogo a modello nel Model Builder di 3Shape. A destra: offset orizzontale per gli analoghi del modello nel Model Creator di exocad.
2. Cataloghi CAD e installazione
Catalogo di download per exocad e 3Shape
Installazione
exocad
1. Il file exocad viene fornito in una cartella compressa. Estrai i file dalla cartella compressa.
2. Inserisci il file delle impostazioni "FORMLABS Form 4B Precision Model.XML" in [percorso di installazione di exocad]/DentalCADApp/library/production
3. Inserisci la cartella delle impostazioni "FORMLABS Form 4 Plateless Model" in [percorso di installazione di exocad]/DentalCADApp/library/modelcreator/plates
3Shape
Il file DME di 3Shape deve essere importato nel sistema mediante l'applicazione Pannello di controllo.
Altri pacchetti software
I consigli di progettazione generali possono essere facilmente adattati ad altri software di progettazione di modelli per i quali non forniamo librerie native. A seguire è riportata una sintesi delle principali impostazioni per i monconi sfilabili che dovrebbero funzionare con la Precision Model Resin:
| Riepilogo delle impostazioni per i monconi sfilabili | |
|---|---|
| Offset per il modello/moncone | Da 0,000 a -0,015 mm |
| Profondità consigliata per la fessura del moncone | ≥ 15 mm |
| Angolazione massima consigliata | +/- 15° dall'asse Z |
| Conicità, se applicabile | 2° |
| Offset per gli impianti da analogo a modello | Vedi la sezione "Offset da analogo a modello consigliati" |
3. Guida dettagliata: stampe di modelli di protesi in PreForm
3.1 Impostazione della stampa
Scopri come iniziare a utilizzare PreForm Odontoiatria.
-
Consigliamo di stampare i modelli direttamente sulla piattaforma di stampa e di assicurarsi che tutte le fessure dei monconi sfilabili o degli analoghi di impianto siano dotate di un foro di drenaggio.
-
Per ottenere risultati ottimali, orienta i monconi e genera gli appositi supporti manualmente. Scopri come impostare manualmente le stampe con PreForm Odontoiatria.
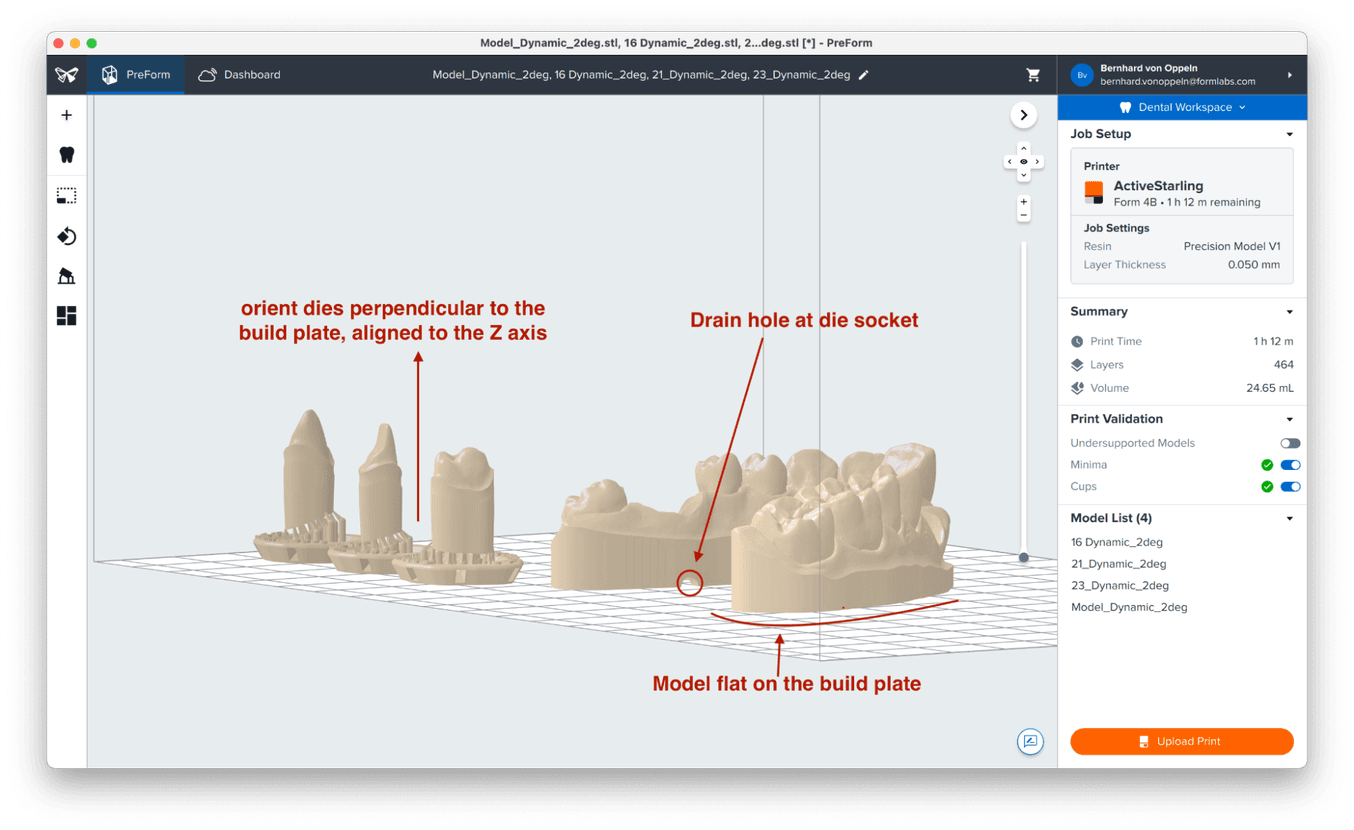
Configurazione ideale per un moncone (con o senza perno):
-
Allinea il moncone all'asse Z, assicurandoti che sia perpendicolare alla piattaforma di stampa per ottenere pareti lisce e uniformi.
-
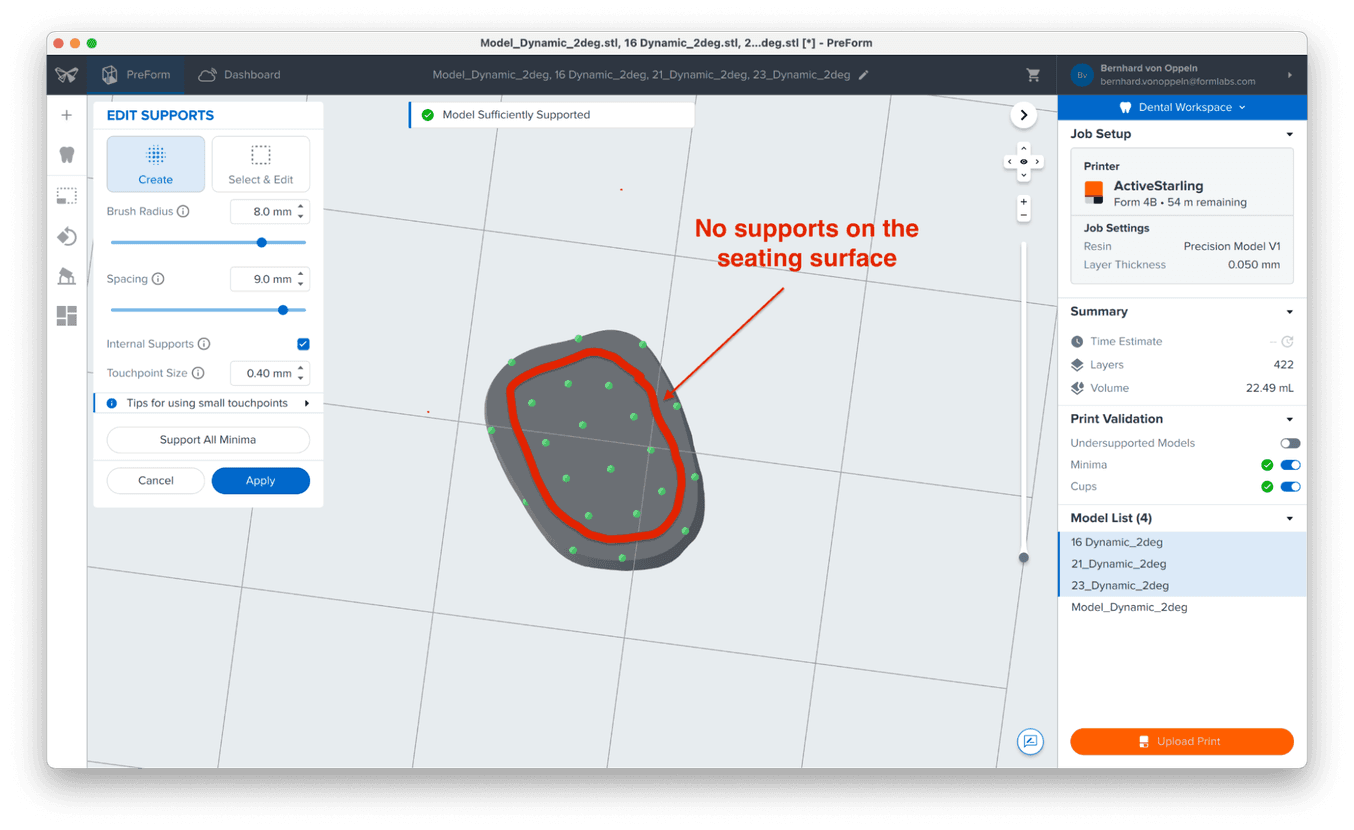
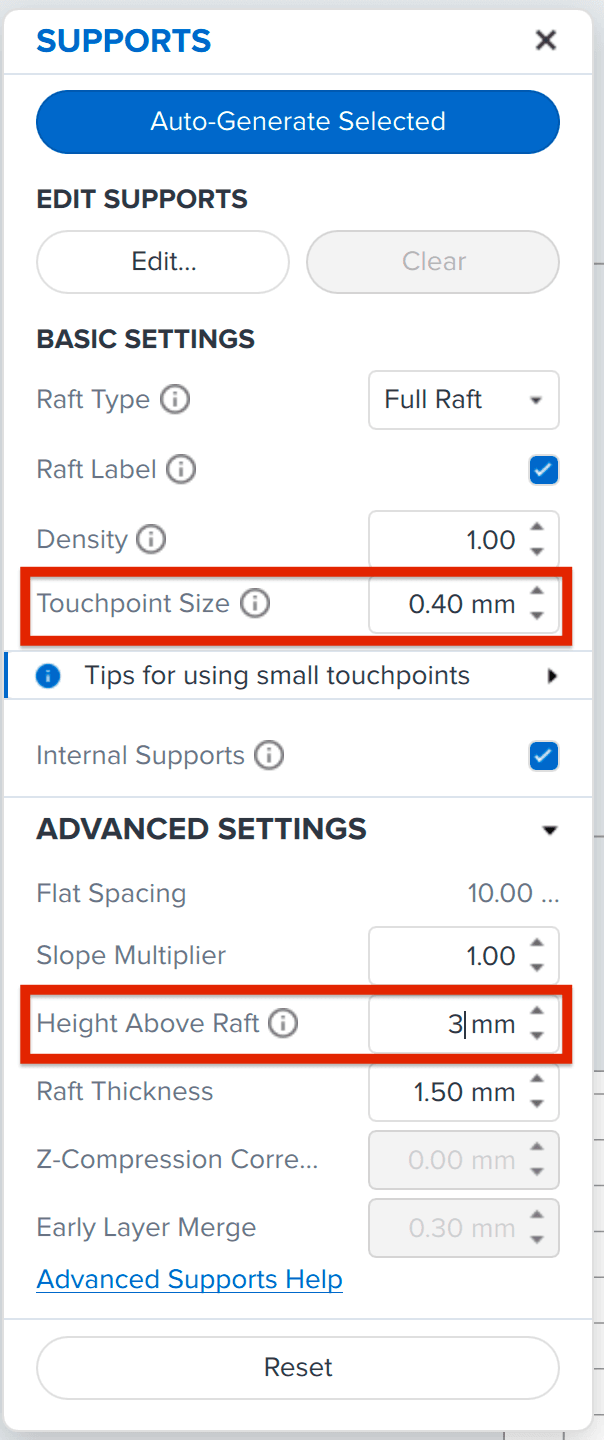
Modifica i supporti manualmente:
-
Riduci la dimensione dei punti di contatto a 0,4 mm per facilitare la finitura.
-
Riduci l'altezza sopra la base a 3 mm per migliorare la stabilità.
-
Non collocare supporti sulla superficie di posizionamento. Posiziona i supporti a circa 1 mm dal bordo esterno del fondo del moncone. Utilizza la seguente immagine come riferimento.
-
3.2 Dopo la stampa: come eseguire la post-elaborazione dei modelli
Le impostazioni consigliate per la post-elaborazione della Precision Model Resin sono:
| Lavaggio | 5 minuti nella Form Wash |
|---|---|
| Asciugatura | 30 minuti di asciugatura sul banco da lavoro o con aria compressa dopo aver estratto le parti dal lavaggio, quindi 15 minuti di asciugatura aggiuntivi |
| Polimerizzazione | 5 minuti a 35 °C nella Form Cure o 30 secondi a intensità 2 nella Fast Cure |
Cosa fare e non fare durante la post-elaborazione
-
Non utilizzare mai spazzole o altri strumenti per la pulizia. Quando le parti vengono estratte dalla Form Wash, risultano morbide e potrebbero perdere accuratezza sia per il modello che per l'aderenza con il moncone.
-
Se hai a disposizione aria compressa per asciugare le parti dopo il lavaggio, fallo subito dopo averle rimosse, quando sono ancora bagnate. In questo modo eviti che i residui di resina disciolti nell'alcool isopropilico si depositino sugli oggetti e ne compromettano l'accuratezza.
Procedura di lavaggio in due passaggi per ottenere risultati ottimali
-
A ogni ciclo di lavaggio, si dissolvono ulteriori residui di resina nell'alcool isopropilico. I residui possono compromettere l'accuratezza di parti delicate come monconi, fessure dei monconi e fessure degli analoghi.
-
Per evitare che questo accada, puoi utilizzare un ciclo di lavaggio in due passaggi:
-
Primo lavaggio con alcool isopropilico usato per 3 minuti
-
Secondo lavaggio con alcool isopropilico pulito per 2 minuti o 2 minuti in un bagno a ultrasuoni con alcool isopropilico pulito
-
Asciugatura all'aria o con aria compressa?
L'uso di aria compressa subito dopo aver estratto le parti dalla Form Wash è utile per evitare che i residui di resina si depositino sulle parti più delicate e riduce il tempo di asciugatura necessario prima della polimerizzazione.
3.3 Finitura delle parti stampate
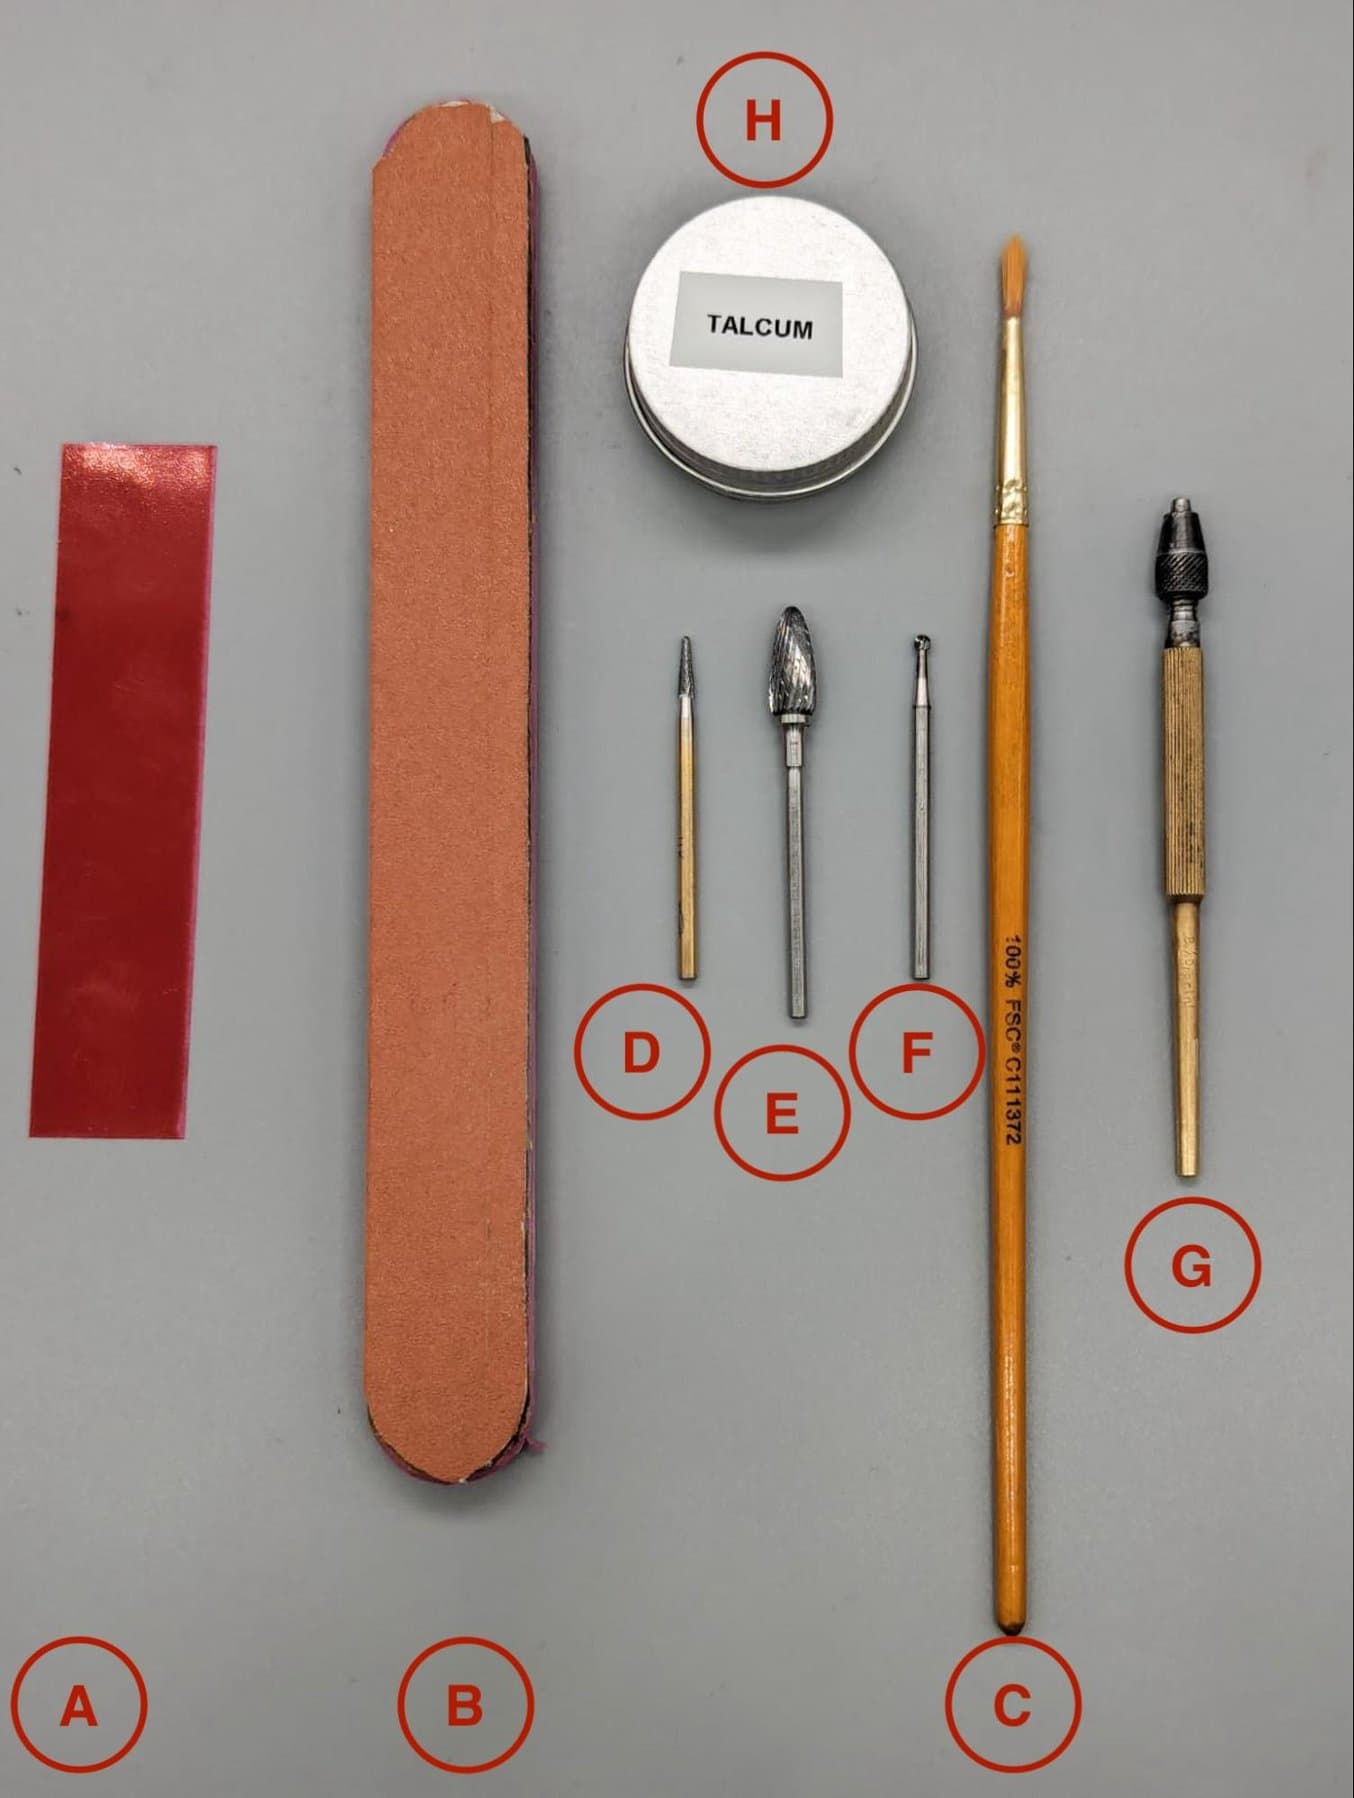
Strumenti consigliati:
| A | Carta per articolazione (facoltativa) |
|---|---|
| B | Carta abrasiva (consigliata) |
| C | Spazzola morbida (consigliata) |
| D, E, F | Diverse frese per la rimozione della resina in eccesso e dei punti di contatto dei supporti (in base alle necessità) |
| G | Strumento per l'estrazione del moncone (consigliato) |
| H | Lubrificante in polvere (talco/polvere di PTFE) (fortemente consigliato) |
Buone pratiche
Rimuovi i punti di contatto. Non toccare l'area di posizionamento. L'area di posizionamento in 3Shape o exocad ha una larghezza media di 1 mm. Per migliorare l'aderenza del moncone, puoi rimuovere in modo più deciso il materiale dall'area interna non di posizionamento, ma presta particolare attenzione sul bordo esterno, poiché è direttamente collegato all'area di posizionamento.
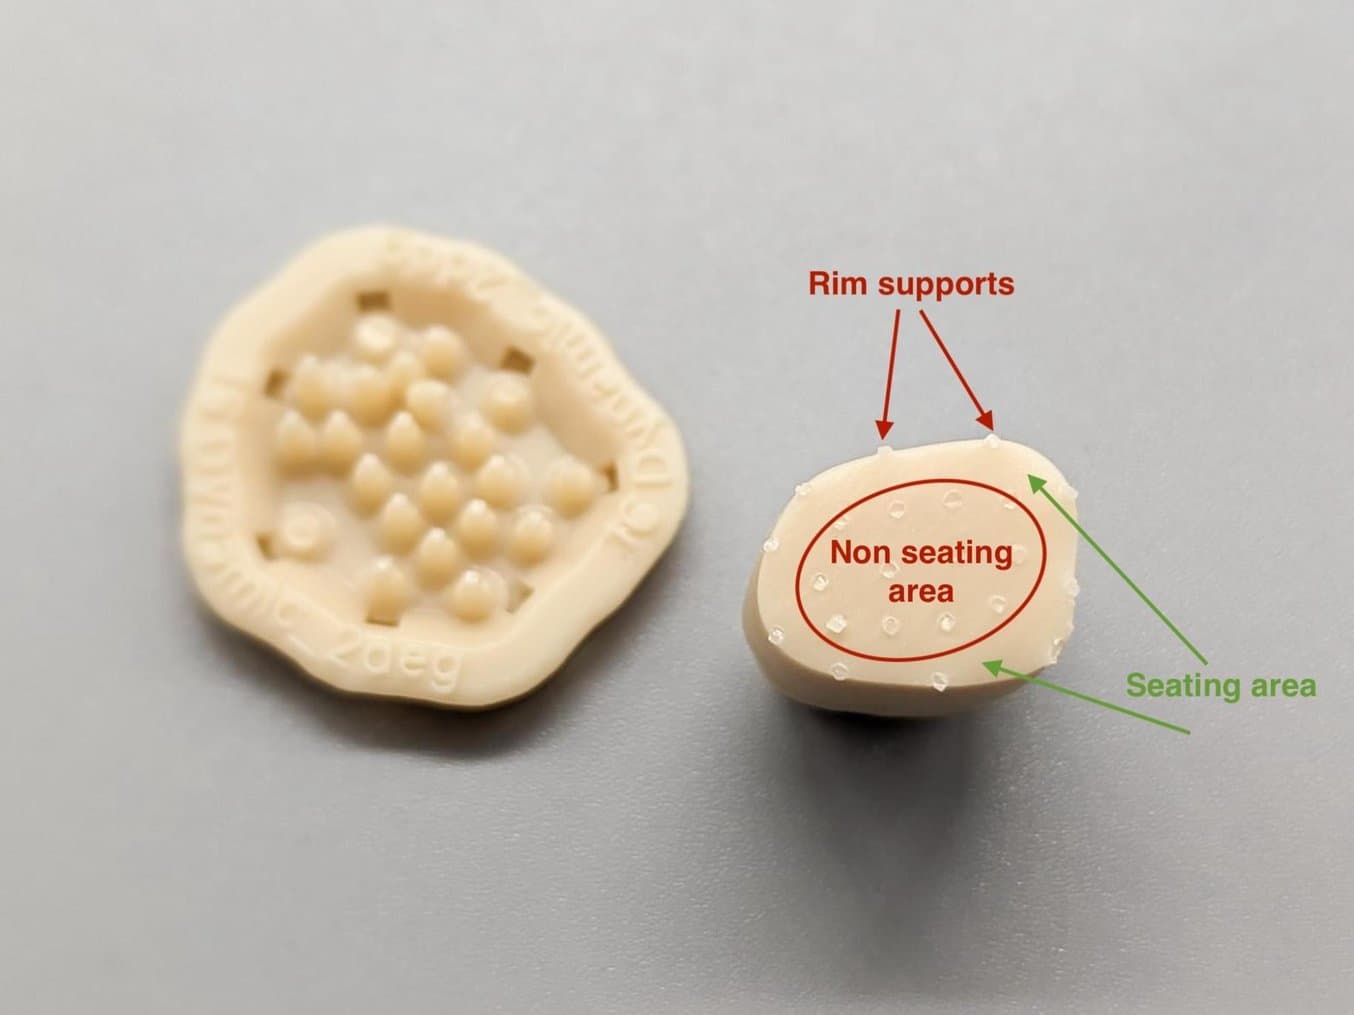
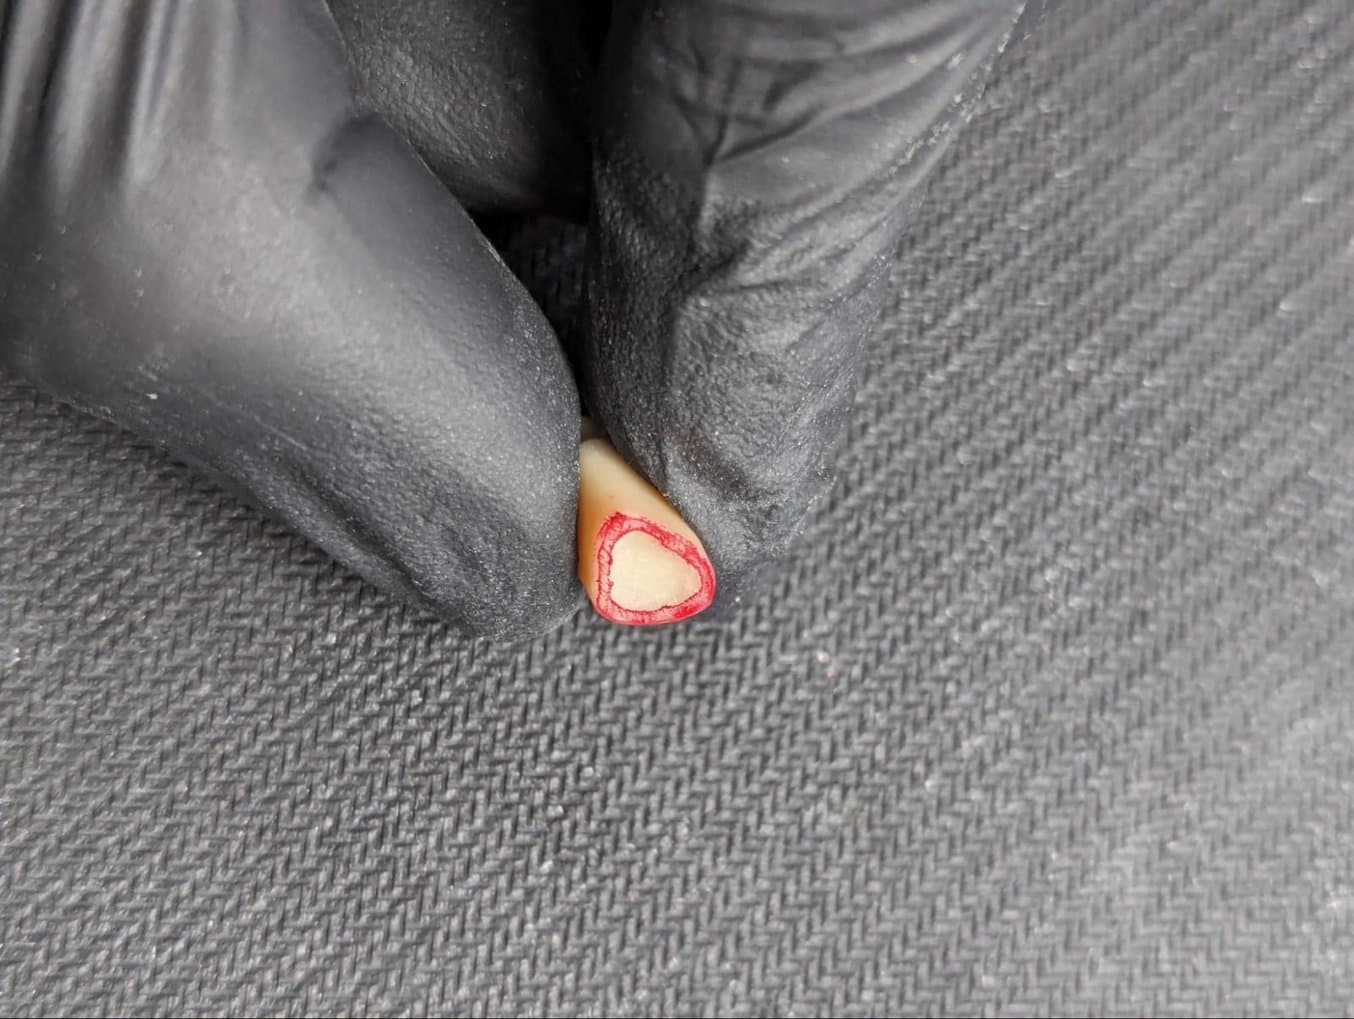
Immagine della base regolata di un moncone per un'aderenza ottimale. L'area interna non destinata al posizionamento è stata scavata per migliorare l'aderenza. Abbiamo utilizzato la carta per articolazione per evidenziare l'area di posizionamento che è rimasta intatta. Questa tecnica può rivelarsi molto utile per chi sta imparando a creare monconi sfilabili.
Assemblaggio
L'assemblaggio di monconi e modello deve essere eseguito con attenzione. Prima di iniziare a spingere il moncone verso il basso, individua con precisione la posizione, la rotazione e l'asse di inserimento. Le nostre impostazioni predefinite sono studiate per assicurare un fissaggio ottimale.
Consigliamo fortemente di utilizzare un lubrificante in polvere per ridurre la frizione e proteggere le superfici dei monconi da usura e abrasione. Il lubrificante in polvere più conveniente è il talco. Non utilizzare lubrificanti in polvere spray, poiché il propellente contenuto nelle bombolette può ammorbidire la resina.
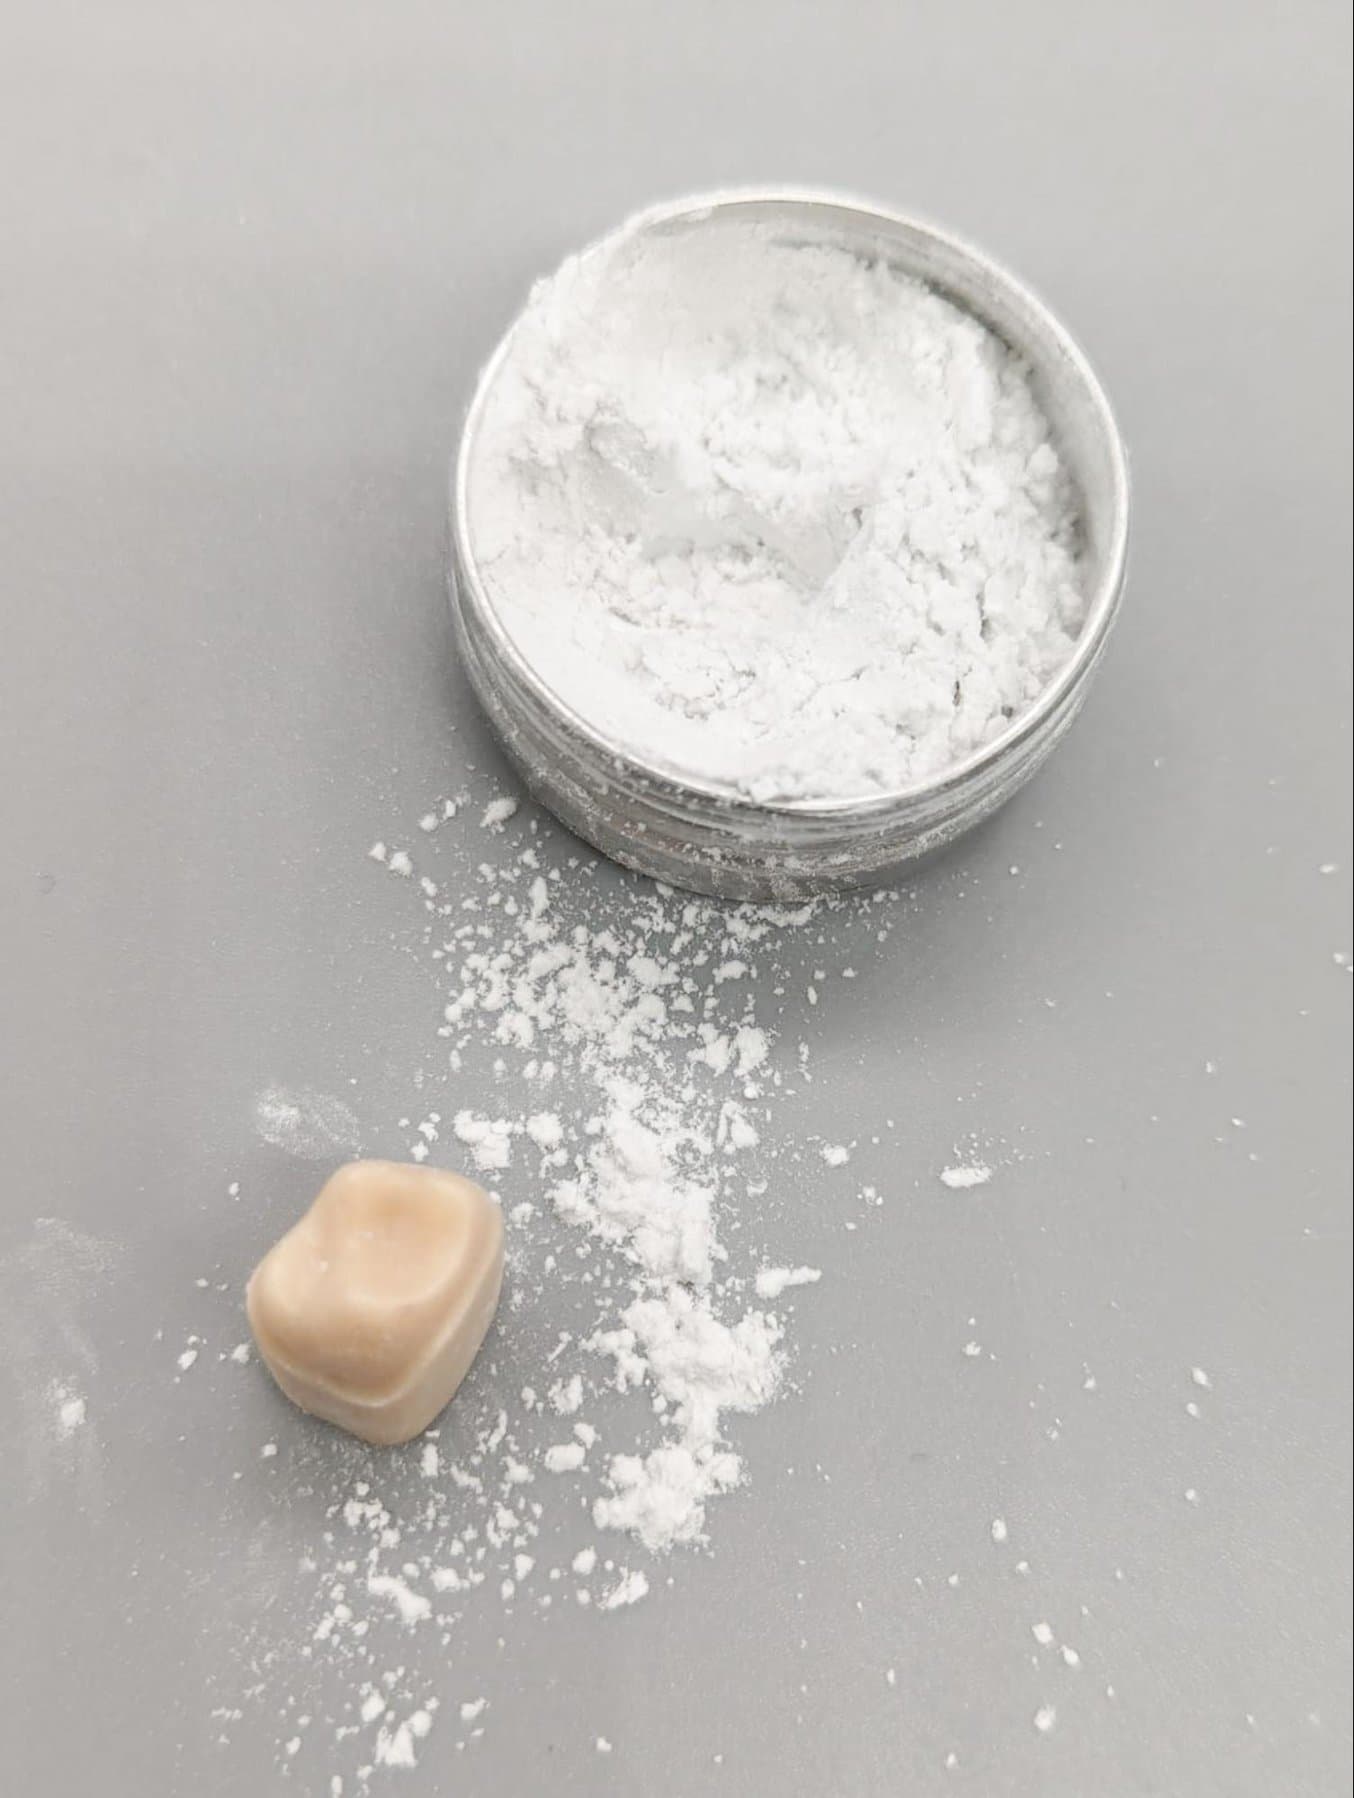
Utilizza il talco per facilitare l'inserimento e proteggere il moncone.
3.4 Cosa succede se il moncone è troppo stretto o troppo largo?
Formlabs offre una serie di impostazioni convalidate per i monconi sfilabili per semplificare l'uso e garantire uniformità. È possibile anche regolare queste impostazioni per personalizzare l'aderenza in base alla propria applicazione. Vediamo di seguito come modificare le impostazioni:
| Moncone troppo largo | Riduci di 10 µm il gioco orizzontale nel design del modello. Esempio: Gioco effettivo del moncone = 0,000 mm Nuovo gioco del moncone = -0,010 mm |
| Moncone troppo stretto | Aumenta di 10 µm il gioco orizzontale nel design del modello. Esempio: Gioco effettivo del moncone = 0,000 mm Nuovo gioco del moncone = 0,010 mm |
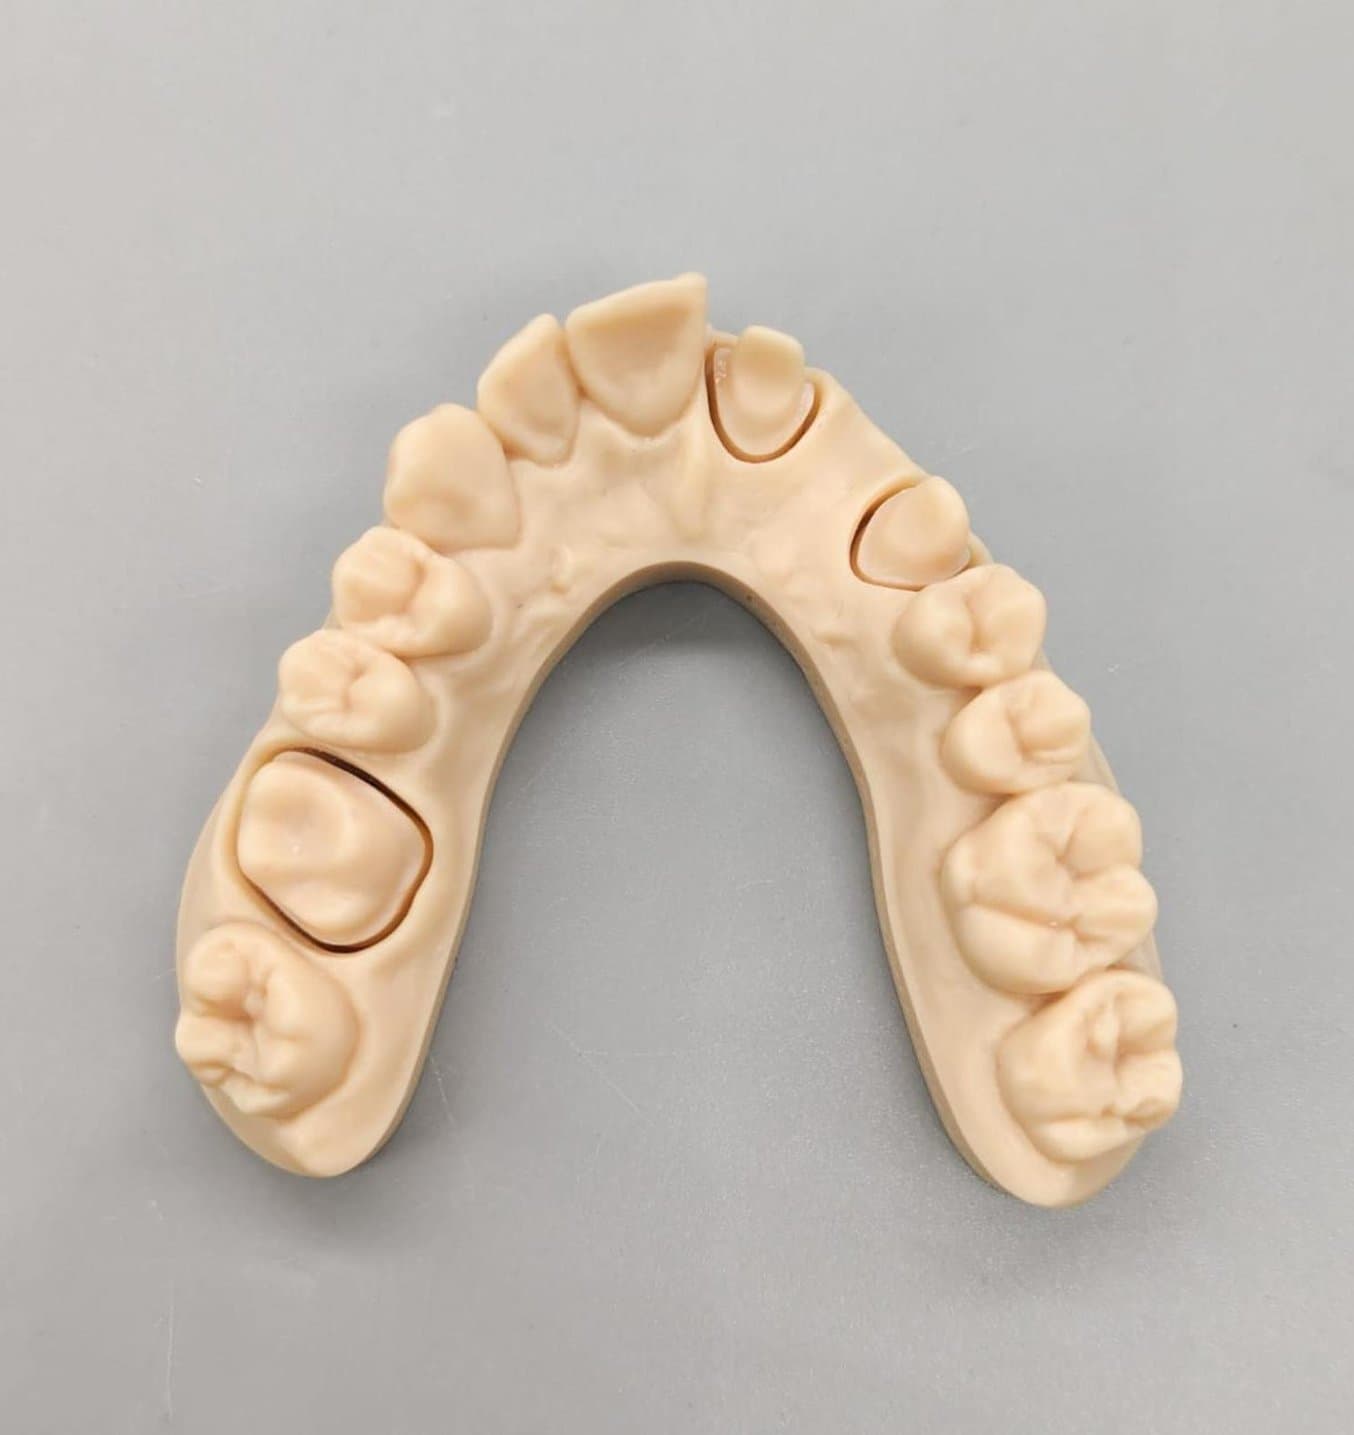
Complimenti, hai creato un modello di protesi odontoiatrica bello e accurato!
4. Risorse aggiuntive sulla progettazione di modelli dentali
3Shape
Consulta la documentazione del 3Shape Dental System installata con Dental System oppure guarda il video tutorial.
Aggiunta di fori di drenaggio con 3Shape:
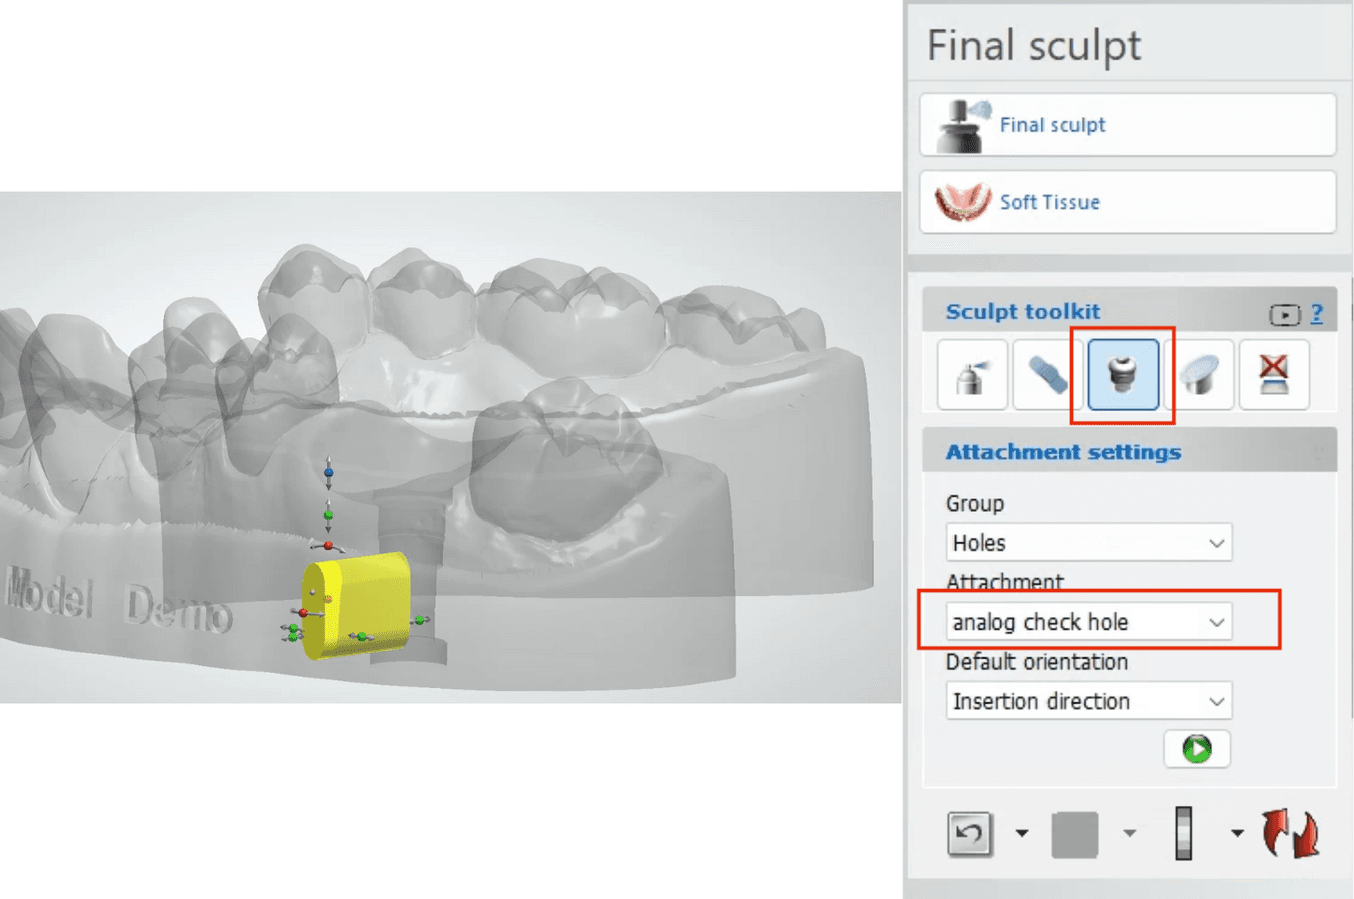
Per i monconi sfilabili, 3Shape aggiunge automaticamente dei fori di controllo dell'aderenza alla fessura del moncone, che fungono anche da fori di drenaggio.
Per gli analoghi di impianto, Formlabs mette a disposizione un catalogo di elementi che viene installato con il file DME della Precision Model Resin.
-
Seleziona l'elemento "analog check hole" (foro di controllo dell'analogo).
-
Inserisci il foro nel modello. Il foro deve essere applicato in un punto che consenta di visualizzare il posizionamento dell'analogo senza compromettere la sicurezza della sua posizione.
exocad
Consulta la pagina Wiki sul Model Creator di exocad oppure guarda il video tutorial.
Aggiunta di fori di drenaggio con exocad:
I fori di drenaggio vanno aggiunti manualmente al modello su exocad. Il software è dotato di un elemento progettato per i modelli a questo scopo.
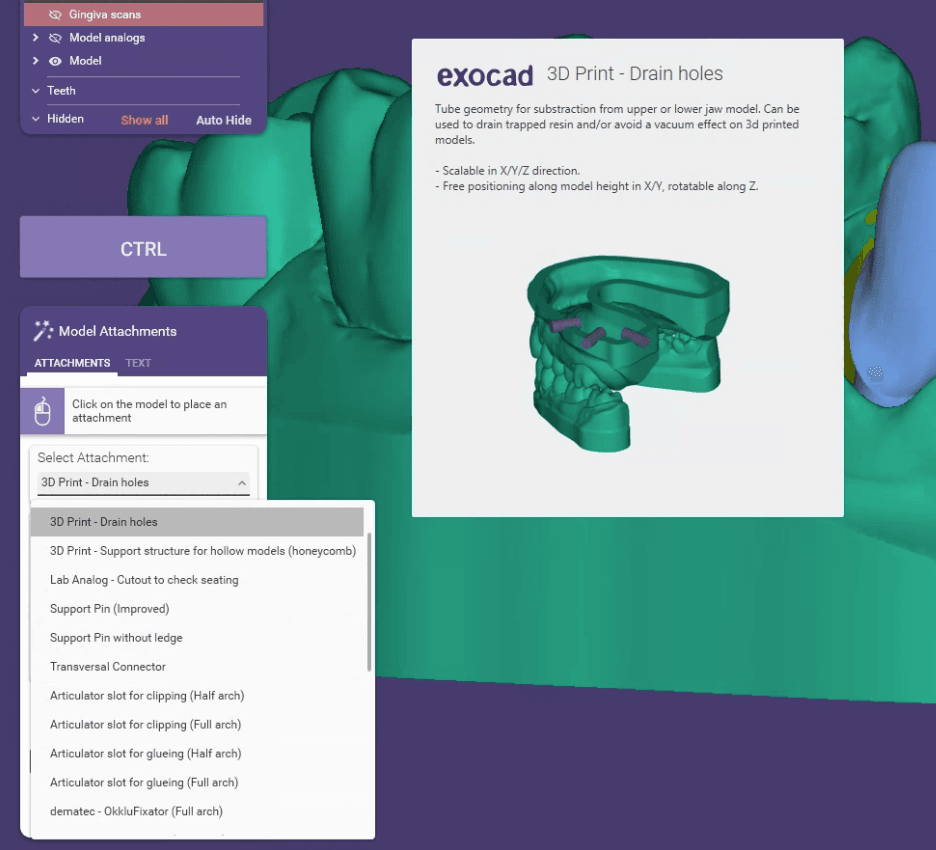
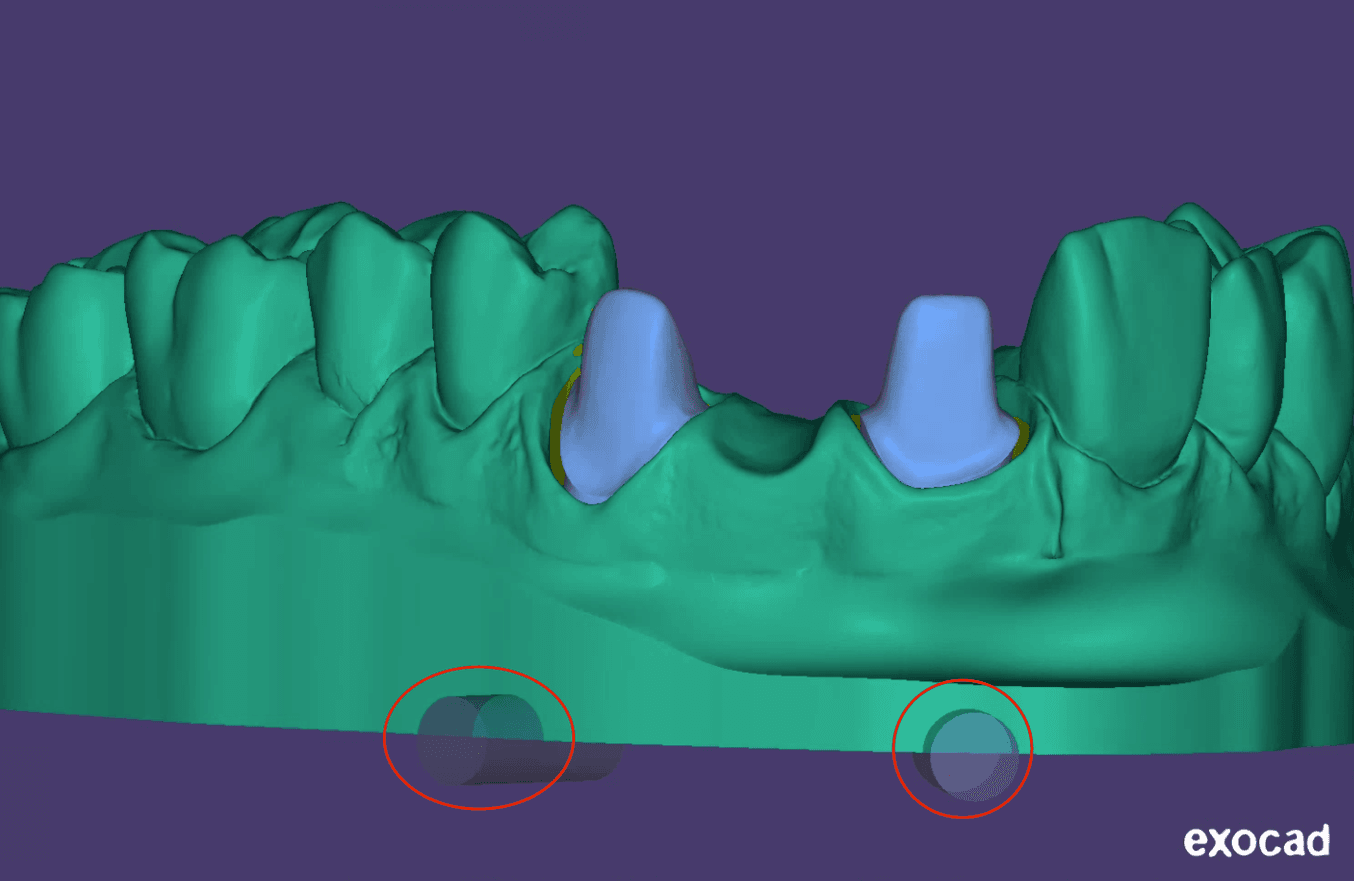
exocad mette a disposizione un catalogo per la realizzazione di fori di drenaggio per analoghi di impianto, disponibile nella fase di selezione degli elementi nel Model Creator:
-
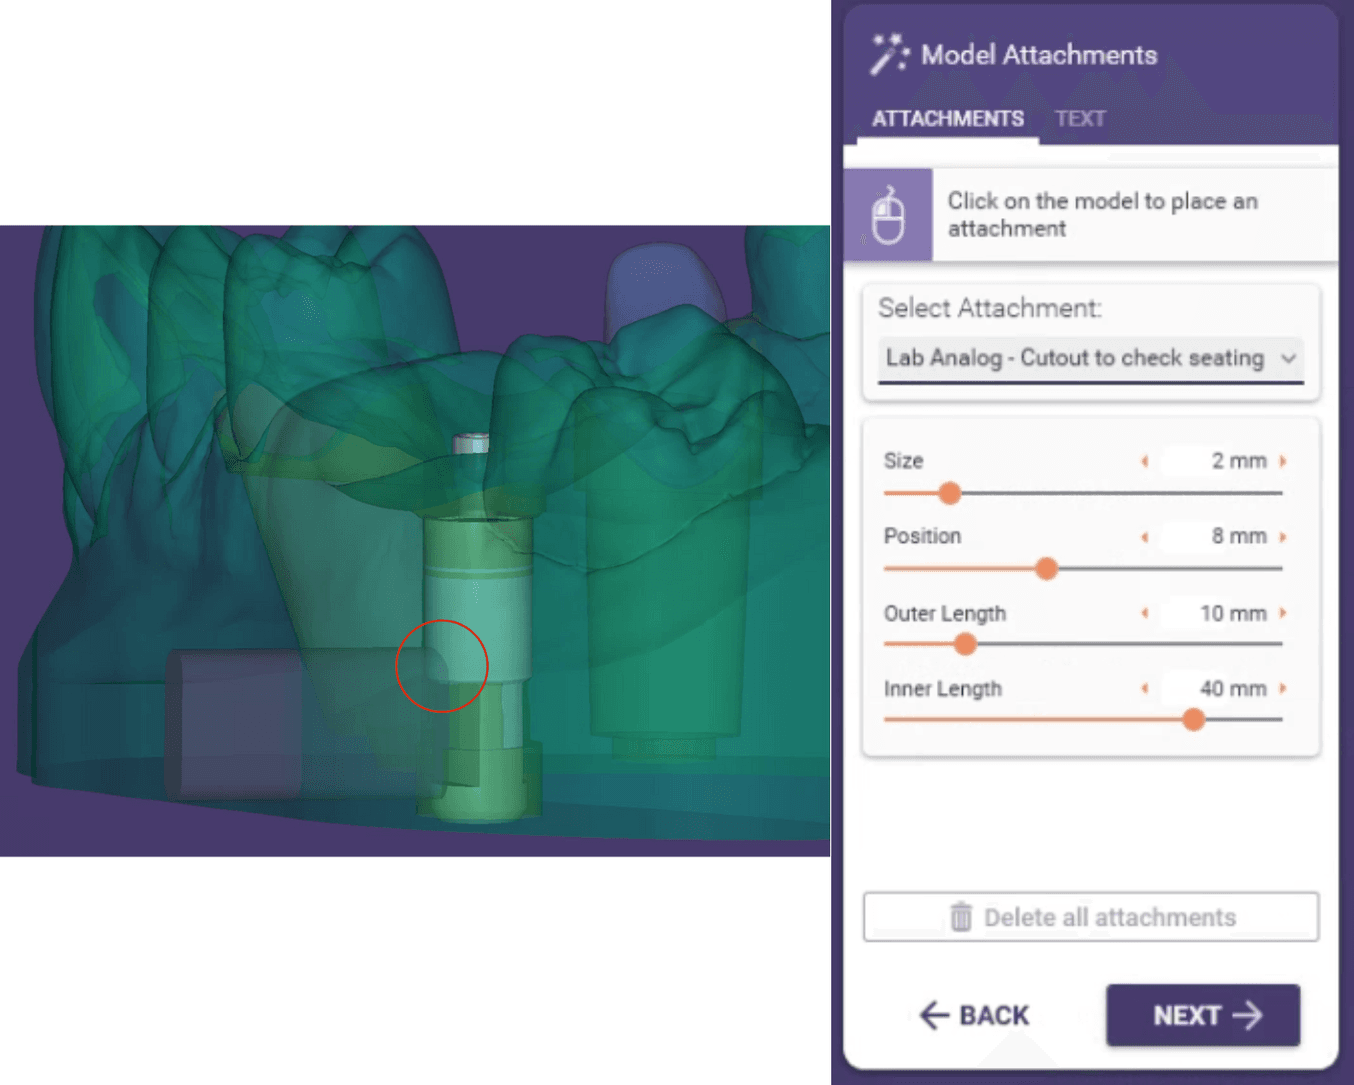
Seleziona l'elemento "Lab Analog - Cutout to check seating" (Analogo - intaglio per il controllo del posizionamento).
-
Inserisci il foro nel modello. Il foro deve essere applicato in un punto che consenta di visualizzare il posizionamento dell'analogo senza compromettere la sicurezza della sua posizione.
Risorse aggiuntive
Esplora le risorse di Formlabs per l'odontoiatria e scopri guide approfondite, tutorial dettagliati, whitepaper, webinar e molto altro.


