
3D-Druck von Okklusions- und Knirscherschienen mit SLA-Druckern von Formlabs
Formlabs provides two distinct materials for splint fabrication:
-
Dental LT Clear Resin: A fracture-resistant option for rigid occlusal splints and guards.
-
Dental LT Comfort Resin: A durable material designed for comfortable, flexible occlusal splints, night guards, and bleaching trays.
These resins are biocompatible Class II/IIa materials approved for long-term intraoral use in both the U.S. and EU. Both materials can be easily polished to achieve high optical transparency and are formulated to resist discoloration over time.
This guide details the complete workflow for producing 3D printed occlusal splints using Formlabs SLA 3D printers, ensuring precise outcomes at every step.
3D-Druck von Okklusions- und Knirscherschienen mit SLA-Druckern von Formlabs

Formlabs provides two distinct materials for splint fabrication:
-
Dental LT Clear Resin: A fracture-resistant option for rigid occlusal splints and guards.
-
Dental LT Comfort Resin: A durable material designed for comfortable, flexible occlusal splints, night guards, and bleaching trays.
These resins are biocompatible Class II/IIa materials approved for long-term intraoral use in both the U.S. and EU. Both materials can be easily polished to achieve high optical transparency and are formulated to resist discoloration over time.
This guide details the complete workflow for producing 3D printed occlusal splints using Formlabs SLA 3D printers, ensuring precise outcomes at every step.
Essentials
Provided by the Dentist
-
A physical or digital impression of the patient’s dentition
-
A prescription with desired type of occlusal splint
Made by Formlabs
-
Resin Tank for each resin
-
Form 4 Mixer for each resin
Made by Third Parties
-
A dental handpiece and tools for acrylics
-
Isopropyl alcohol (IPA)
-
Optional:
-
Desktop scanner ( to digitize a physical impression )
-
A steam cleaner
-
An ultrasonic bath
-
Pumice and polishing compound
-
Needed From the Dentist
Provided by the Dentist
-
A physical or digital impression of the patient’s dentition
-
A prescription with desired type of occlusal splint
Made by Formlabs
-
Resin Tank for each resin
-
Form 4 Mixer for each resin
Made by Third Parties
-
A dental handpiece and tools for acrylics
-
Isopropyl alcohol (IPA)
-
Optional:
-
Desktop scanner ( to digitize a physical impression )
-
A steam cleaner
-
An ultrasonic bath
-
Pumice and polishing compound
-
Workflow Requirements
Made by Formlabs
Latest PreForm Dental and Firmware versions
Made by Third Parties
Dental design software or outsourcing to a dental design provider
Made by Formlabs
Latest PreForm Dental and Firmware versions
Made by Third Parties
Dental design software or outsourcing to a dental design provider
Workflow Requirements
Dental design software requires a digital impression of the patient’s anatomy in order to design an occlusal splint or guard. To acquire this data, scan the patient directly with a 3D intraoral scanner or scan a physical impression or a poured model with a desktop 3D scanner.

Workflow Requirements
2.1 Design the Appliance
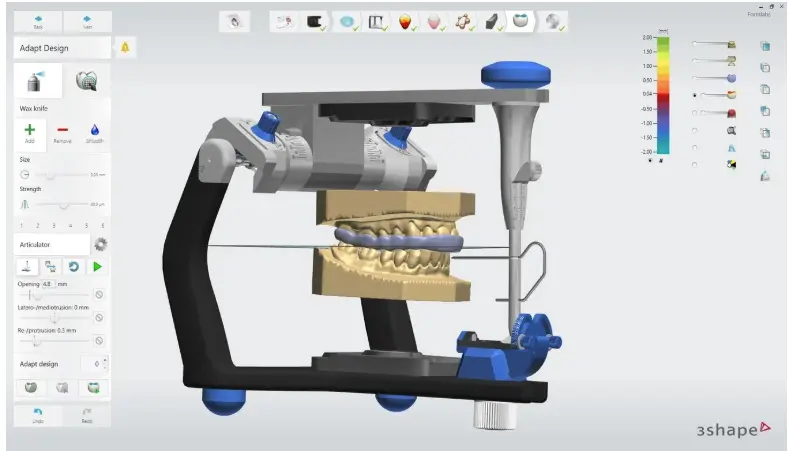
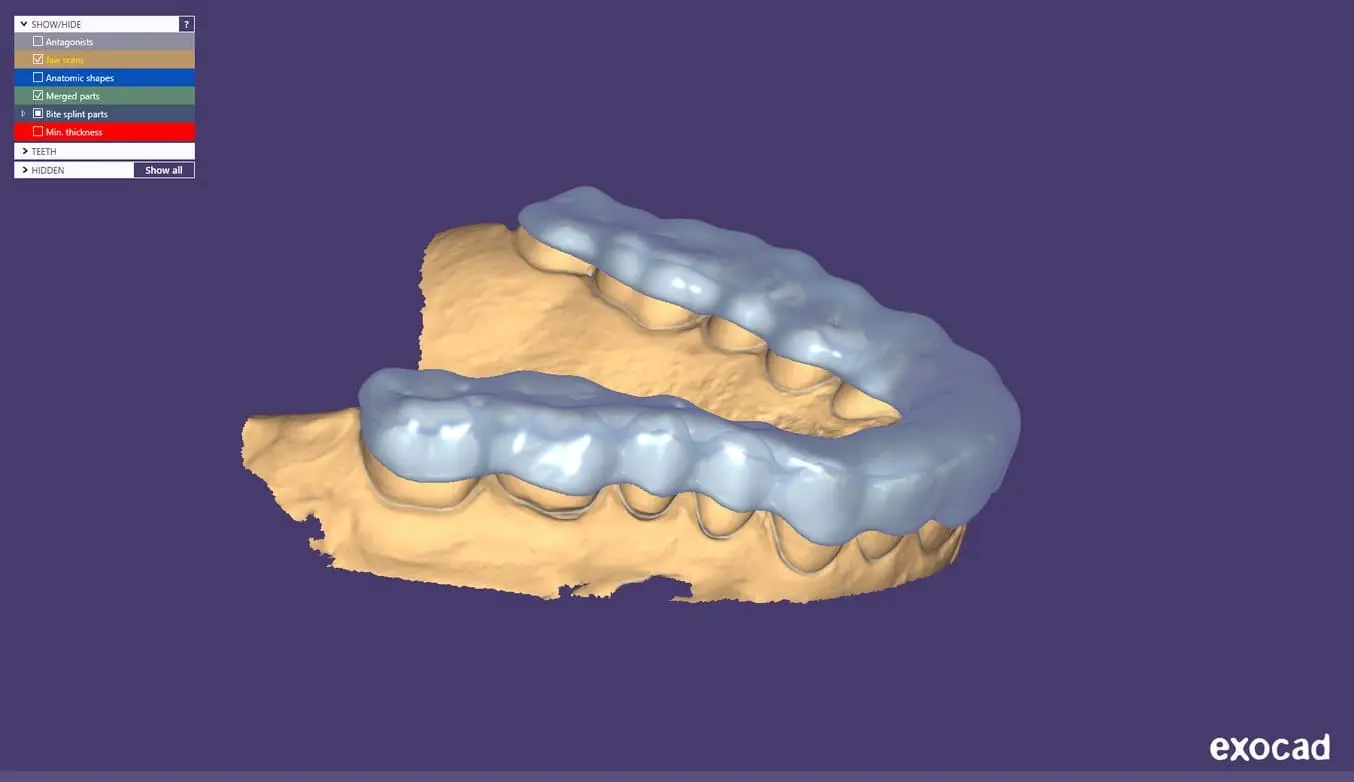
Es gibt viele Softwareoptionen für das digitale Design von Okklusionsschienen. In diesem Anwendungsleitfaden gehen wir auf die Parameter von 3Shape Dental System und ExoCAD ein.
Außerdem gibt es Anbieter für zahnmedizinisches CAD, denen Sie die digitalisierte Abformung zusenden können, um ein Design zu erhalten.
Allgemeine Anforderungen an die Konstruktion
Bitte befolgen Sie den entsprechenden Fertigungsleitfaden für materialspezifische Konstruktionsanforderungen wie etwa die Mindeststärke der Okklusionsfläche und die Mindestwandstärke.
Einstellungen in 3Shape & exocad
Dental LT Clear Resin (V2): Ein Versatz von 0,05 mm bis 0,1 mm (je nach Fall und gewünschter Anschmiegung: je kleiner der Wert, desto enger die Passung)
Dental LT Comfort Resin: Ein Versatz von 0,0 mm bis -0,03 mm (je nach Fall und gewünschter Anschmiegung: je kleiner der Wert, desto enger die Passung)


2.2 Export the STL File
Once the case has been designed to specification, manufacturing can begin. The majority of dental design software generates a manufacturing file in STL format. Locate the file and move it into the print preparation software, PreForm Dental.
3. Print
Note
Use latest PreForm and Firmware versions
3.1 Import File(s)
Follow the instructions to activate Dental Workspace for PreForm. Open PreForm and set up your splint print job using an adequate preset. You can find instructions here on:
-
How to activate and use Dental Workspace from PreForm
-
How to create a preset
PreForm Dental Workspace will take care of importing, orienting, and supporting your splint in an optimal way.


3.2 Adjust Touchpoints
The PreForm Dental Workspace auto-generates supports based on material properties. Your supports might be at unsuitable areas like antagonist contact impressions or dynamic occlusal contact surfaces. For optimal results, we recommend entering the Support menu and adjusting touchpoints as needed.
Be sure not to reduce the number of supports and always properly support the parts of the splint closest to the build plate.
PreForm will indicate in red what areas might require additional support.
Confirm under the Job Info menu bar on the right side of the window that Printability has green thumbs-up.

3.3 Layout
Bei normalen Drucken empfehlen wir, die Teile in der Mitte der Konstruktionsplattform zu platzieren.
Beim Druck mehrerer Teile optimieren überlappende Rafts die Ausnutzung des Konstruktionsvolumens. Zudem sparen Sie so Material.

3.4 Sending the Job to the Printer
Send the job to the printer by clicking the orange printer icon on the left.
The Print dialog box will open. Click the orange Print Now or Upload Job button to send the job to the printer (whether you see one or the other button in this dialog depends on the current configuration of the selected printer).

3.5 Set Up the Printer
Shake the splint material cartridge and then insert the cartridge, a build platform, and a compatible resin tank into the Form 4B 3D printer.
-
Begin printing by selecting the print job from the printer’s touch screen
-
Follow any prompts or dialogs shown on the printer screen
-
The printer will automatically complete the print
Attention
For full compliance and biocompatibility, splint materials require a dedicated Resin Tank and Build Platform. Only use the Form Wash with other Formlabs biocompatible resins, such as Surgical Guide Resin.
4. Post Processing
Caution
Always use gloves when handling uncured resin and parts.
Note
Post processing steps for Dental LT Clear Resin (V2) and Dental LT Comfort Resin are different. Please refer to your splint material’s manufacturing guide for the appropriate details.
Needed From the Dentist
Remove printed parts from Form 4 Flex Build Platform by pushing the quick release handles. Use a spatula if you printed on the Form 4 Build Platform.
Tip
Printed parts can also be washed directly on the build platform in the Form Wash.


Needed From the Dentist
Precautions
-
When washing the printed part with solvent, it should be in a properly ventilated environment with proper protective masks and gloves.
-
Expired or unused resin shall be disposed of in accordance with local regulations.
-
IPA shall be disposed of in accordance with local regulations.
-
Use a dedicated wash for biocompatible parts to avoid contamination
Place the printed parts in a Form Wash (Second Generation) filled with isopropyl alcohol (IPA) and wash them using the recommended wash time as specified in the manufacturing guide for your splint material.
Alternatively, an ultrasonic wash unit may be used, see manufacturing guide for specific directions.
Make sure the parts are fully submerged in IPA when washing.

Notice
Exceeding wash duration may affect dimensional accuracy and performance of printed parts over time.
Notice
Exceeding wash duration may affect dimensional accuracy and performance of printed parts over time.

Needed From the Dentist
Notice
For optimal mechanical properties and biocompatibility, it is essential to observe the recommended drying times after washing the printed parts in alcohol, before placing them in the Form Cure.
Remove parts from the IPA and leave to air dry at room temperature. Refer to your resin’s manufacturing guide for the exact drying time.
Inspect printed parts to ensure that they are clean and dry.
No residual alcohol, excess liquid resin, or residue particles may remain on the surface before proceeding to subsequent steps.
4.4 Post-Curing
Place the dried printed parts in a Form Cure and post-cure using the recommended post-cure settings for your splint material. Please refer to the manufacturing guide.

Needed From the Dentist
Supports can be removed using a cutting disk or sharp tweezers.


Tip
While ripping the supports from the part might be quicker, it can leave divots in the part. We recommend cutting the supports off individually.
Untersuchen Sie die dentale Anwendung. Falls Sie Risse entdecken, entsorgen Sie das Teil und drucken Sie es erneut.

4.6 Finishing and Polishing
Using a handpiece and a carbide cutter or universal silicone wheel, smooth the support surfaces. The tools and polishing compounds employed for conventional acrylic appliances are suitable. For a high-gloss finish, the quickest and simplest method involves using a lathe with pumice and a high-gloss polishing compound designed for acrylics.
For dental practices without lathe access, the same outcome can be achieved as explained in this video.


Optional
Verify the vertical dimension of the appliance and make adjustments as needed.
5. Care Instructions
Vollständig nachbearbeitete Teile können gereinigt und desinfiziert werden. Bitte entnehmen Sie die detaillierten Empfehlungen dem Fertigungsleitfaden Ihres Schienen-Druckmaterials.