
Note: For the best results, use the latest version of PreForm and printer firmware.
WHITE PAPER
3D Printing Temporary Applications: Full-Arch Implant-Supported Appliances, Single-Units, and Bridges
This application guide is a step-by-step walkthrough of the workflow for producing temporary full-arch implant-supported appliances (All-on-X), and temporary single-units and bridges with Formlabs Premium Teeth Resin and Formlabs Dental 3D printers. Always consult the official Manufacturing Guide and Instructions for Use documents for both All-on-X and provisional restorations for the absolute requirements.
3D Printing Temporary Applications: Full-Arch Implant-Supported Appliances, Single-Units, and Bridges
Download as PDFThis application guide is a step-by-step walkthrough of the workflow for producing temporary full-arch implant-supported appliances (All-on-X), and temporary single-units and bridges with Formlabs Premium Teeth Resin and Formlabs Dental 3D printers. Always consult the official Manufacturing Guide and Instructions for Use documents for both All-on-X and provisional restorations for the absolute requirements.
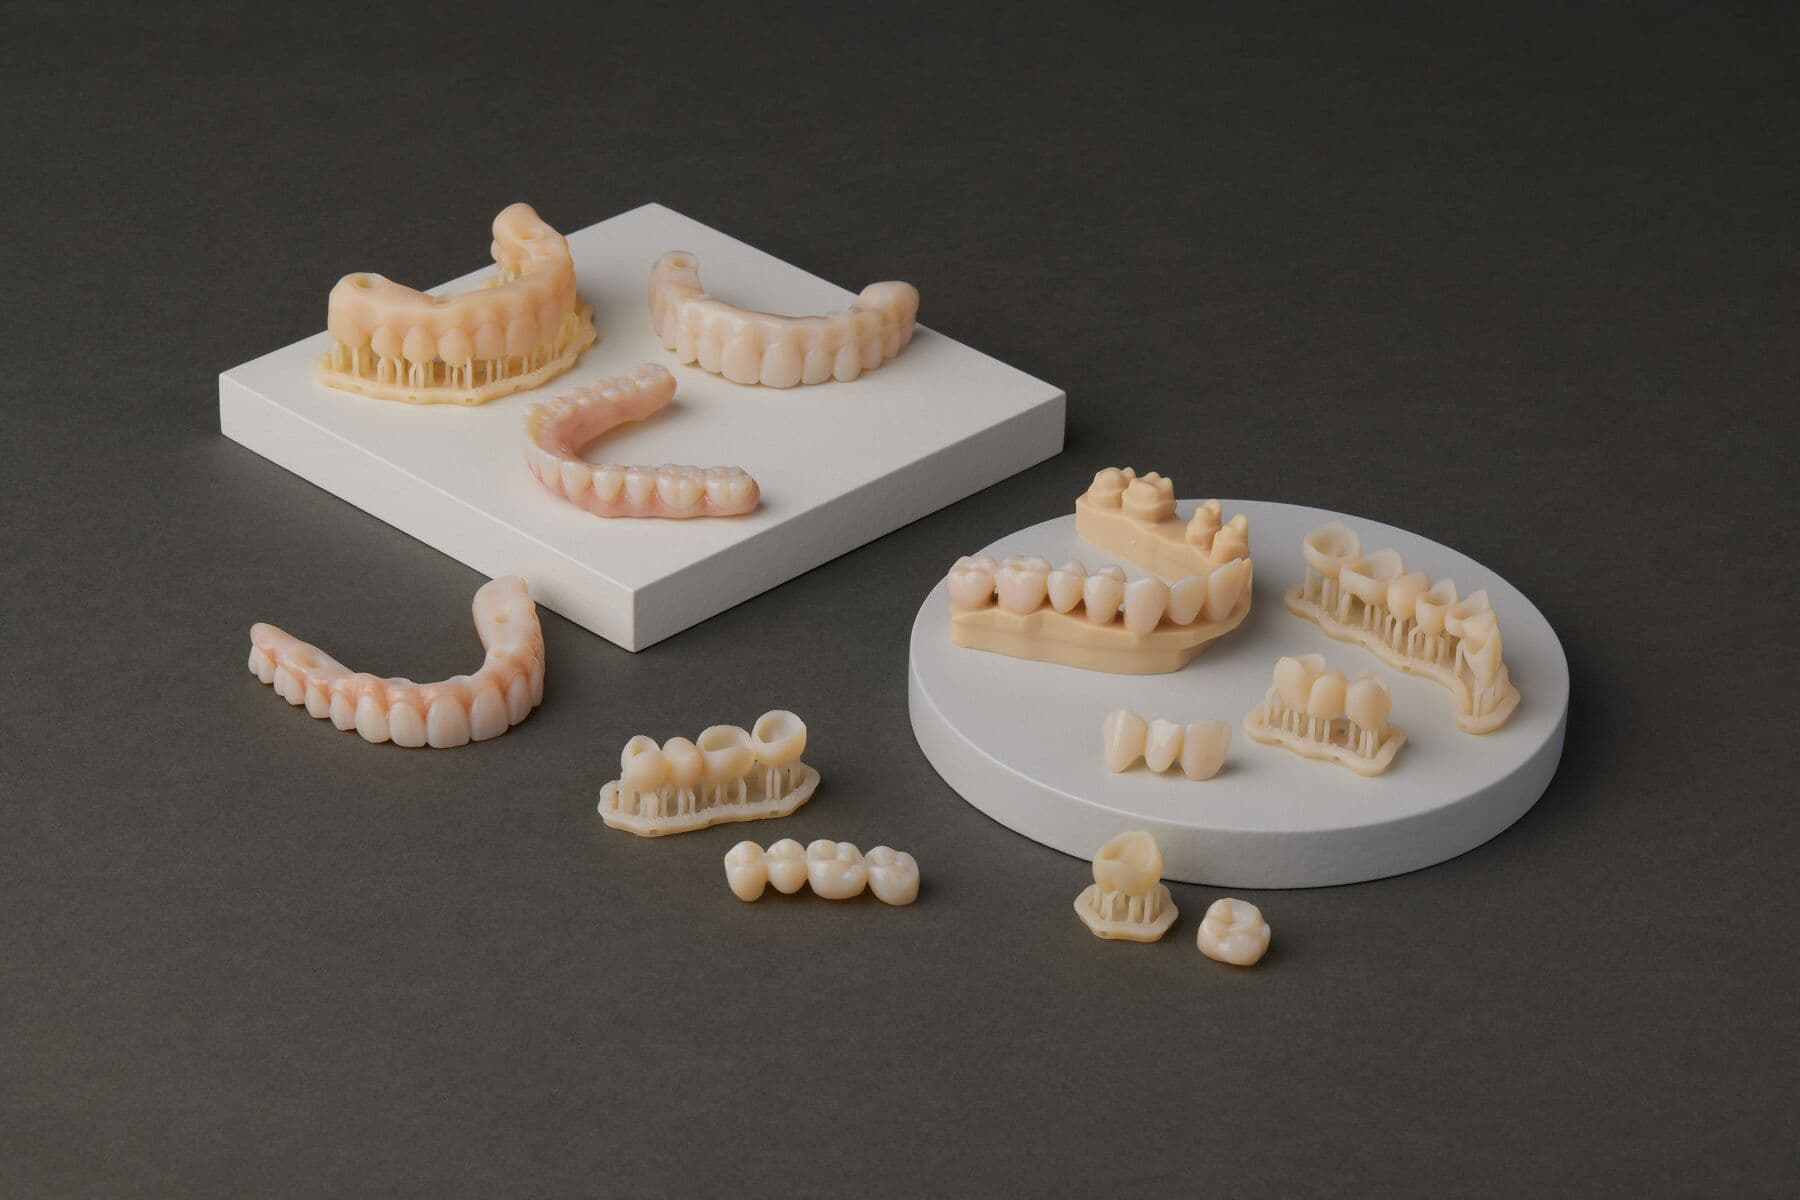
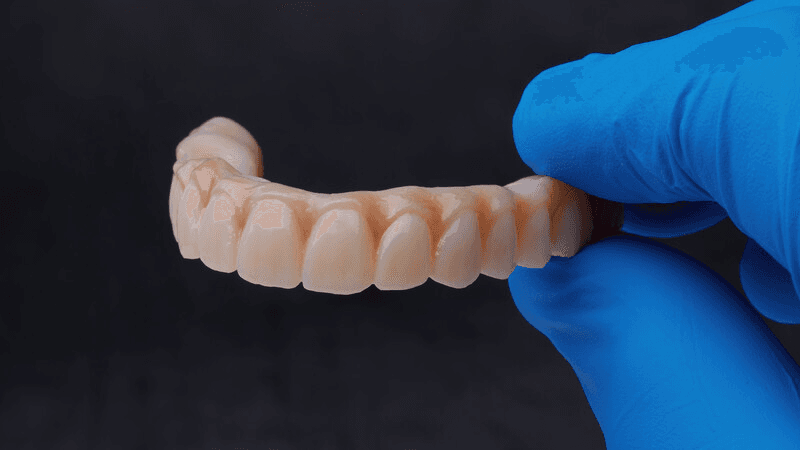
Premium Teeth Resin allows dental professionals to grow and expand production with an efficient, cost-effective 3D printed solution for the production of temporary full-arch implant-supported restorations, temporary single units, and bridges. This tooth-colored formulation is a nano-ceramic-filled biocompatible material with enhanced aesthetics, superior intraoral mechanical properties, and validated longevity to guarantee optimal clinical performance. Indicated for up to seven-unit bridges and available in four shades, this highly filled material provides excellent marginal adaptation, strength, and aesthetics. Use traditional temporary cements to attach restorations produced with Premium Teeth Resin for up to 12 months.
This application guide details the critical considerations and steps for going from a digitized patient model to a 3D printed appliance on Formlabs stereolithography (SLA) 3D printers and post-processing ecosystem. Use the following workflow to ensure precise results.
For more information, please refer to the Manufacturing Guide.
Book a Free Consultation
Get in touch with our dental 3D printing experts for a 1:1 consultation to find the right solution for you.
Workflow Requirements
Needed From the Dentist
- A physical or digital impression of the patient's intraoral anatomy
- Bite registration
- Prescription with desired tooth shape, shade, and other clinical considerations
Required Hardware and Materials
Made by Formlabs
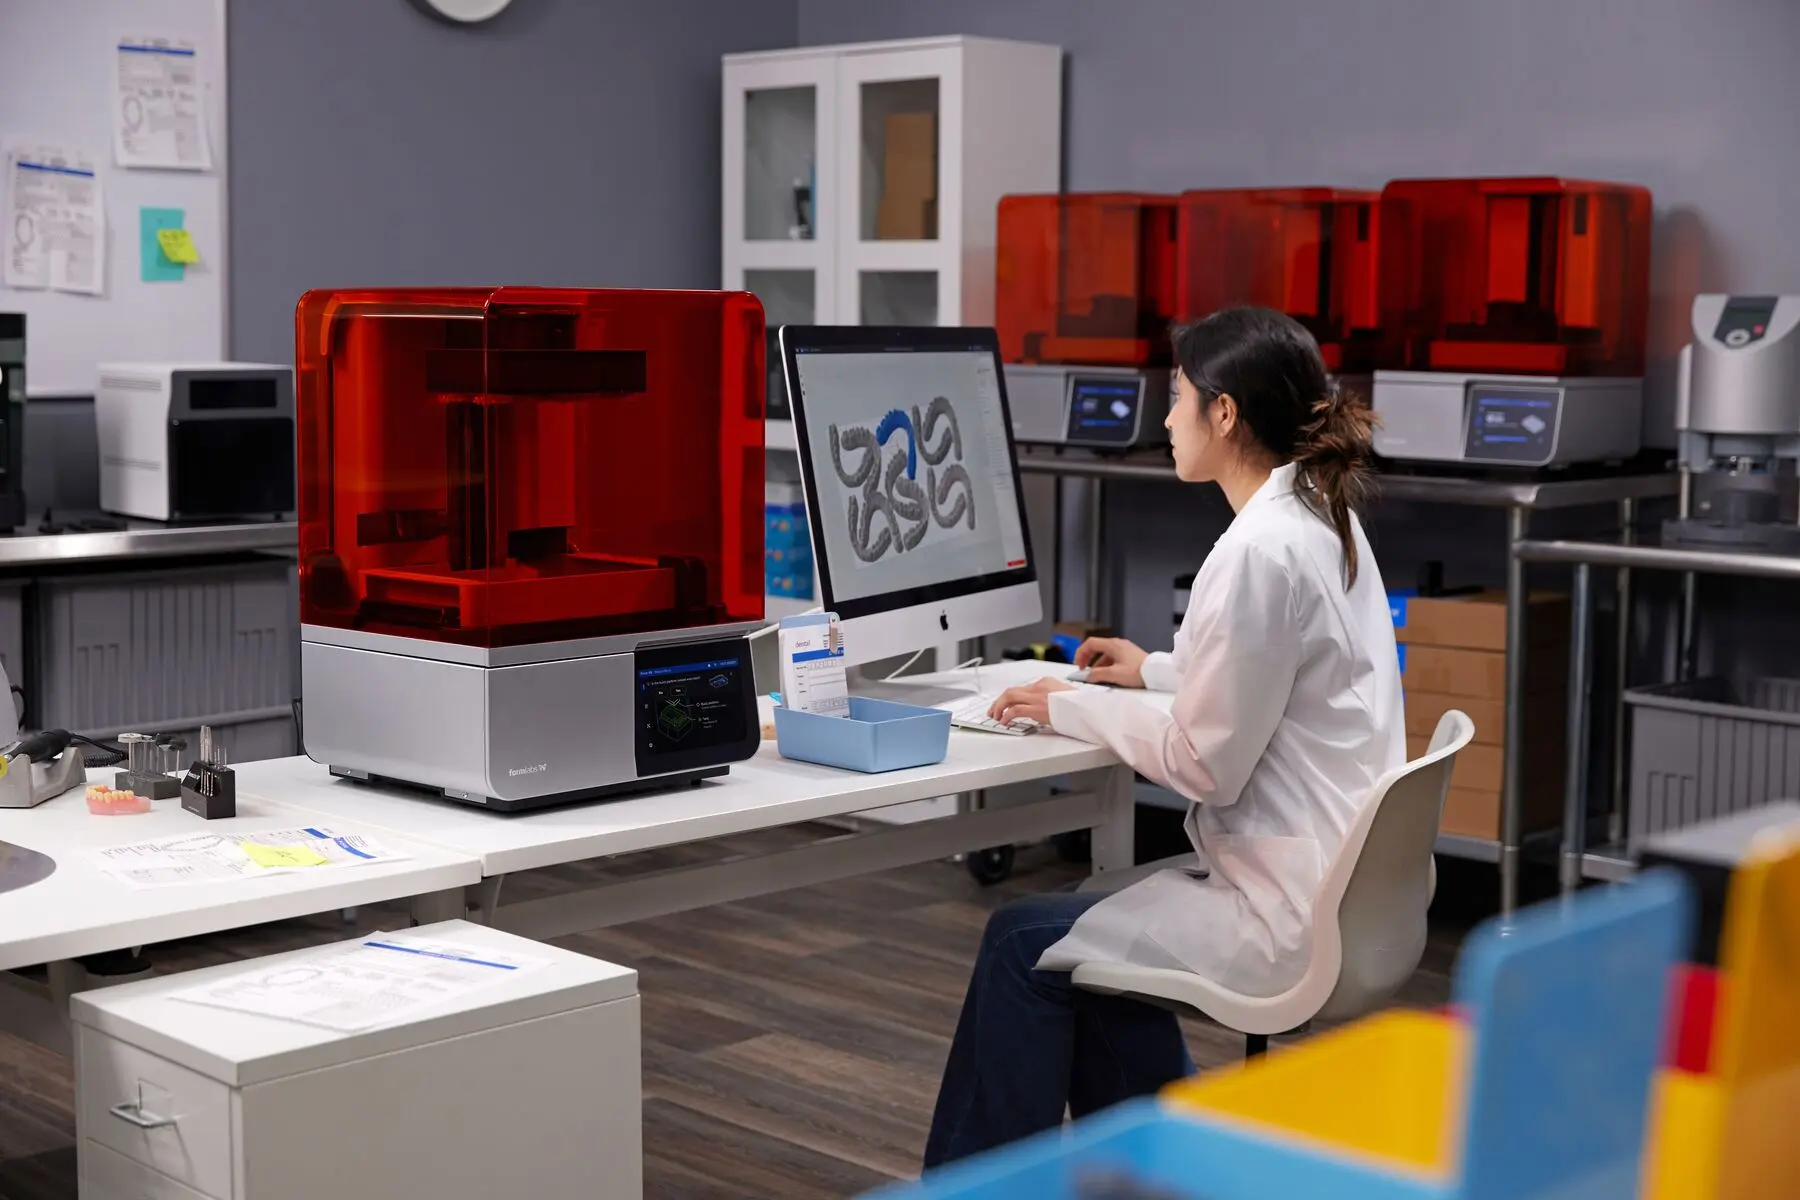
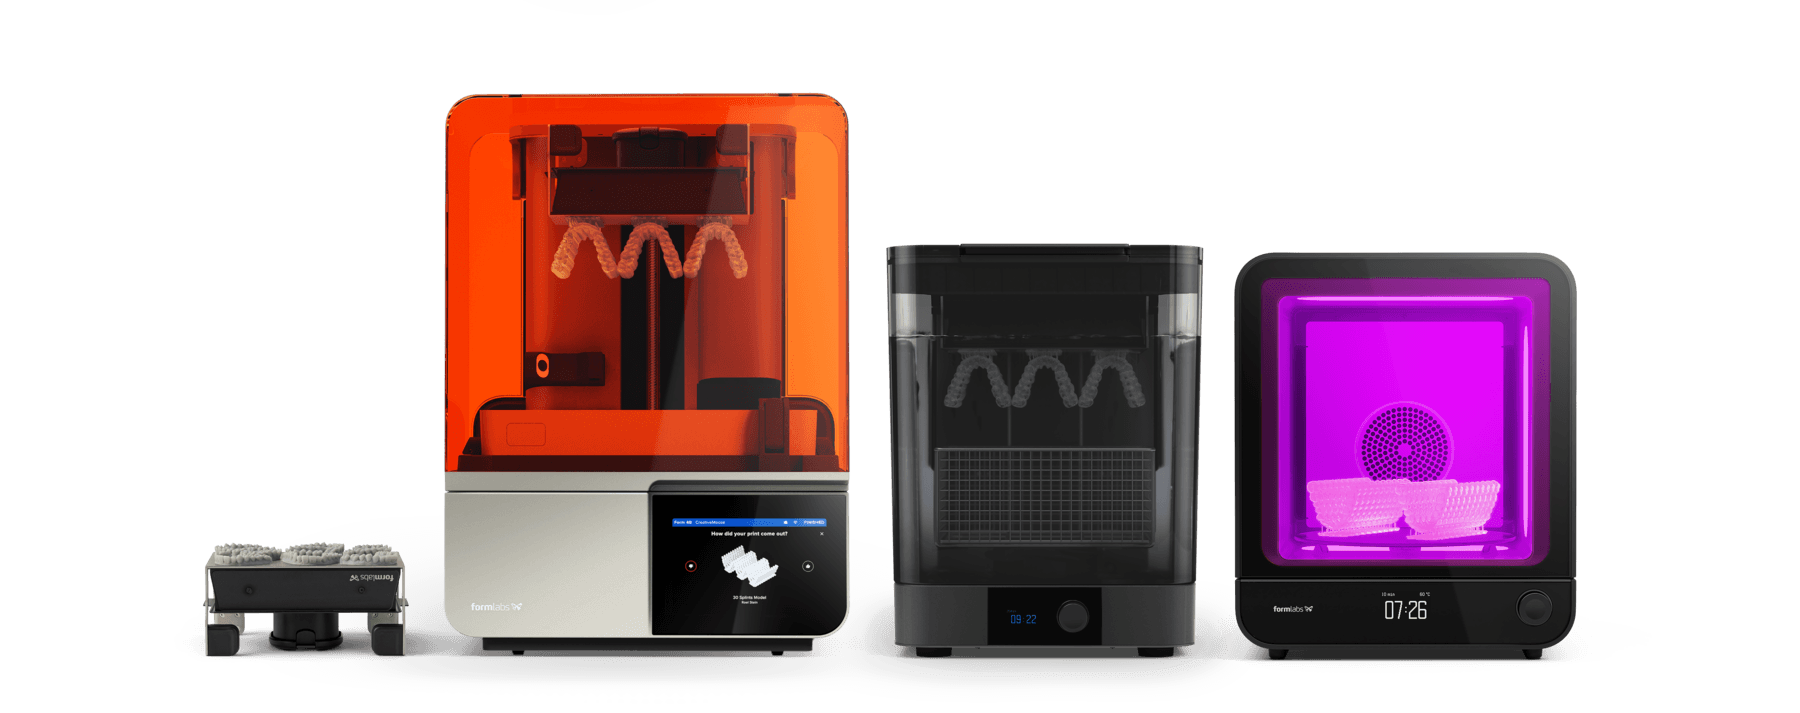
- Form 4B, Form 4BL, Form 3B/+, or Form 3BL SLA 3D printer
- Form 4 Resin Tank, Form 4L Resin Tank, Form 3 Resin Tank, or Form 3L Resin Tank
- Compatible Build Platform* used with biocompatible materials only
- Premium Teeth Resin
- Form Wash, Form Wash L, or Ultrasonic Bath
- Formlabs validated curing unit: Form Cure, Form Cure, Form Cure L, or Fast Cure
- Finishing kit or secondary wash station
*Do not use the Stainless Steel Build Platform as the material might experience over-adherence to the build plate surface.
Made by Third Parties
- Gloves
- Silicone tongs (for removing parts from the Fast Cure)
- Dental handpiece with cutting discs and finishing wheels, composite polishers, and other cutting tools
- Handheld UV light cure unit (dependent on the cementing agent selected)
- Lathe with rag wheel for polishing (optional)
- Steam cleaner (optional)
- Synthetic pumice and polishing compound (optional)
- Desktop scanner (if the lab receives physical impression or model)
- Scraping tool
- Paper towels
- Compressed air nozzle
- A toothbrush or pipe cleaner
- Squeeze bottle filled with isopropyl alcohol (IPA)
- IPA ≥99%
- Implant components
- Temporary cement
- Pink composite for characterization on the gum portion
- Staining and glaze kit (e.g. GC Optiglaze™ or VITA Akzent LC) and brushes
Required Software
Made by Formlabs
- PreForm Dental 3.33.3 or higher (we recommend updating to the latest version)
- Firmware 2.2.1 or higher (we recommend updating to the latest version)
Made by Third Parties
- Design software developed for this application (refer to the table below)
| Purchased CAD | Pay-per-case CAD | Design service |
|
Unlimited usage Best for high production and is likely more powerful |
No upfront fees Best for low volume and control |
Pay-per-case No access to CAD, send files and Rx |
|
Examples: |
Examples: |
Examples: |
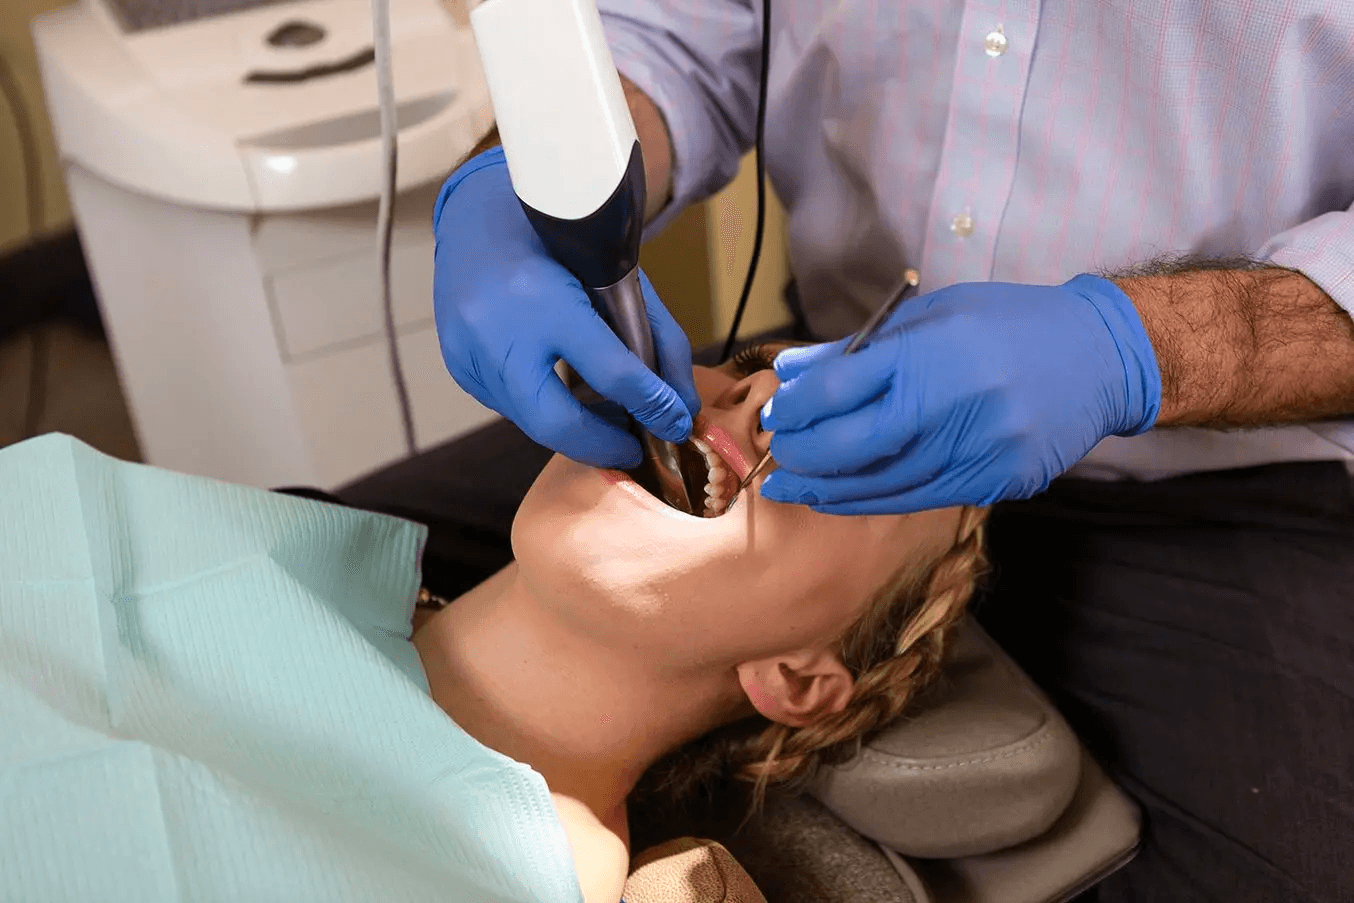
1. Scan
An intraoral scan or a 3D scan from a plaster model of the patient's oral anatomy, a digital or physical bite registration, and an additional scan with scan markers are needed to design an implant-supported restoration.
While photographs and CBCT scans of the bone structure are optional, many design software platforms can integrate this data. Photographs are particularly valuable for case planning and setup, especially in complex cases like full-mouth rehabilitation.
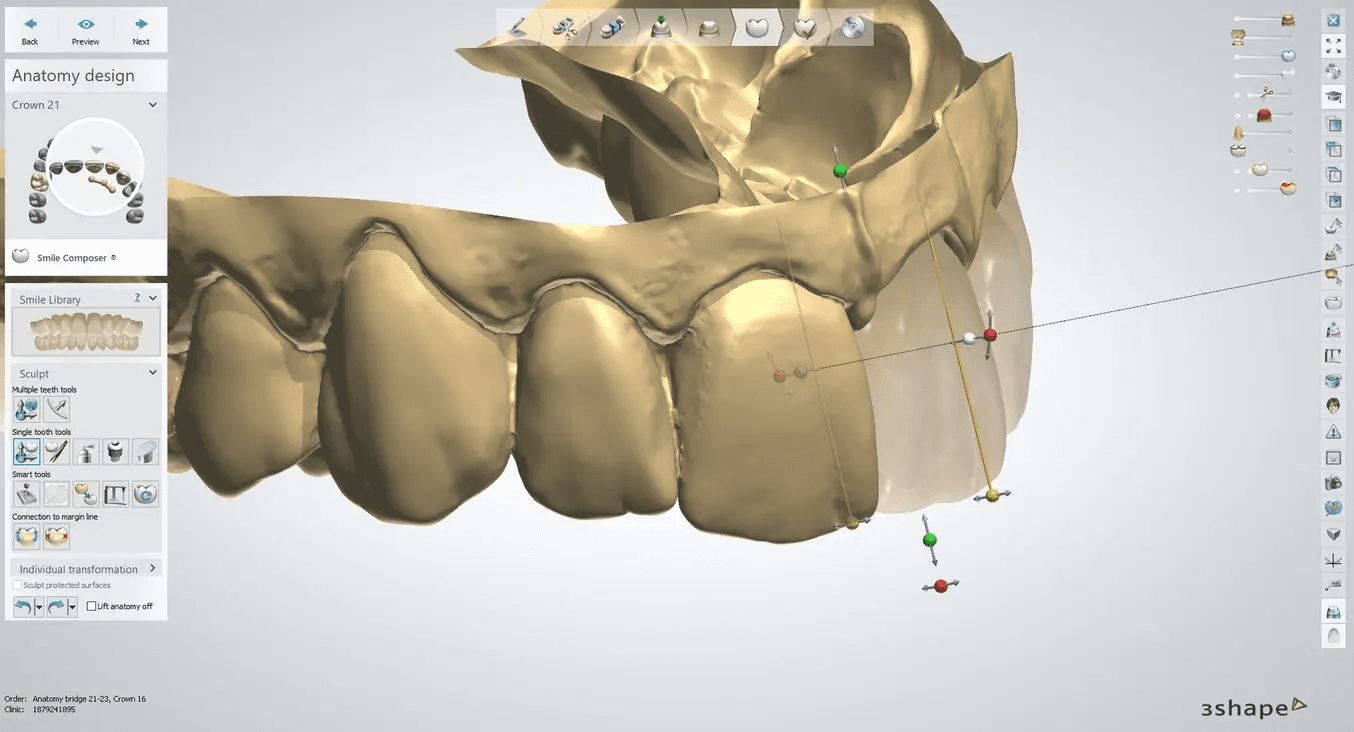
2. Design
2.1 Design for Different Applications
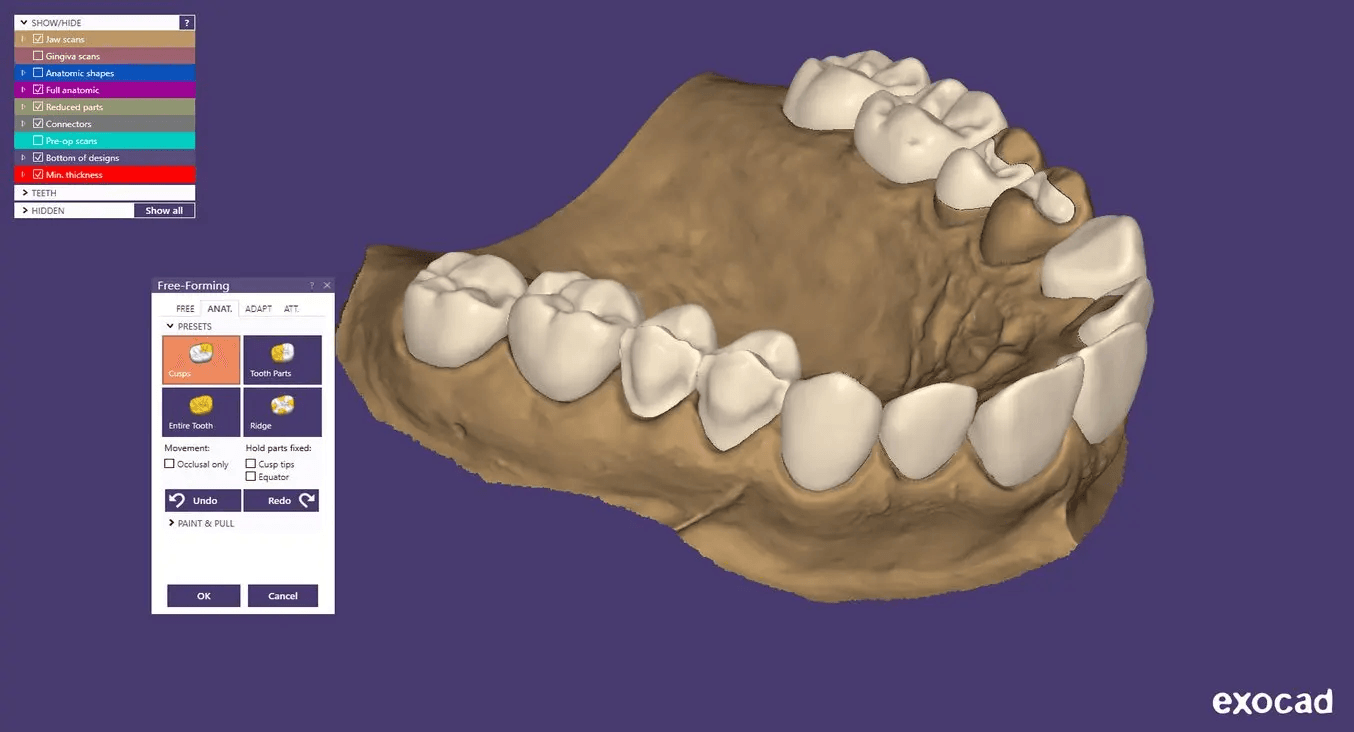
Import the digital file of the patient’s anatomy into your design software to begin creating the appliance.
Adjust your workflow according to the software you use. Use the following tips while designing the appliance, restorations, or bridges.
Design settings recommendations:
- Single units (crowns, inlays, onlays, veneers):
- Minimum wall thickness: 1.0 mm
- Bridges (up to seven units):
- [Anterior] Minimum wall thickness: 1.0 mm
- [Posterior] Minimum wall thickness: 1.5 mm
- [Anterior] Minimum cross-sectional area of the connector: 12 mm2
- [Posterior] Minimum cross-sectional area of the connector: 16 mm2
- Maximum construction length: seven units
- Pontic maximum: one molar width
- Temporary full-arch implant-supported appliances (All-on-X):
- Minimum wall thickness: 1.0 mm
- Minimum wall thickness around the TiBase/custom abutment: 1 mm
- Cement gap: as provided by the implant manufacturer's library
- Disable drill compensation
3Shape Settings
- Cement gap: 0.01 mm
- Extra cement gap: 0.07 mm
- Distance from margin line: 1 mm
- Margin line offset (width): 0.15 mm
- Drill compensation: off
exocad Settings
- Gap: 0.06 mm
- From margin: 1 mm
- Additional spacing
- Axial: 0.01 mm
- Radial: 0.01 mm
- Border
- Horizontal: 0.15 mm
- Angled: 0 mm
- Angle: 0°
- Vertical: 0 mm
- Below Margin: 0 mm
- Advanced:
- Anticipate Milling: off
2.2 STL File Output
Once your dental case design is finalized, you can proceed to manufacturing. Most dental design software exports manufacturing files in STL format, and some can also output PLY or OBJ files. PreForm Dental supports STL, OBJ, and 3MF file formats, ensuring compatibility with your design files.
Learn how to start using PreForm Dental here.
Note: Certain dental CAD software offers direct integration with PreForm Dental. To confirm if an integration is available for your specific software, please contact your dental CAD provider.
3. PreForm Print Set-up
Crowns, bridges, and implant-supported restorations need to be set up manually in PreForm Dental. Learn how to set up restorations manually in this video.
3.1 Import the File(s)
Import the design file(s) by dragging it into PreForm, or use the File menu to locate the file on your computer or network, as demonstrated in this video.
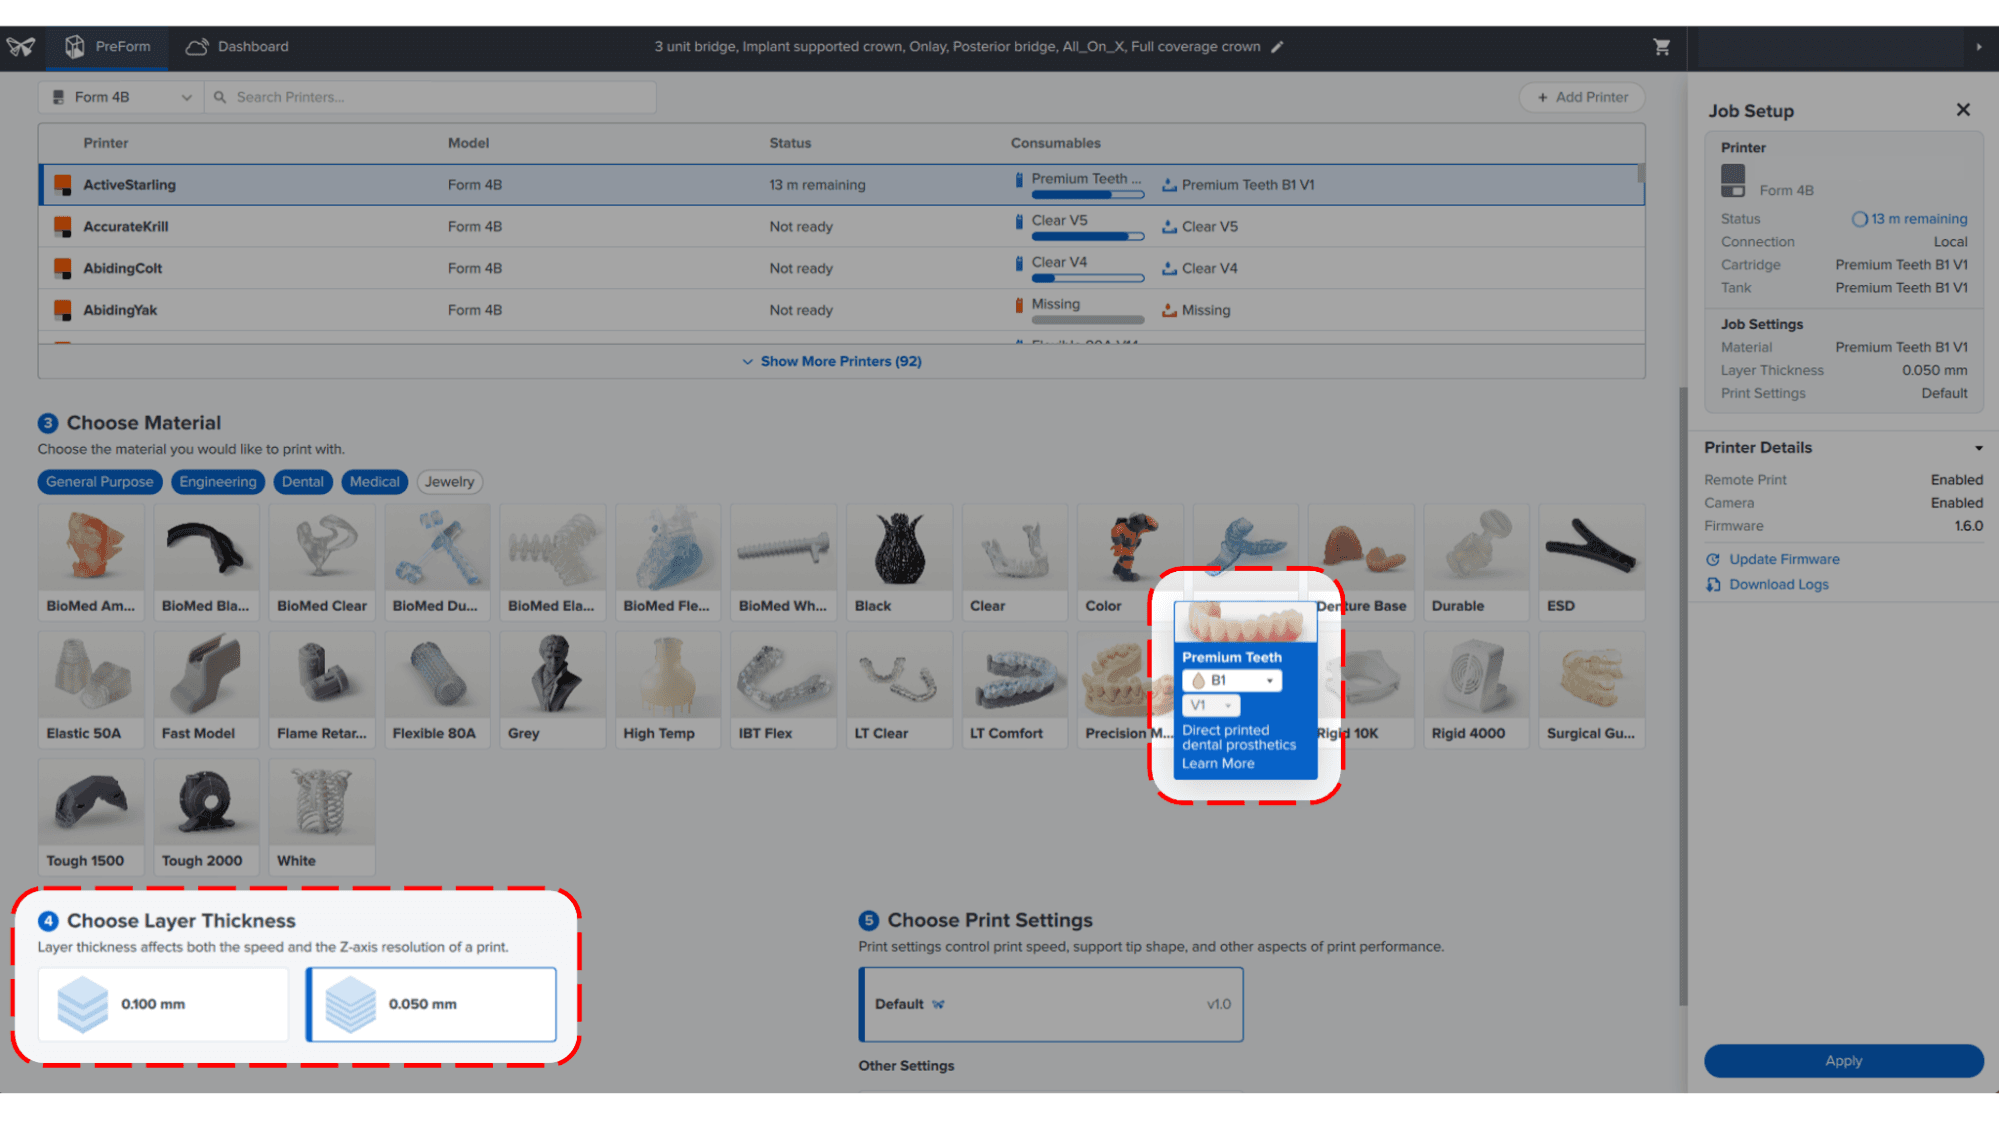
3.2 Material and Layer Height Selection
Select the material for printing by clicking the printer box in the Job Setup menu on the right-hand side.
Locate and select Premium Teeth Resin in the material selector. Select the shade.
For full-arch implant-supported appliances and temporary single units or bridges, we recommend selecting a 50 μm layer height setting for the highest accuracy. You can also select 100 μm for faster prints.
3.3 Orientation
Note: Proper part orientation ensures optimal accuracy and fit.
3.3.1 Full-Arch Implant-Supported Appliances
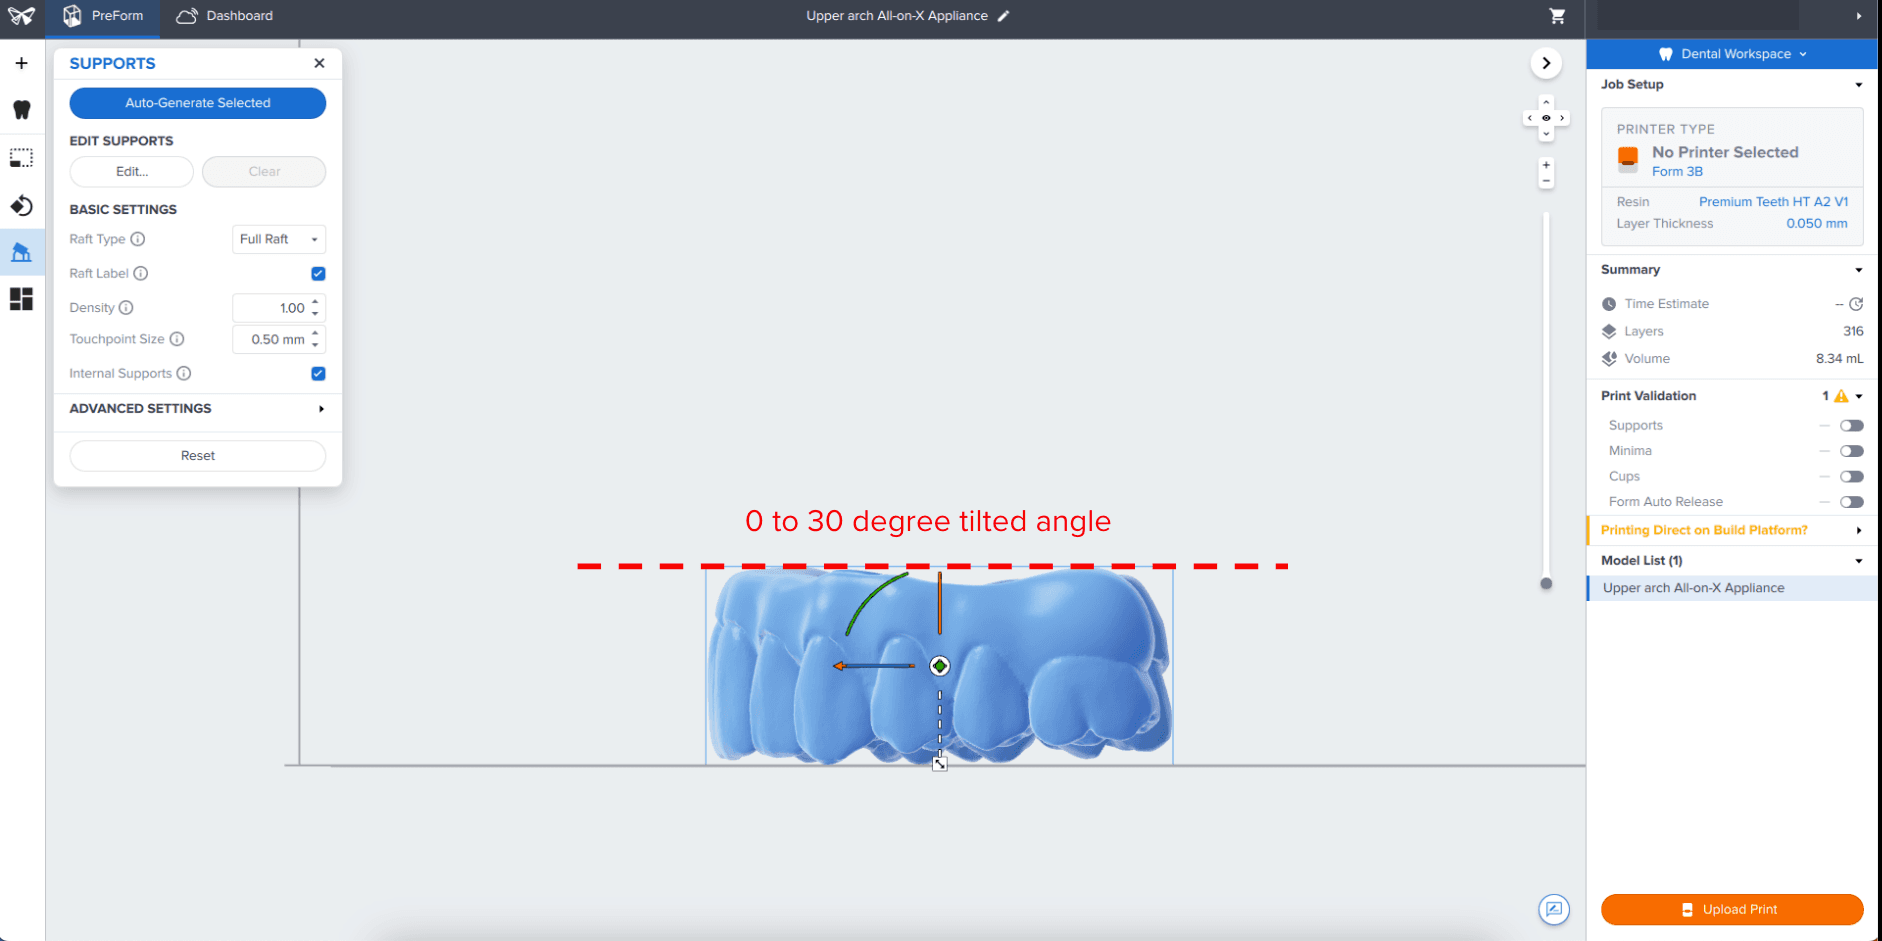
Position the appliance at an angle between 0° and 30°, with the anterior teeth closest to the build platform. Ensure the occlusal surface faces toward the build platform, while the intaglio surface faces away. Aim to align the implant geometries as closely as possible to the Z-axis for optimal accuracy.
3.3.2 Temporary Single-Units and Bridges
Position the appliance with the occlusal surface facing the build platform and the intaglio surface facing away.
Note: Printing times vary depending on object orientation and job setup.
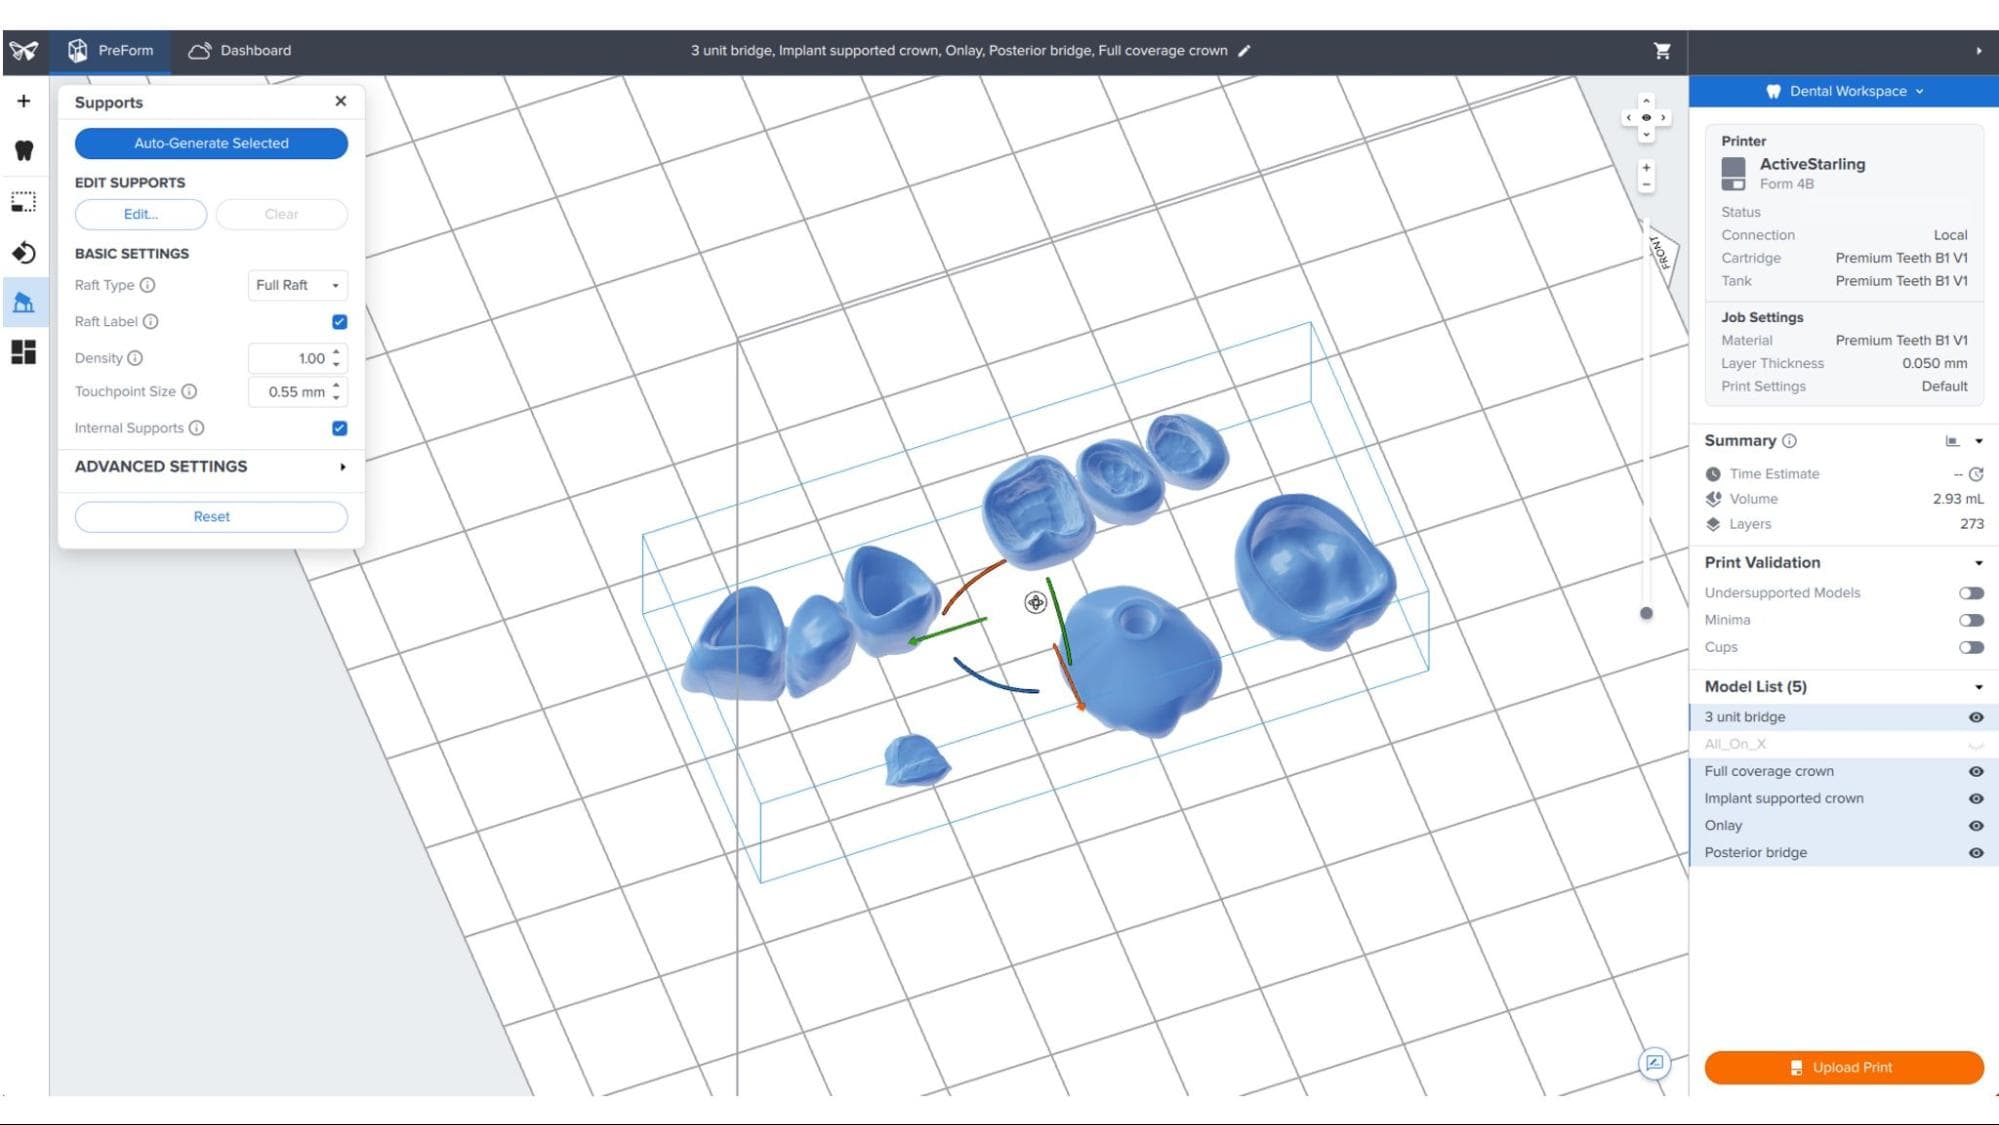
3.4 Generate Support Structures
Note: Always use a full raft to ensure optimal accuracy and stability, while also making it easier to remove the part from the build platform.
3.4.1 Automatic Support Generation
Open the Supports tool on the left side of PreForm and uncheck Internal Supports (2). Click the Auto-Generate Selected or Auto-Generate All button (1). PreForm will indicate in red which areas might require additional supports.
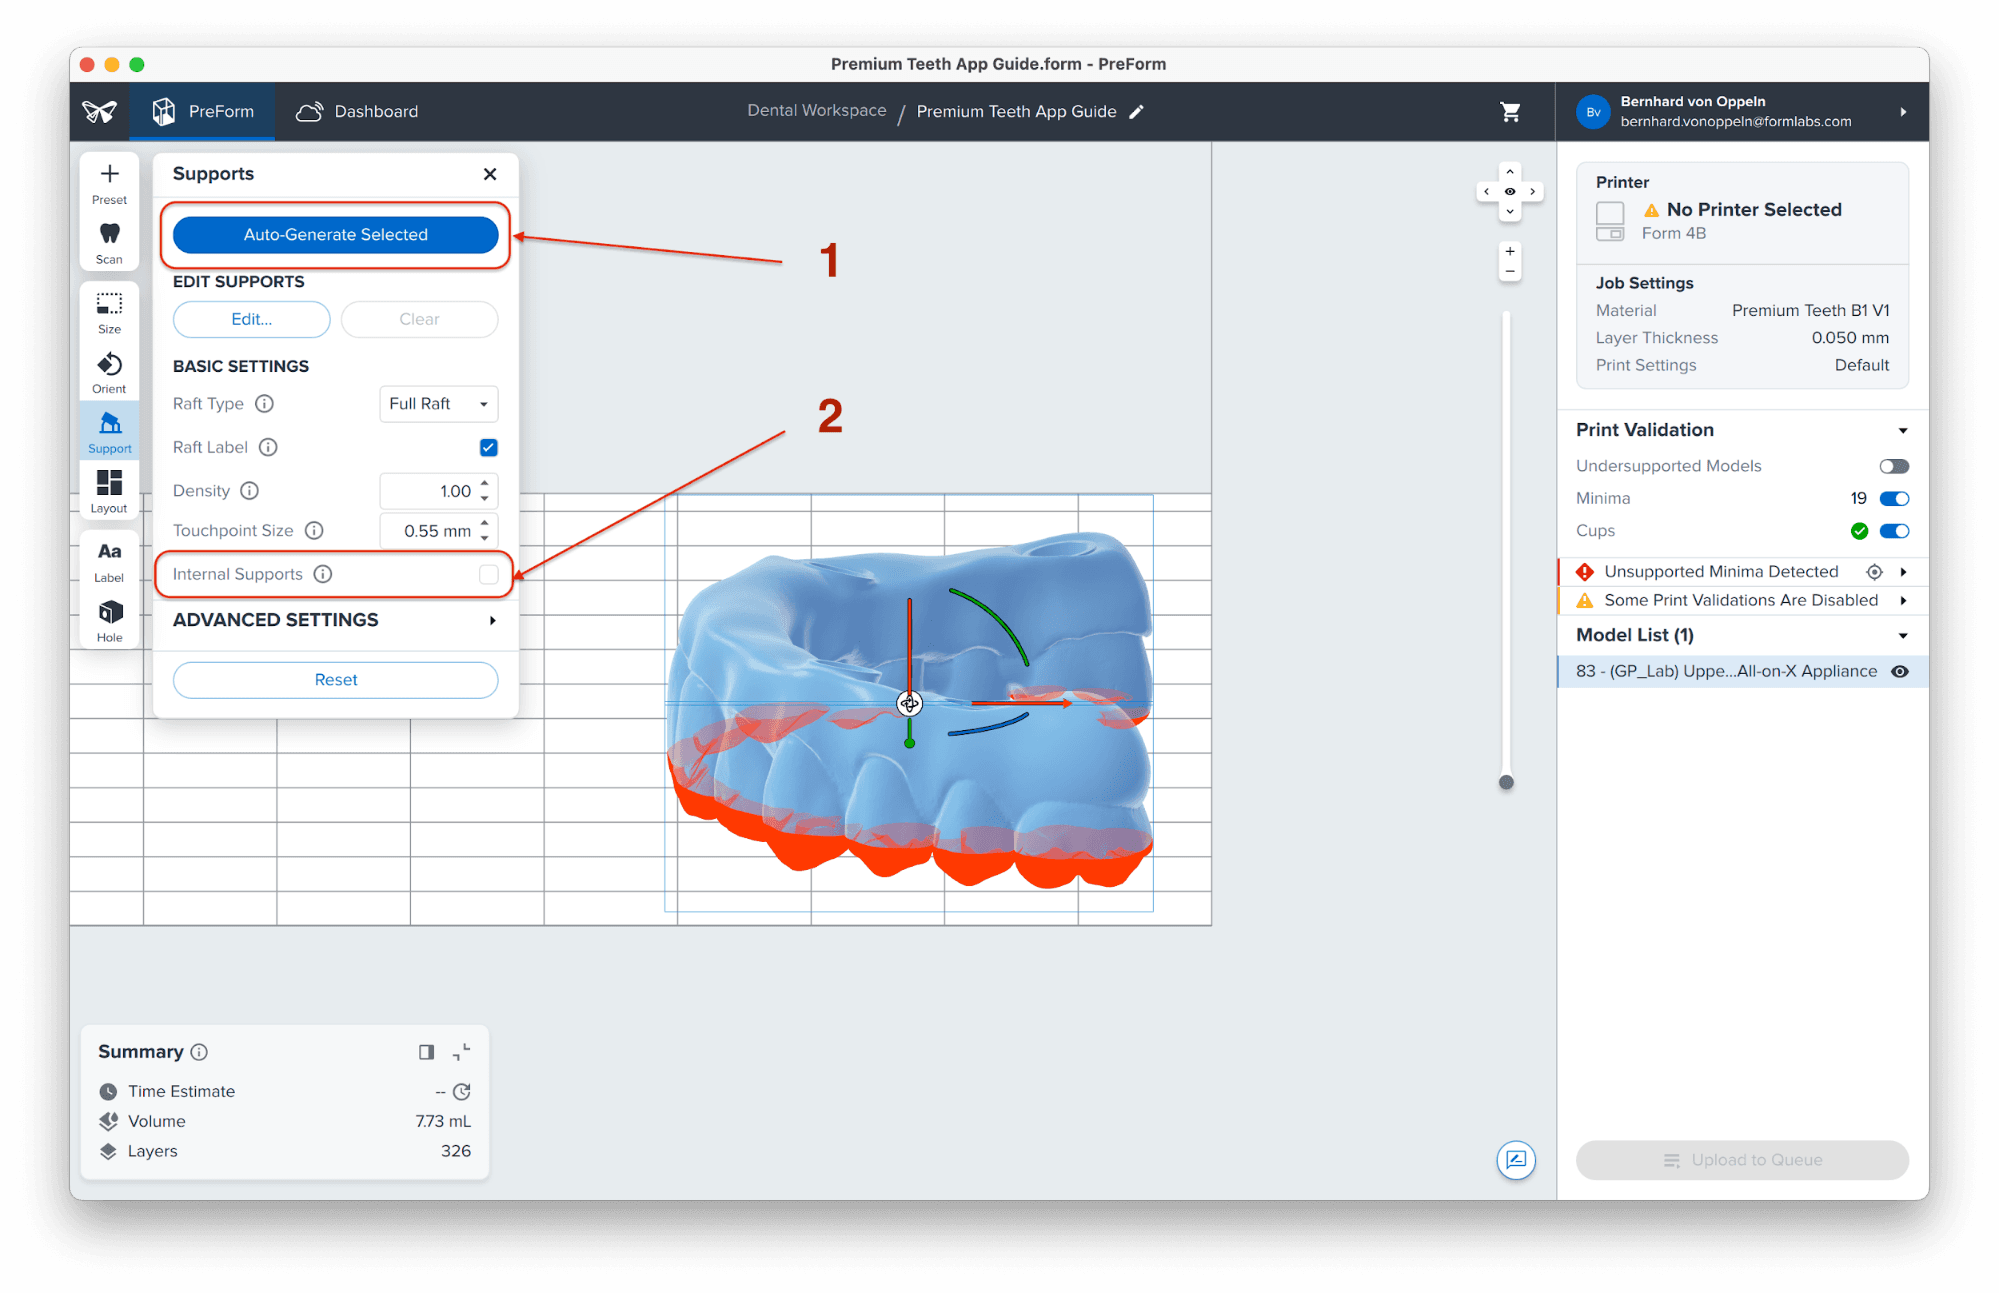
Note: The default support settings are optimized for the best fit of large-span bridges. For simpler cases, you may reduce the support density and touchpoint sizes as needed.
3.4.2 Manual Support Editing
Once supports are generated, verify their locations. If a support point is in an undesired location, like intaglio areas, contact points, or connection geometries, you can edit the location by clicking the Edit… (3) button in the Supports menu.
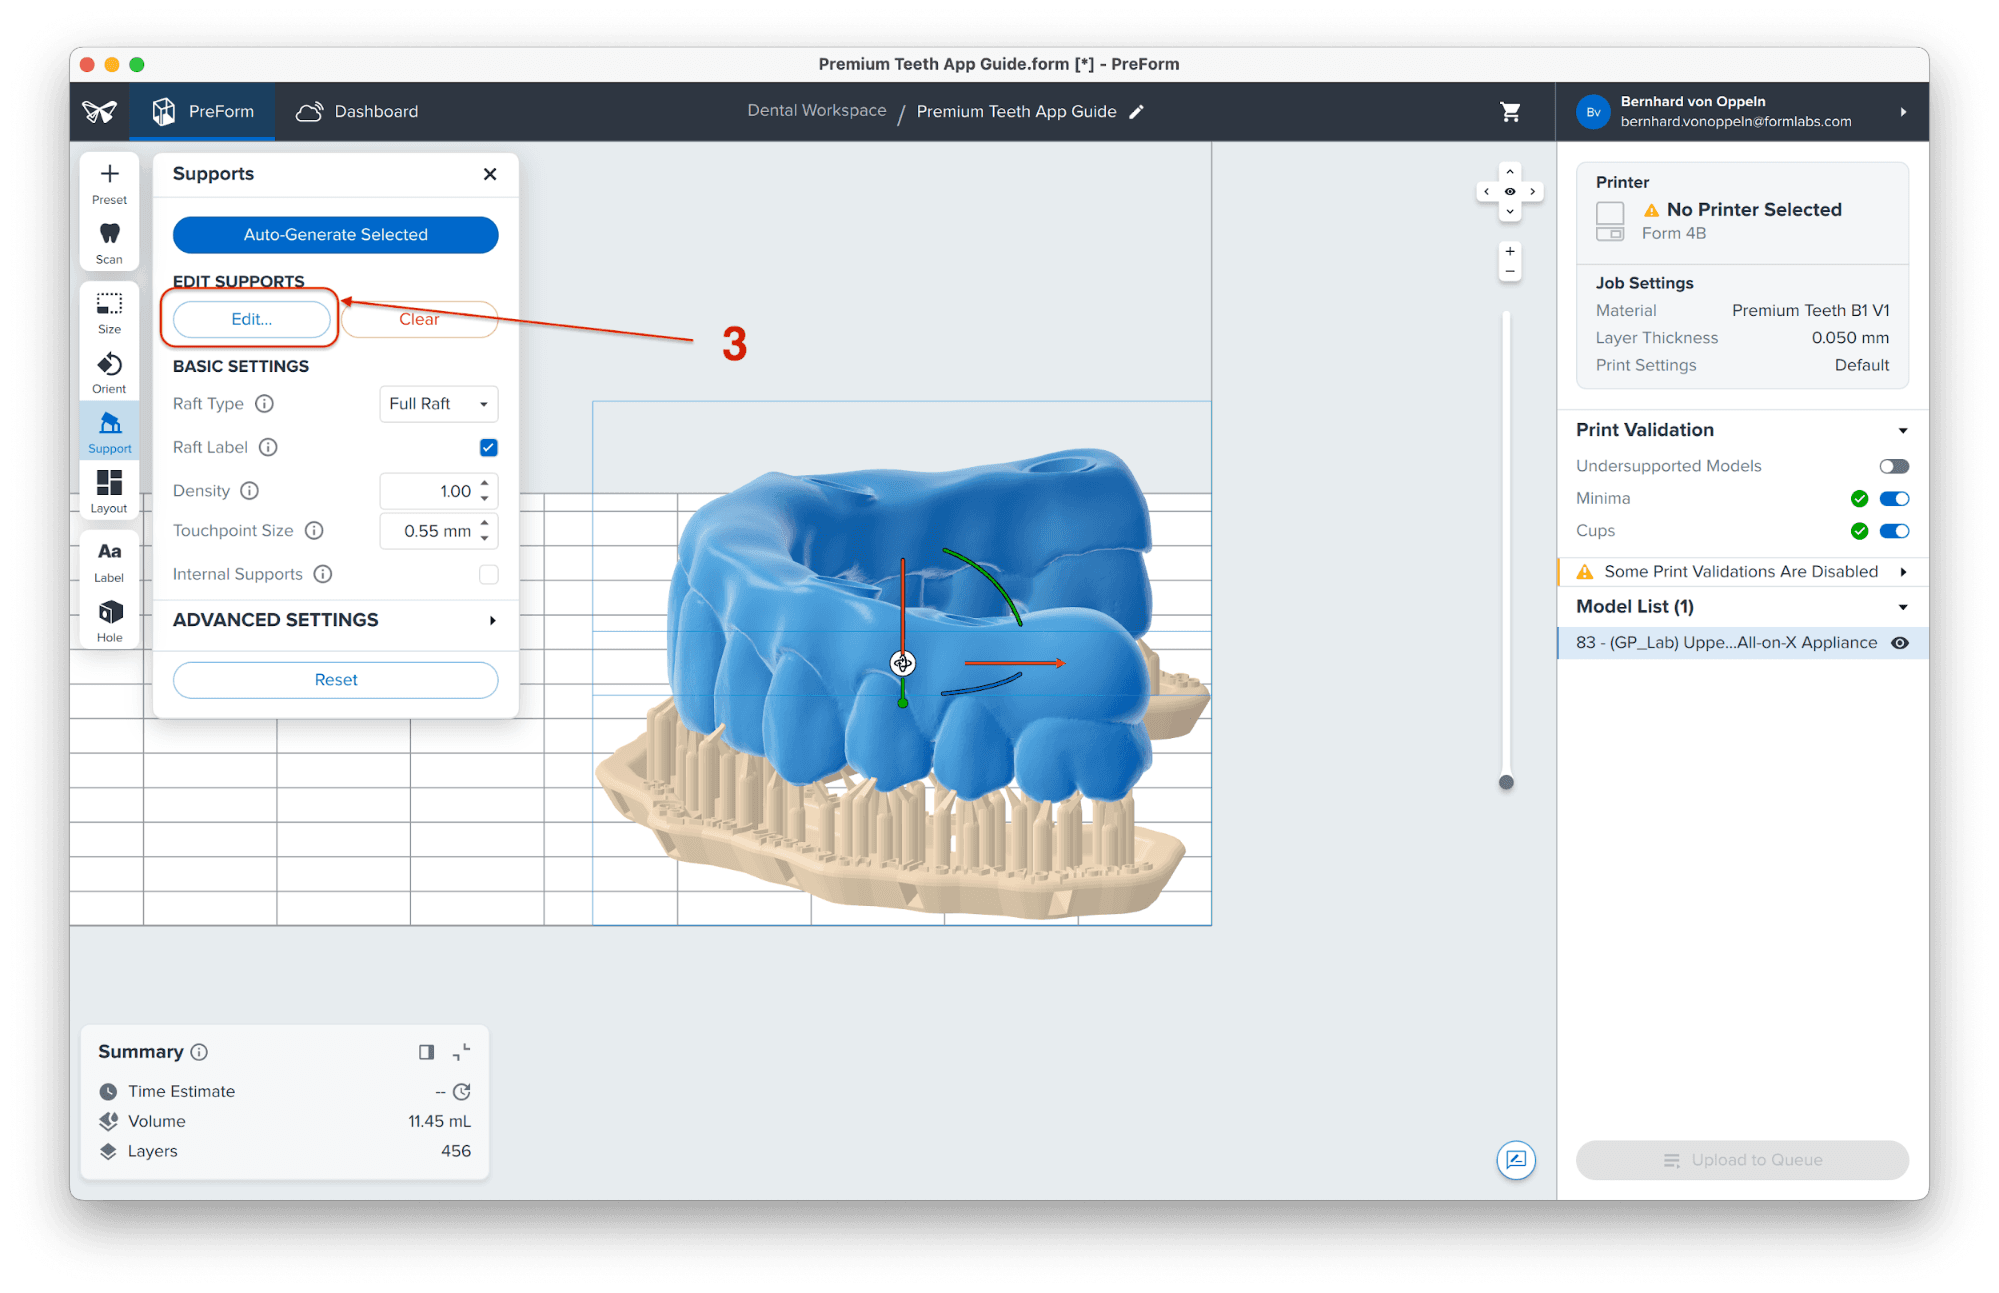

Click on a support touchpoint sphere to remove it and click on areas without supports to add touchpoints (4).
Confirm under the Job Setup menu bar on the right side of the screen that Print Validation shows a green thumbs-up (5).
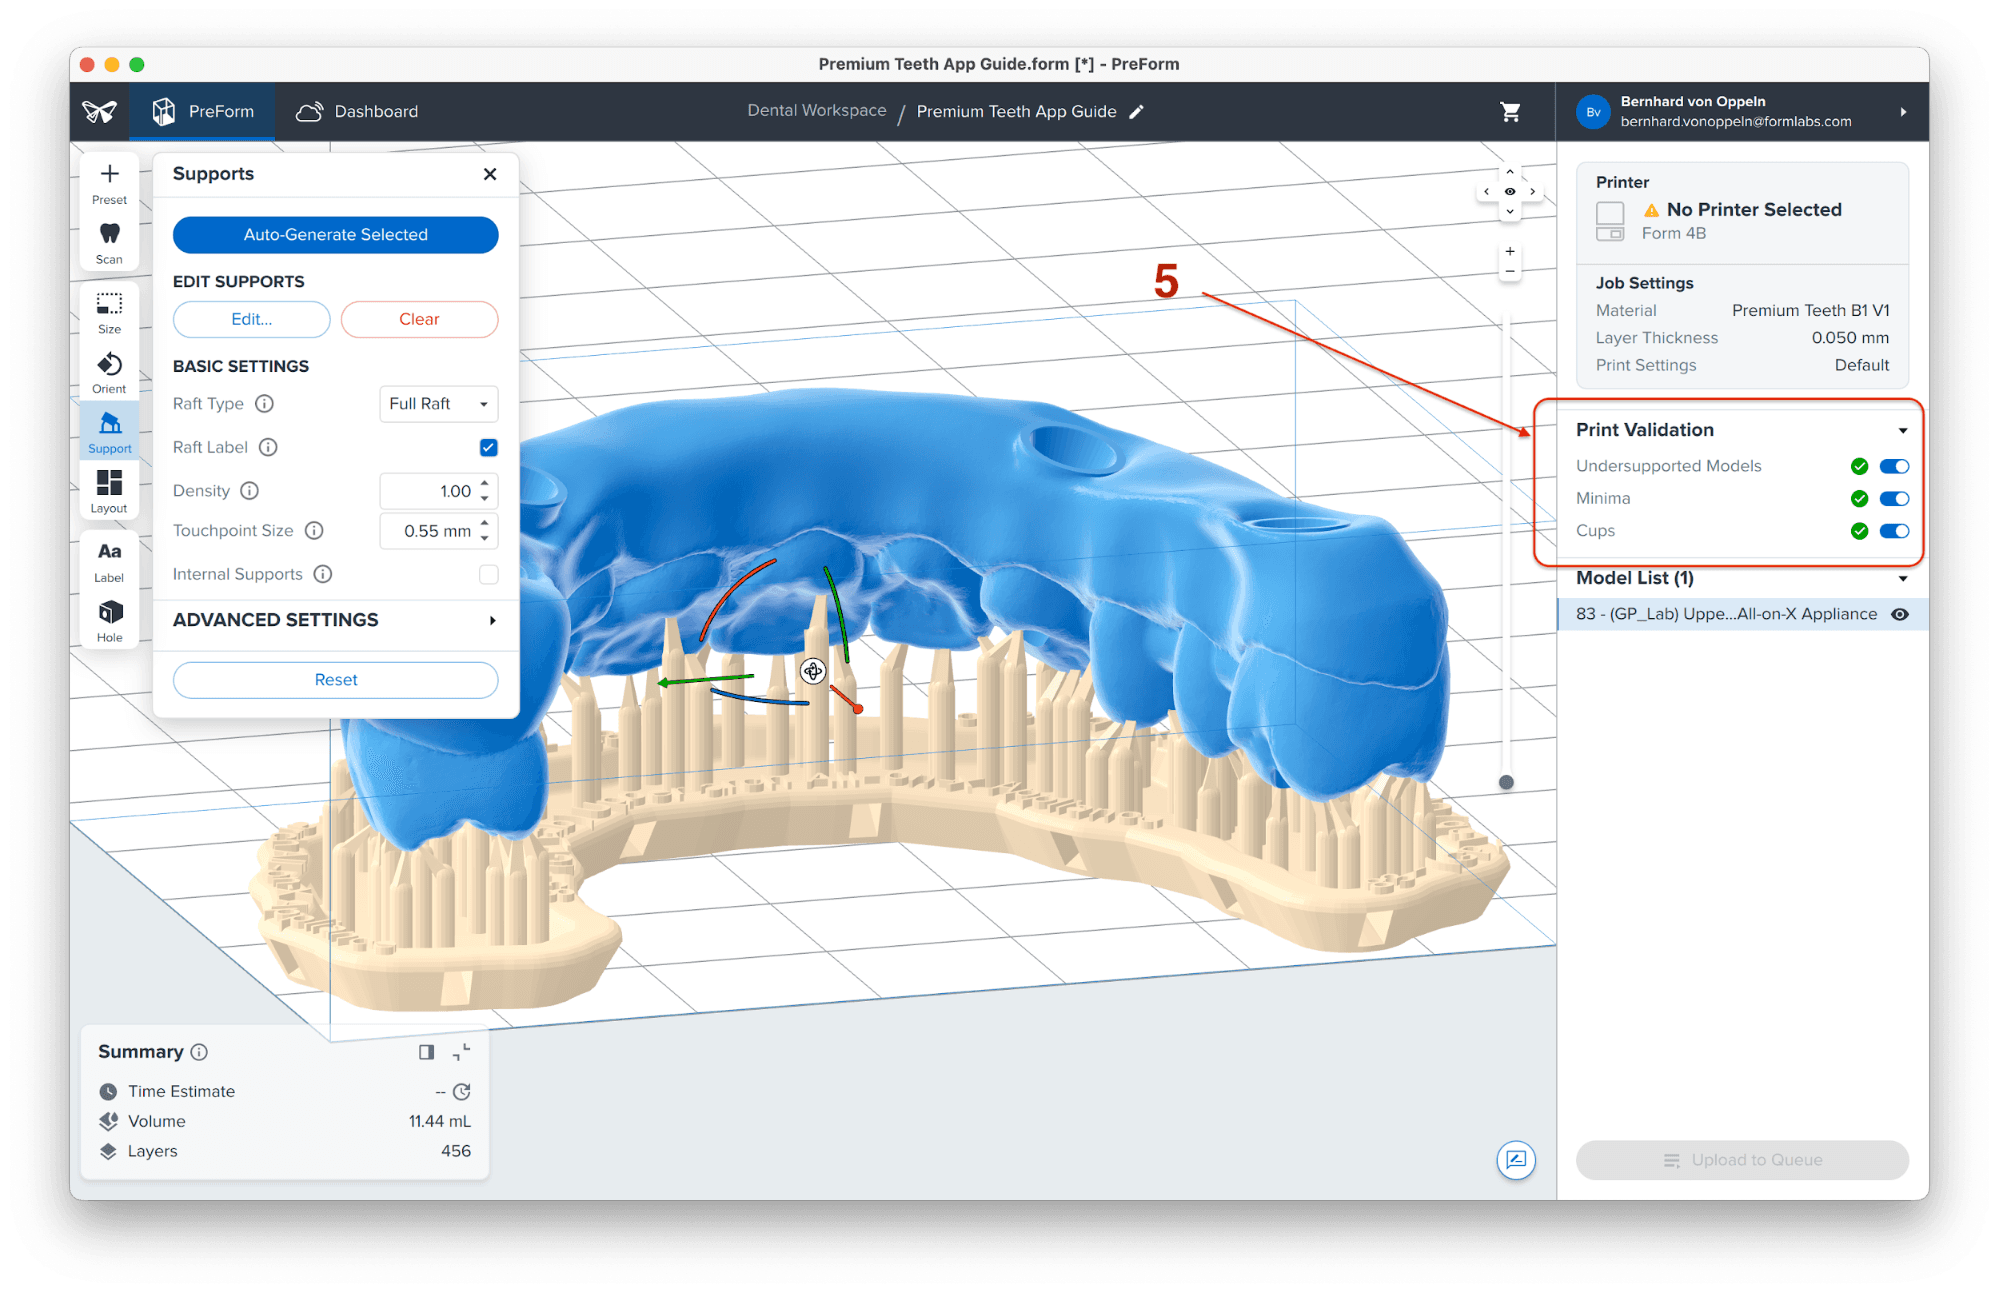
Note: While adding or editing supports, click the Printability button and enable Show Minima. The Printability feature allows you to add only as many supports as necessary, reducing post-processing time.
3.5 Print Layout
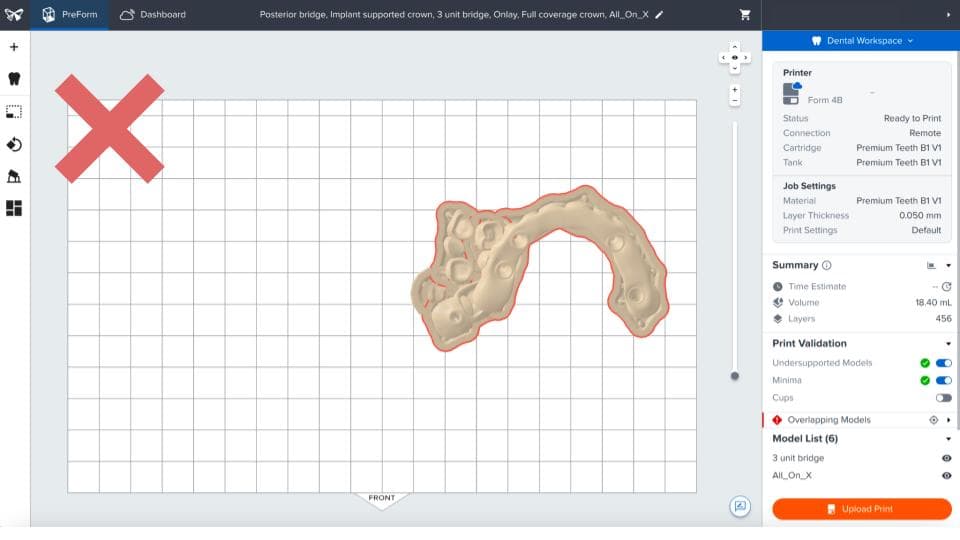
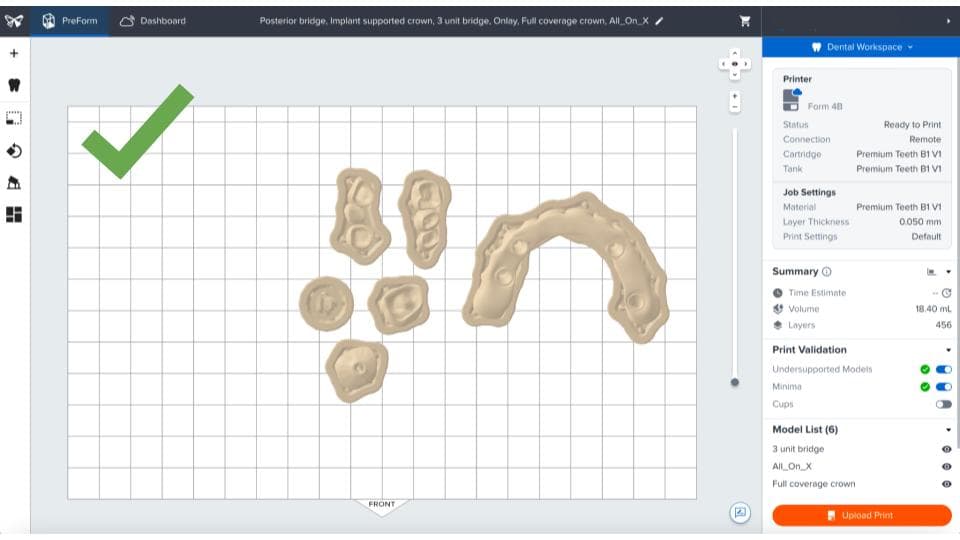
Note: Avoid overlapping parts.
Once the layout is complete, the job is ready to be sent to the printer.
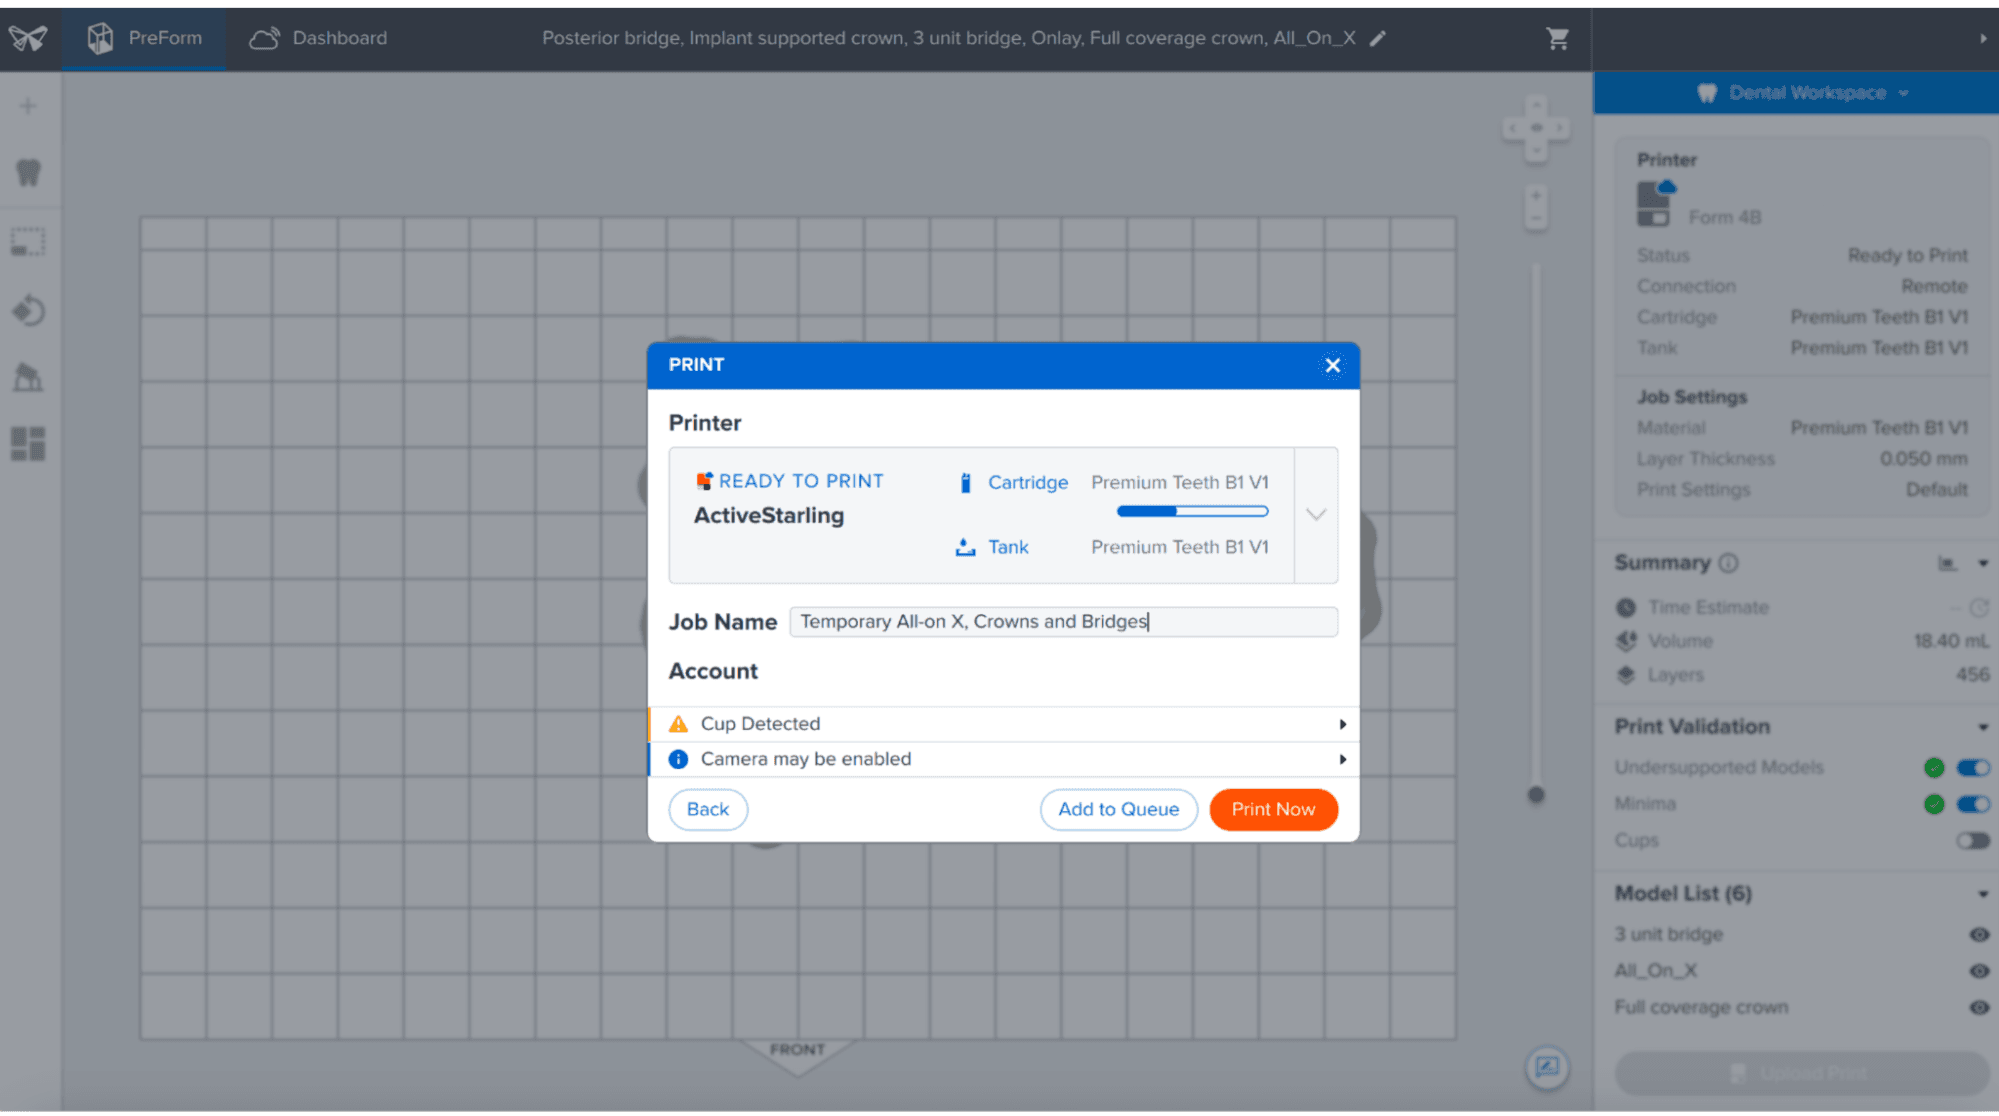
3.6 Transferring the Job to the Printer
Send the job to the printer by clicking the orange printer icon on the right side of the screen.
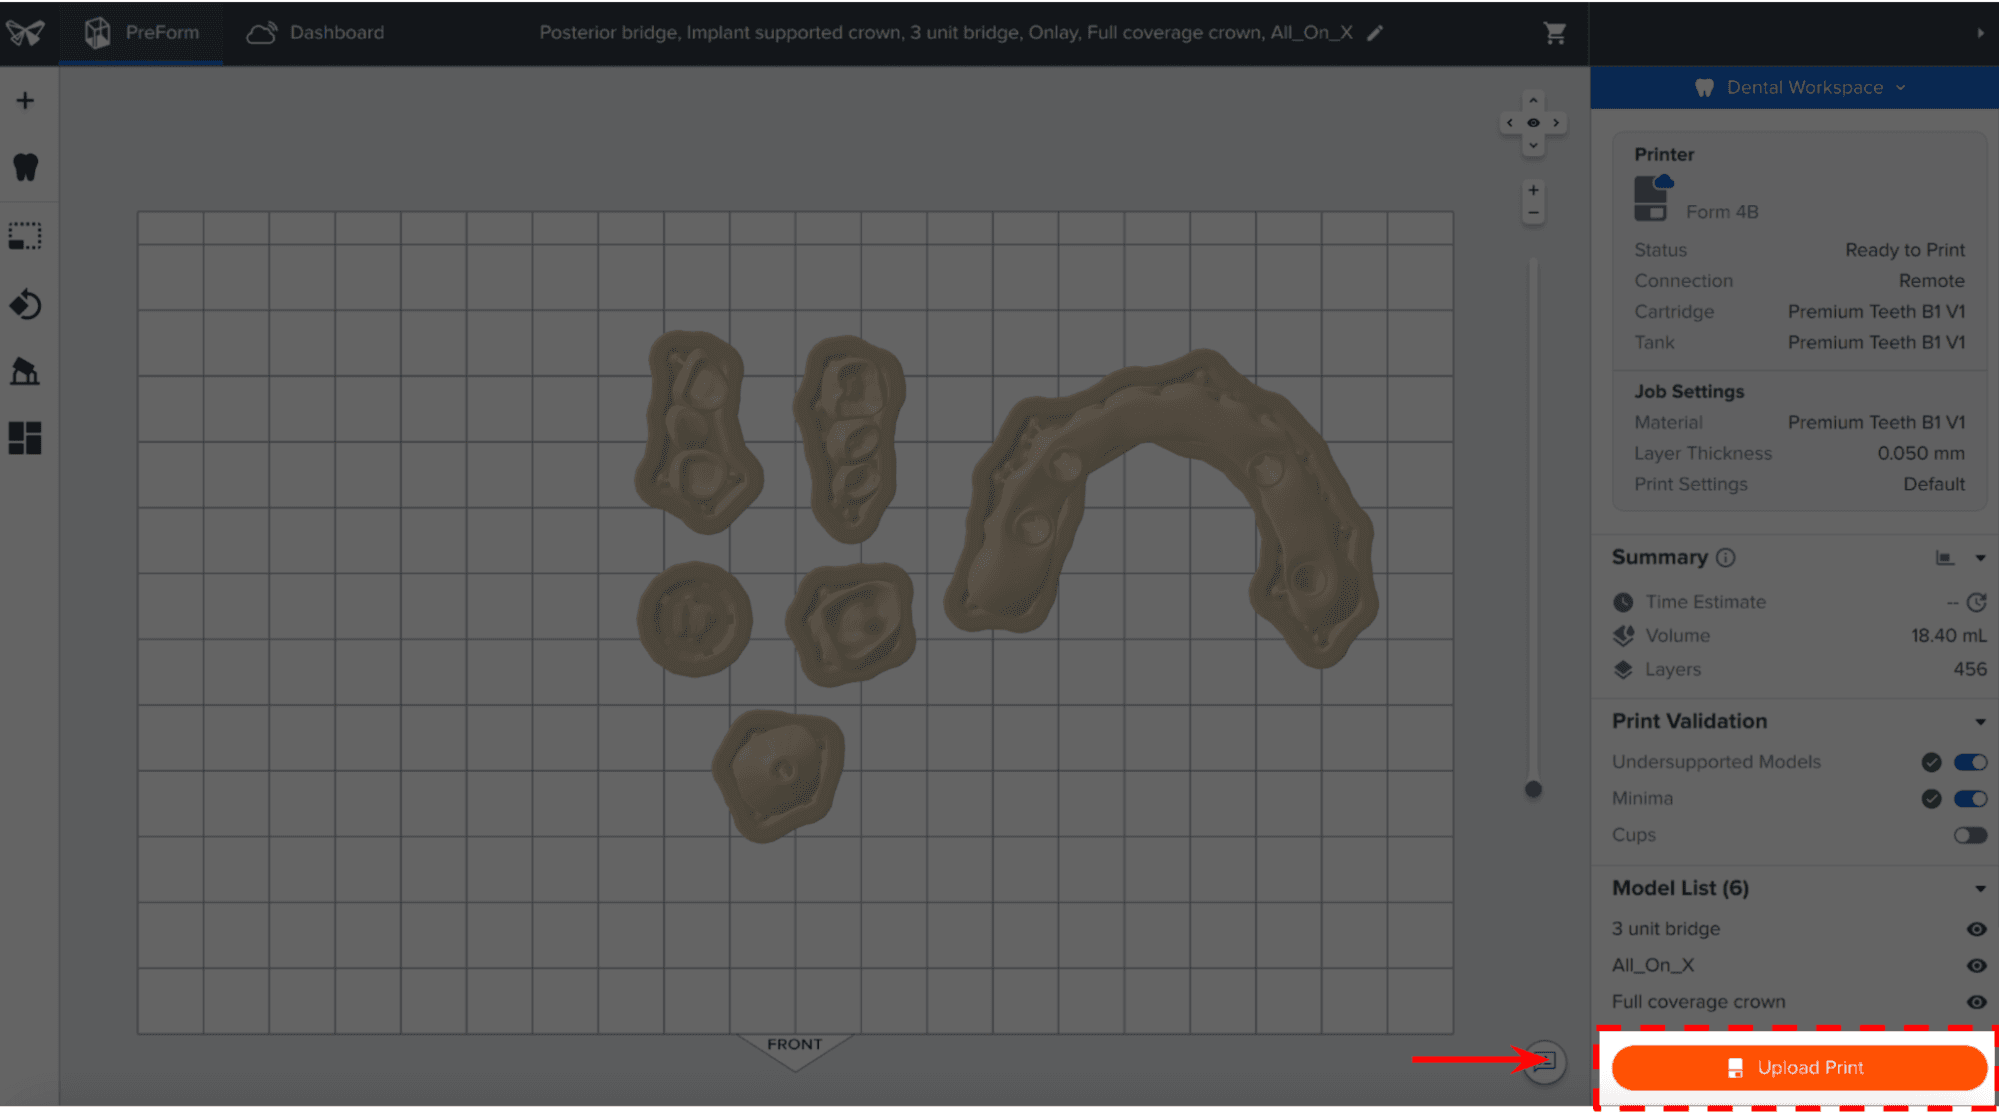
The Print dialog box will open, here you can change the printer the job is being sent to (see 1), rename the job, and send the job to the printer using the Upload Job (see 2) button.
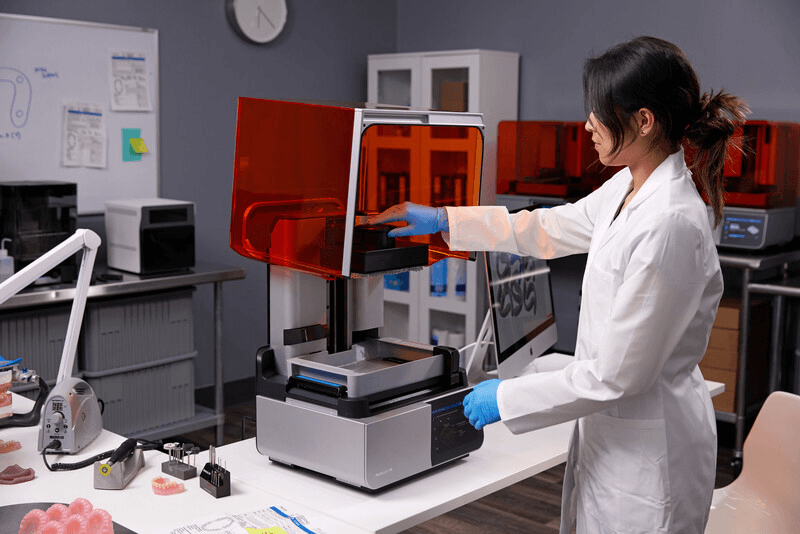
3.7 Set Up the Printer

Shake the Premium Teeth Resin cartridge and then insert the cartridge, a build platform, and a compatible resin tank into your printer.
- Begin printing by selecting the print job from the printer’s touchscreen.
- Follow any prompts or dialogs shown on the printer screen.
- The printer will automatically complete the print.
If starting with an empty resin tank, save time by manually pre-filling the tank by pouring in resin directly from the cartridge.
Note: Please verify printer and resin compatibility on the Formlabs support site before printing.
Note: For full compliance and biocompatibility, Premium Teeth Resin requires a dedicated Resin Tank, Build Platform, Form Wash, and Finish Kit .
4. Post-Processing
Note: Always use gloves when handling uncured resins and parts.
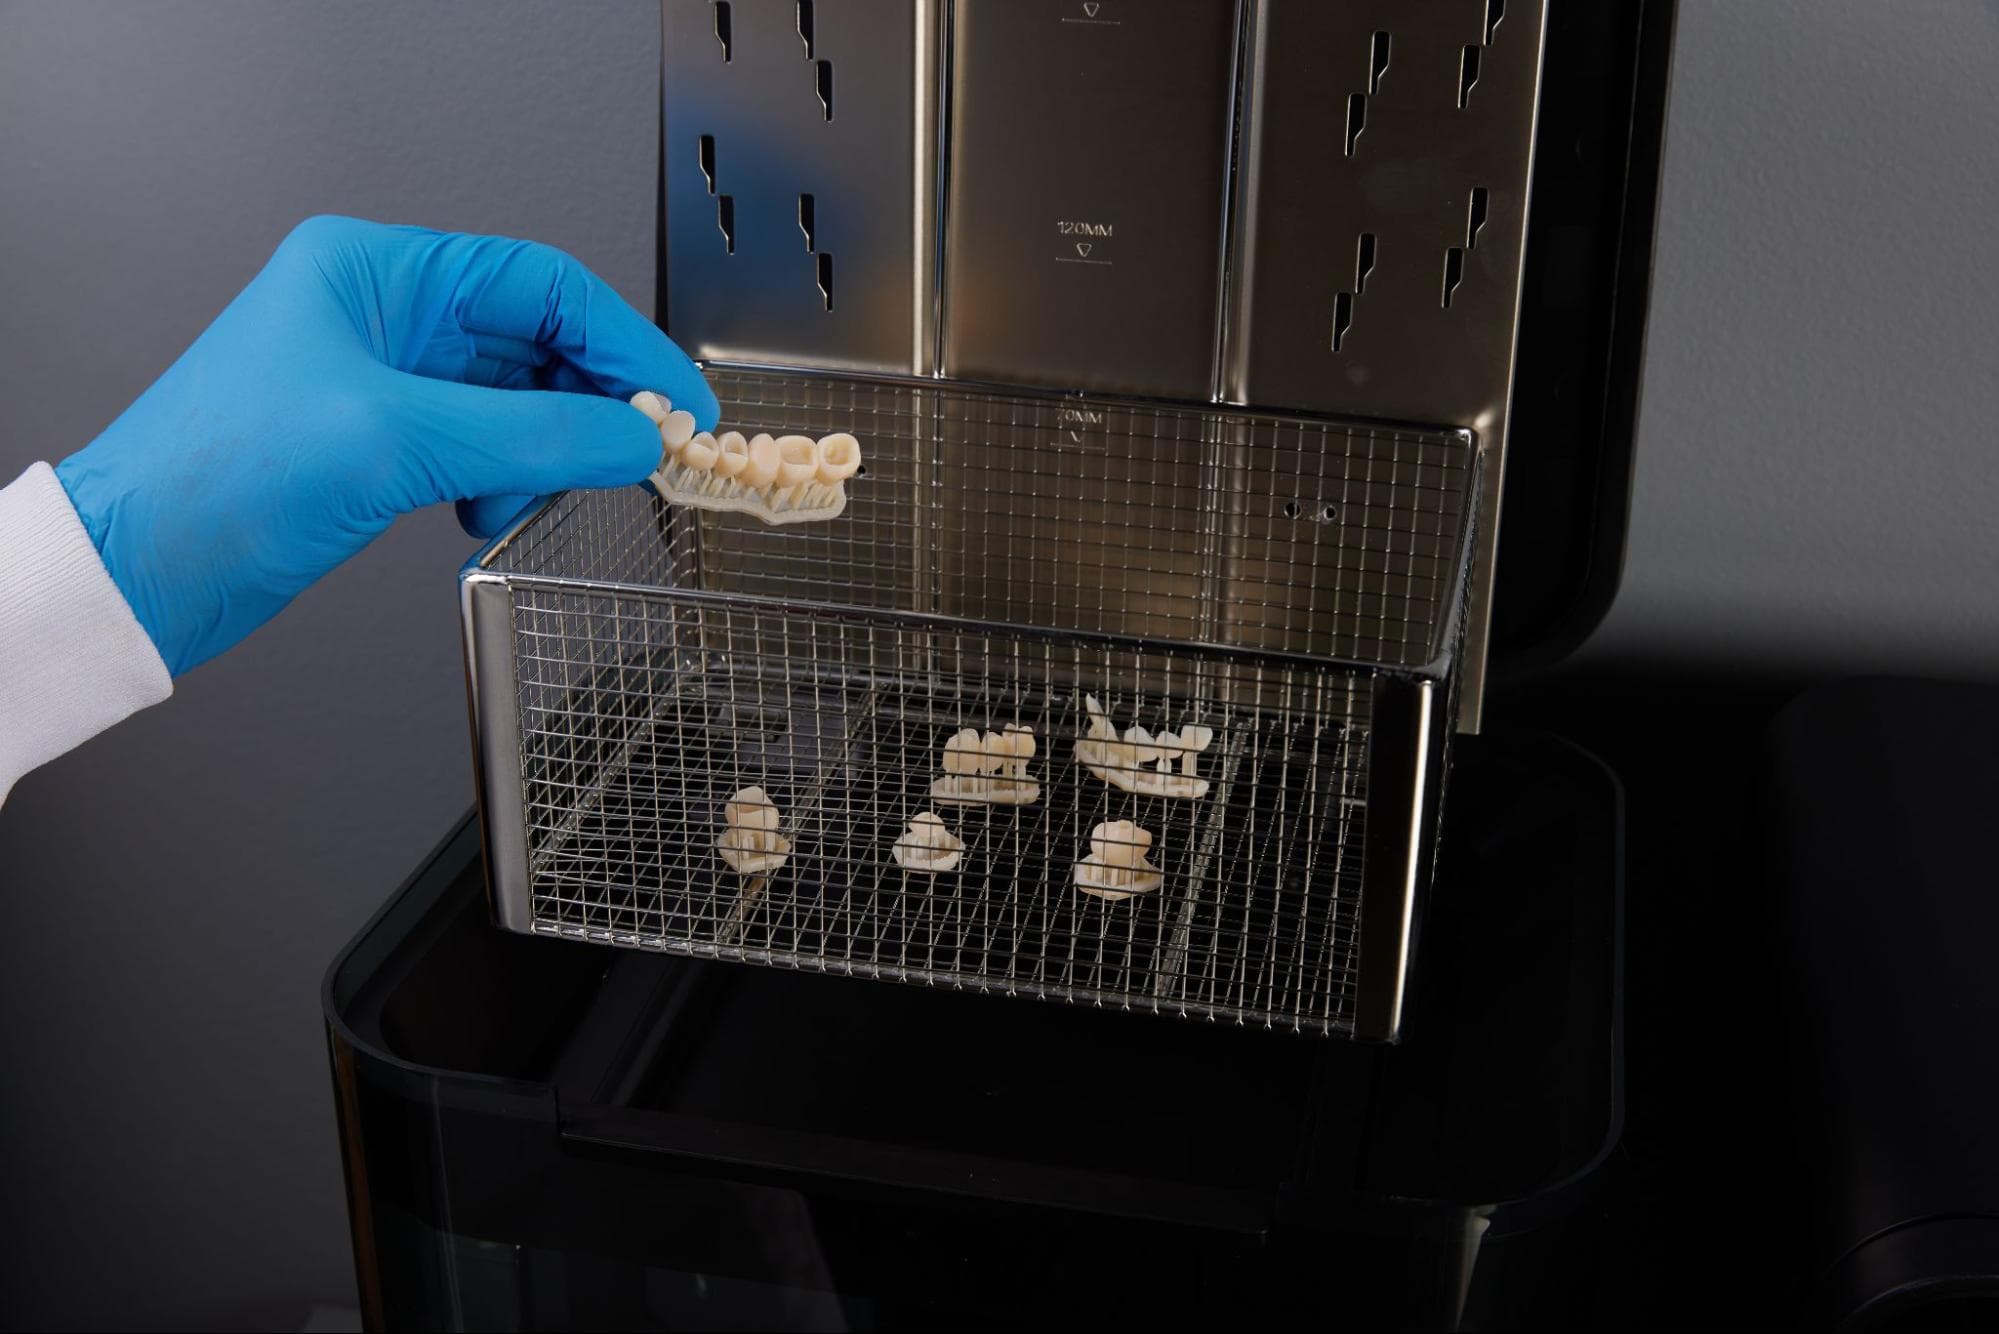
4.1 Part Removal
Remove the printed parts from the Build Platform using the part removal tool provided by Formlabs or by using the release handles from Build Platform 2 or Build Platform Flex. Alternatively, you can wash the parts on the build platform using the Form Wash by placing the build platform directly into the Form Wash.
Use the adjustable arms in the Form Wash to adapt it to the different build platforms.
4.2 Washing
Precautions
- When washing the printed part with IPA, ensure a properly ventilated environment and use proper protective masks and gloves.
- Follow local regulations when disposing expired or unused Premium Teeth Resin
- Follow local regulations when disposing of IPA.
Place printed parts in a Form Wash filled with IPA (≥99%) and wash them for the time established in the Manufacturing Guide.
Make sure the parts are fully submerged in IPA when washing.
Wash the parts using a Form Wash/Form Wash V2. Alternatively, an ultrasonic bath is highly effective for cleaning small parts like printed restorations. Avoid leaving parts in IPA longer than necessary.
Note: Using isopropyl alcohol in an ultrasonic bath presents a risk of fire or explosion. When using an ultrasonic wash read and follow all safety recommendations from the ultrasonic wash manufacturer.
You can use a very soft brush soaked in fresh IPA to remove excess resin and minimize post-processing. Avoid mechanical cleaning to preserve the part's fit!
4.3 Drying
Remove parts from IPA and leave to air dry at room temperature for at least 30 minutes in a well-ventilated area.
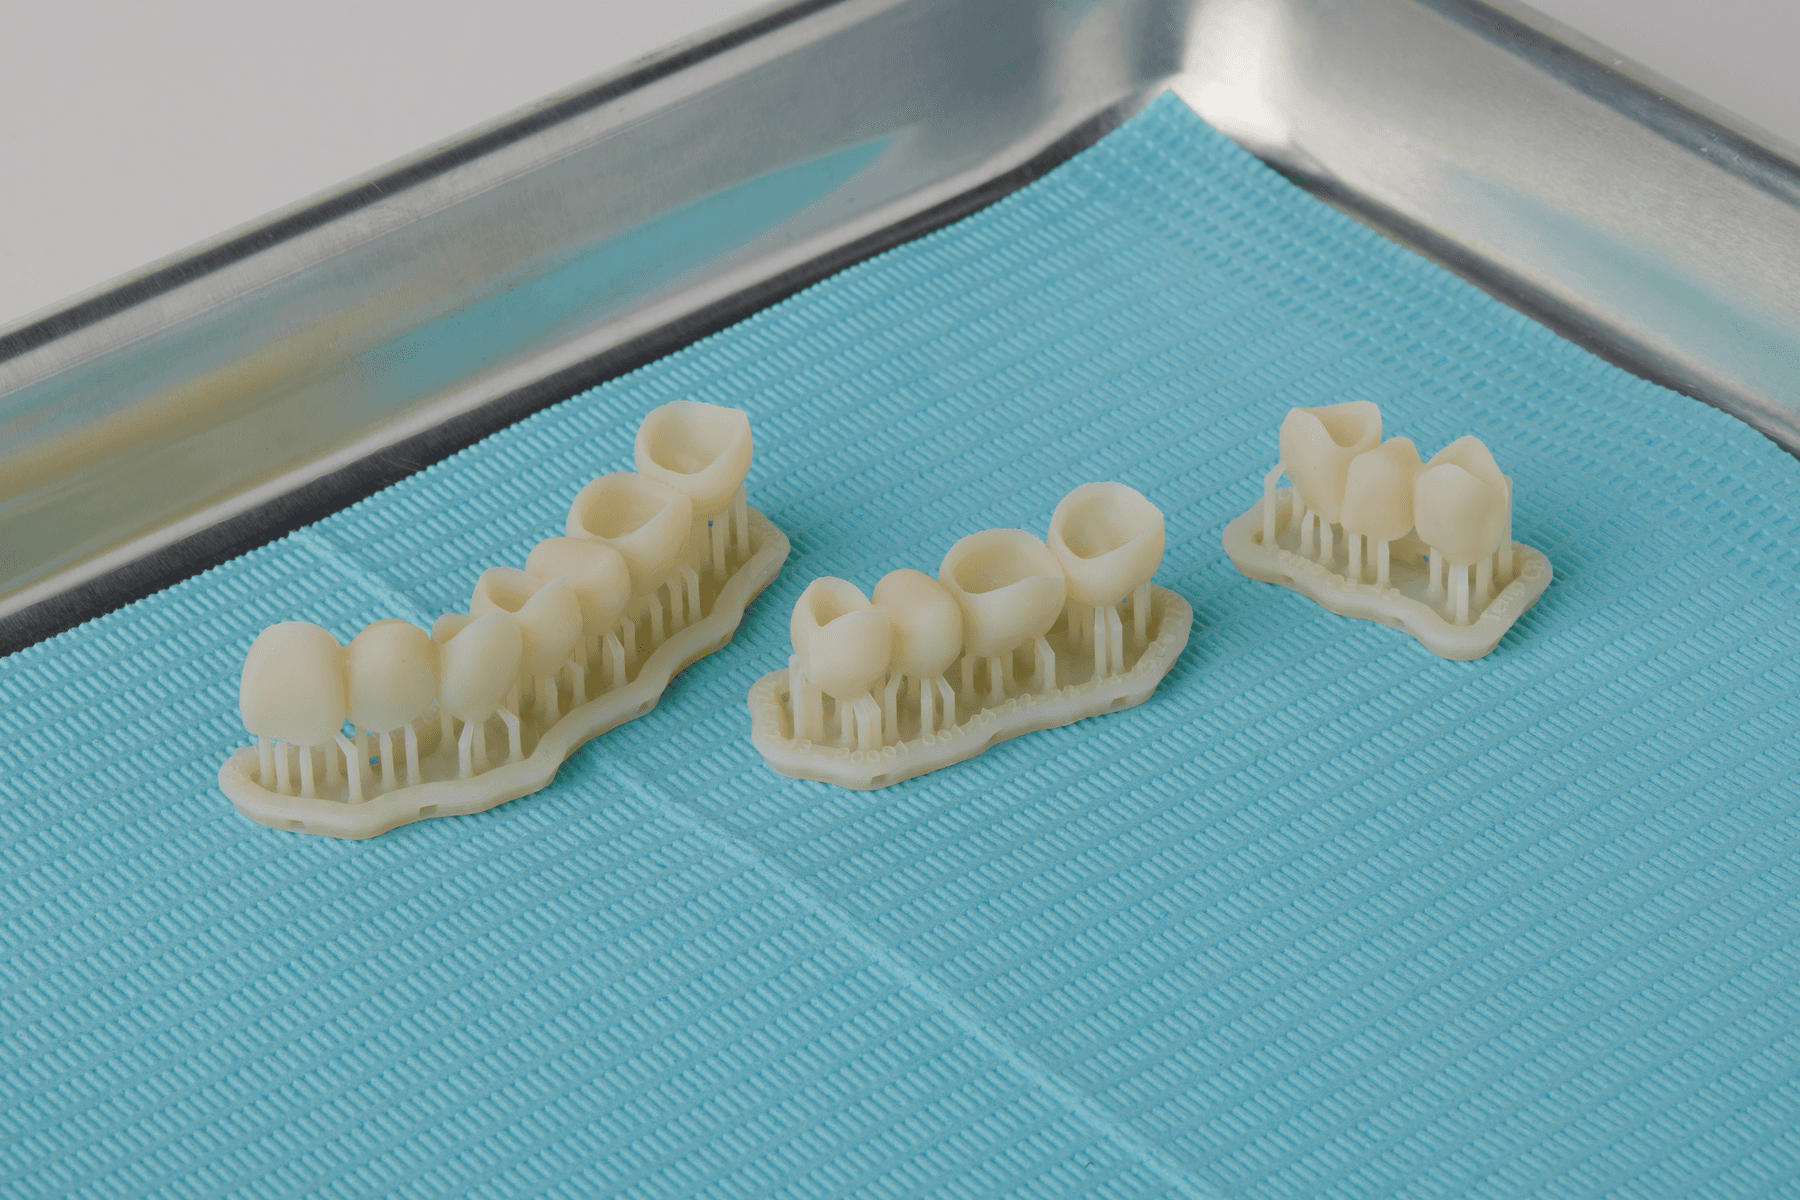
Inspect printed parts to ensure that parts are clean and dry. Ensure no residual alcohol, excess liquid resin, or residue particles remain on the surface before proceeding to subsequent steps.
If any wet, uncured resin is still present after drying, use a squeeze bottle with fresh IPA to remove the uncured resin, then air dry the parts again. The use of compressed air allows for rapid inspection.
Compressed air can aid in drying parts for a quicker inspection of unwashed resin. However, ensure a 15-minute bench drying period afterward.
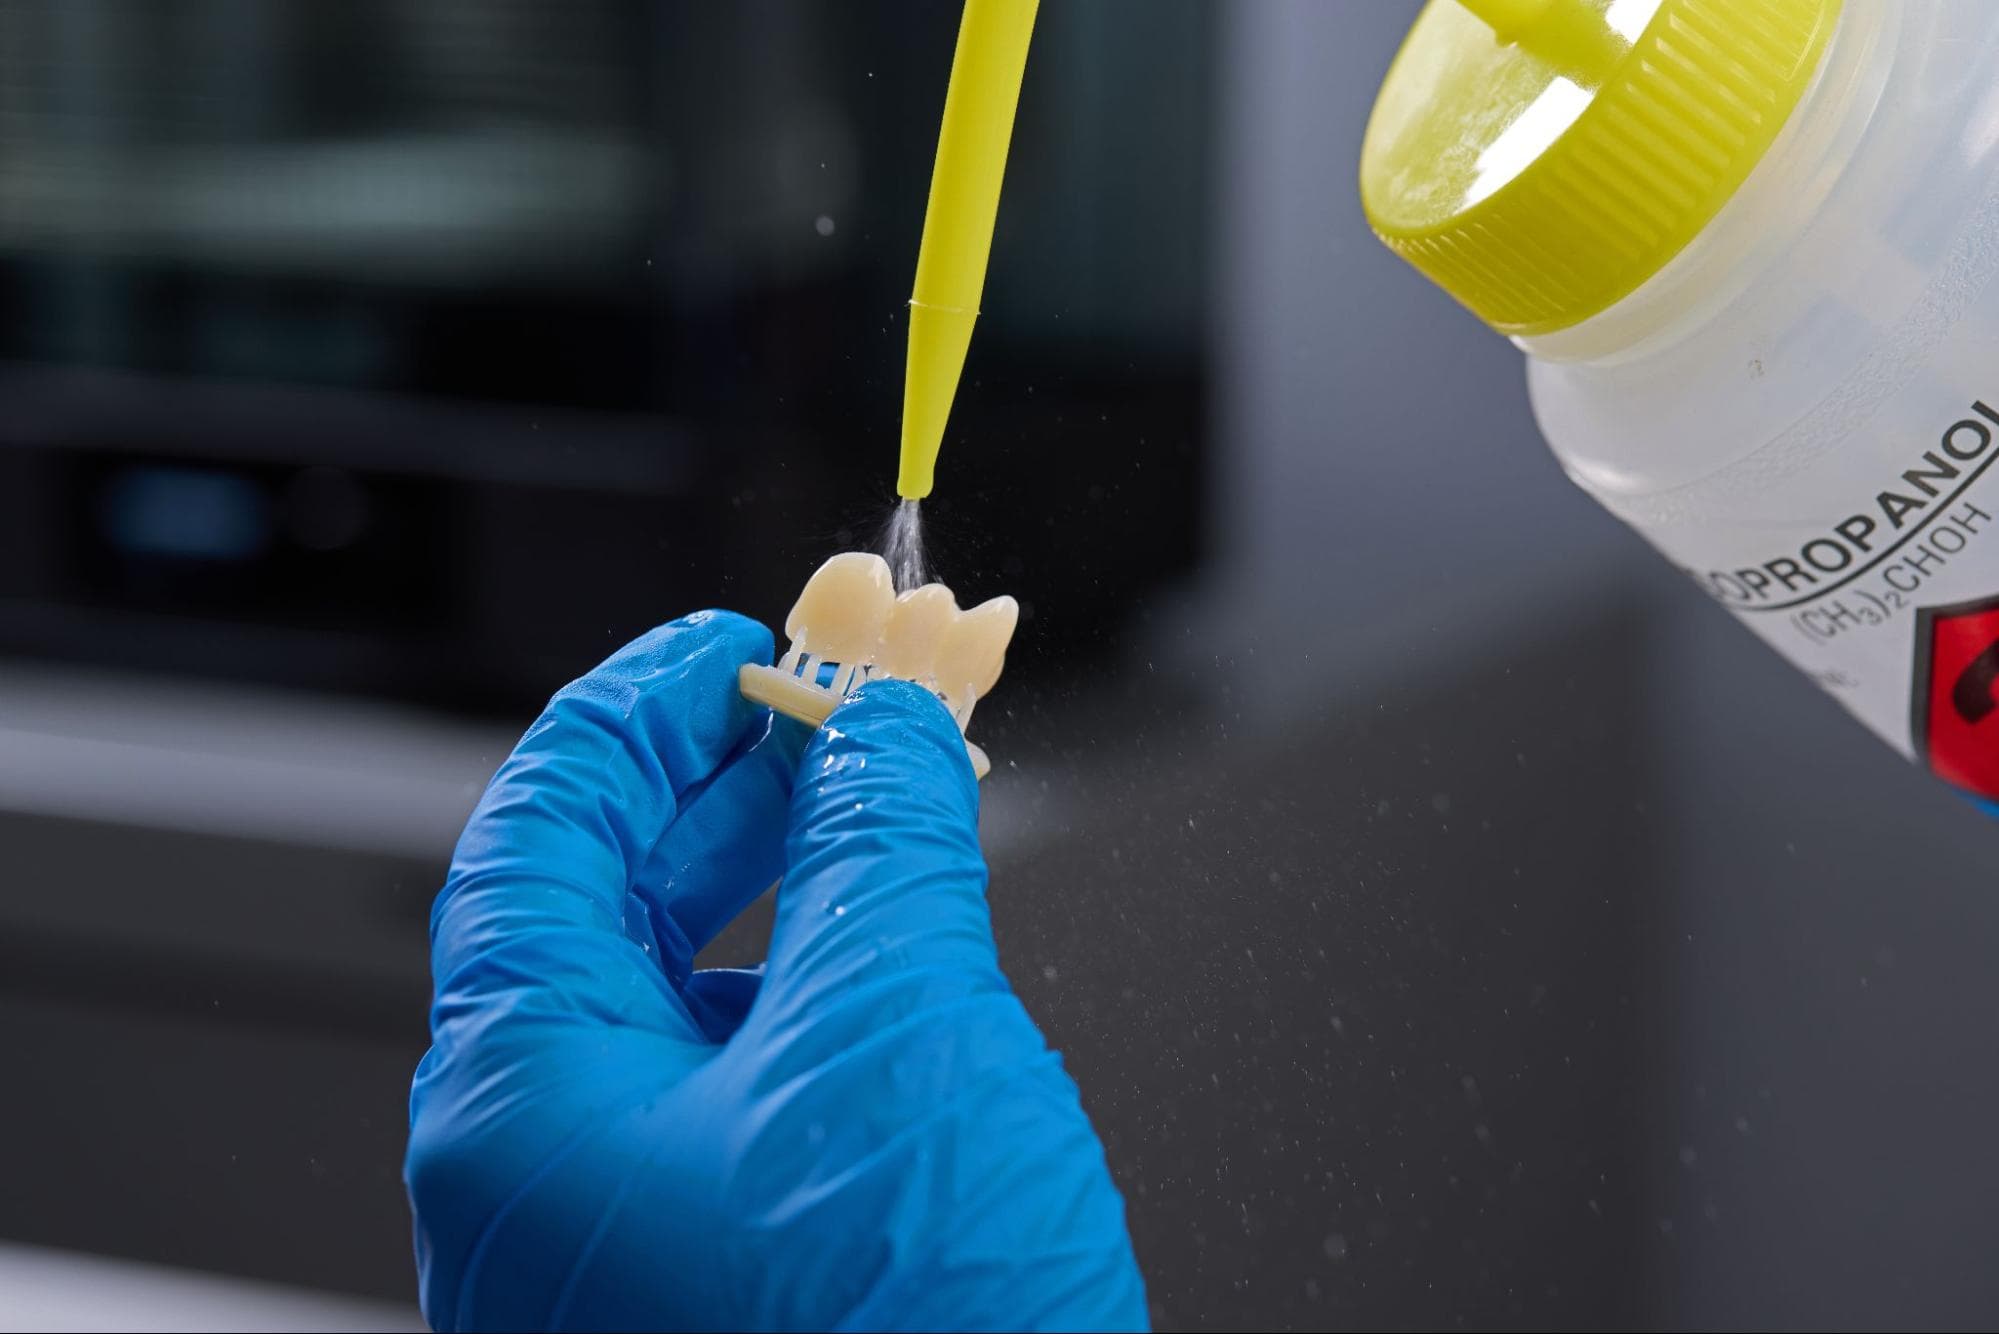
Tip: Immediately blow-dry parts after removing them from IPA to prevent dissolved resin from settling on the part.
Note: Dry times can vary depending on the design of parts and ambient conditions.
4.4 Final Post-Cure
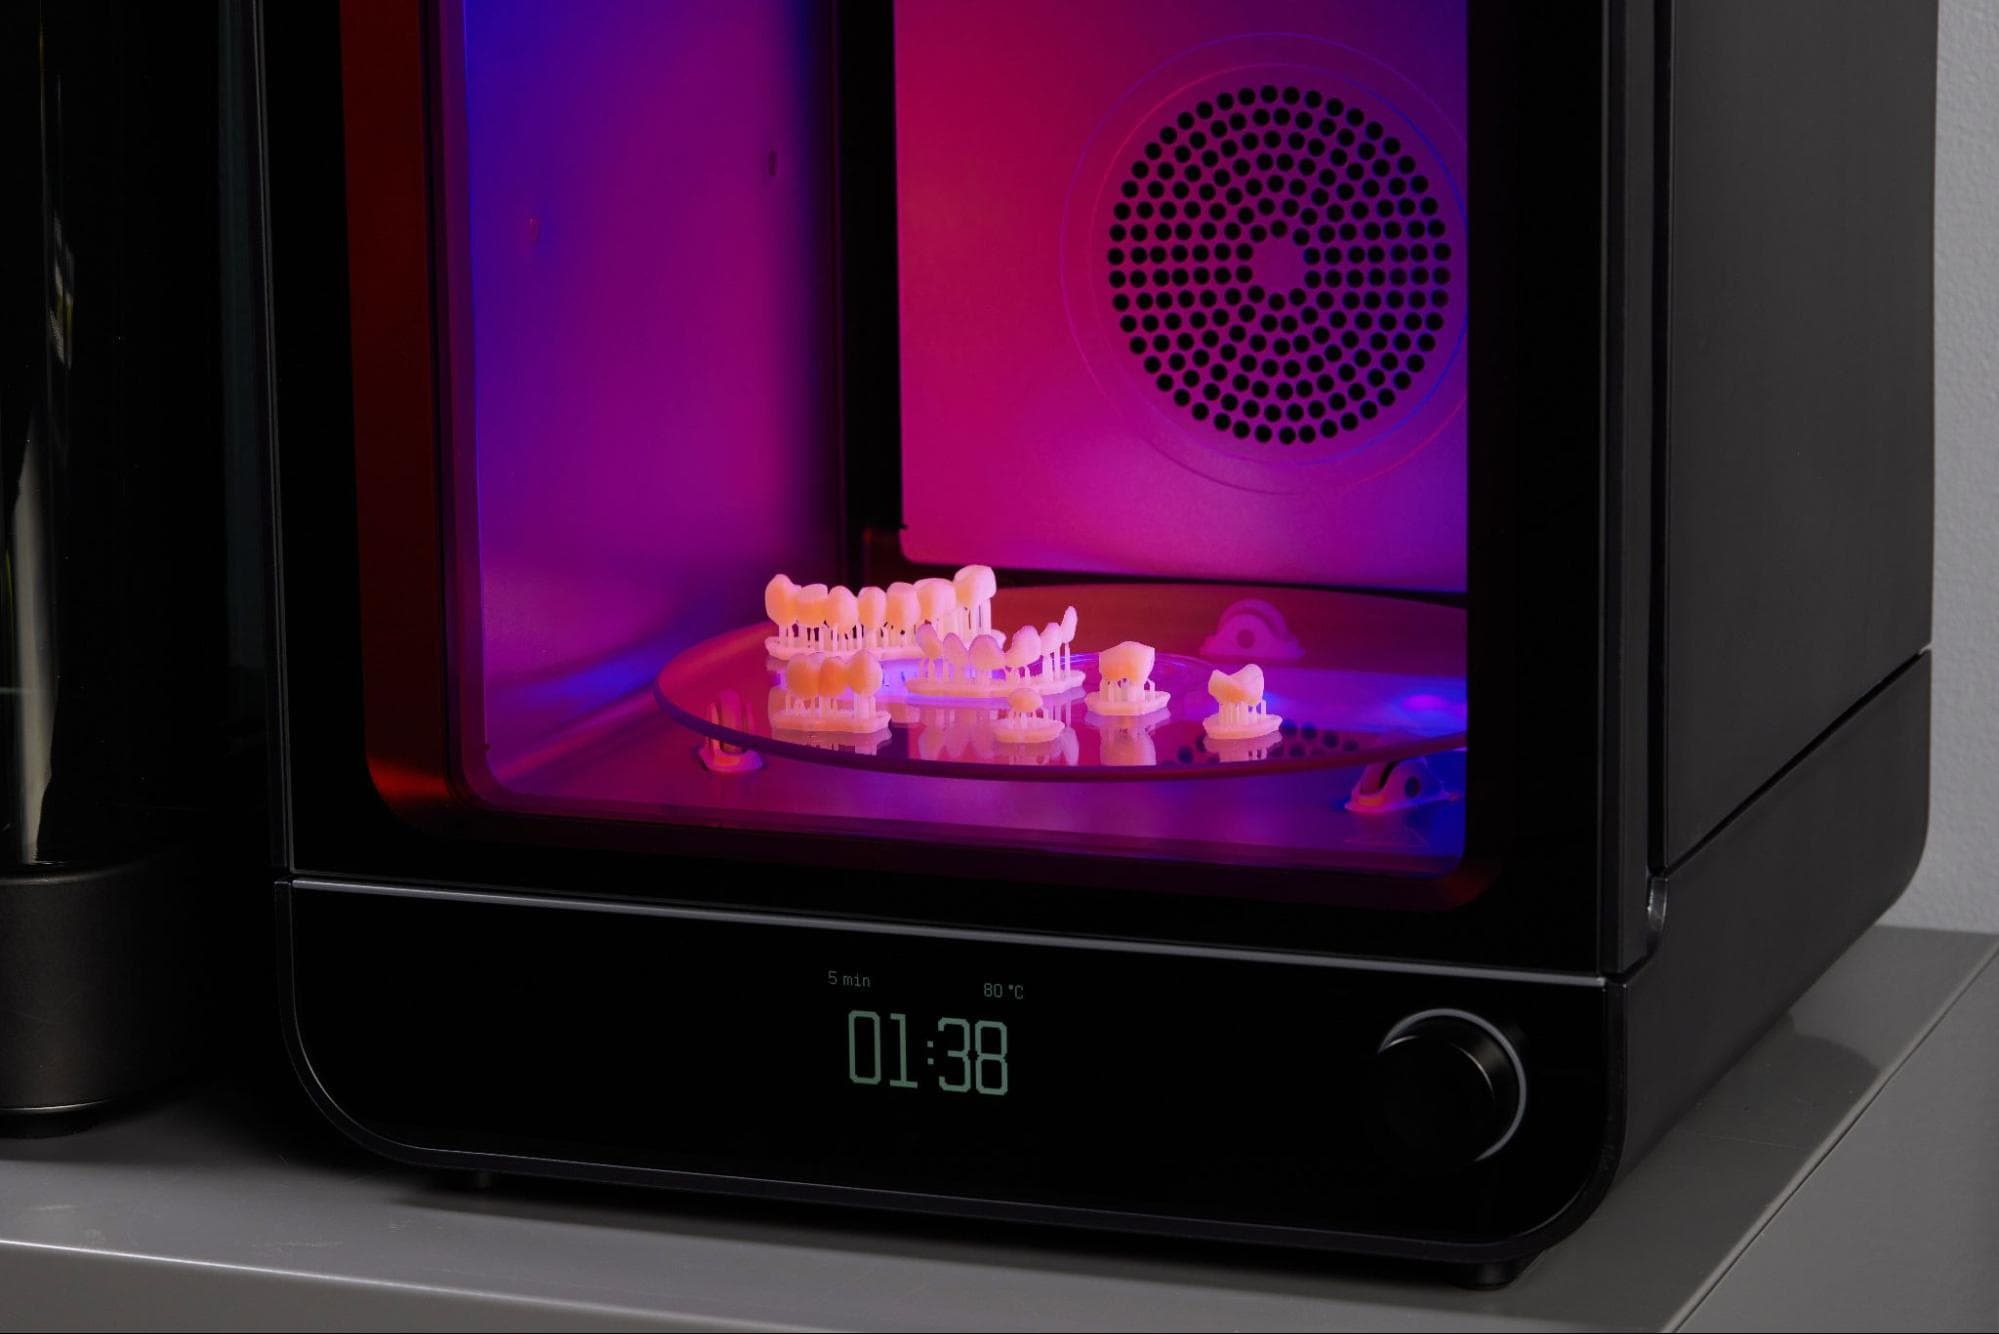
At this point, the appliance is ready for the final post-cure. Printed parts should be cured using a Formlabs-validated curing unit (Form Cure, Form Cure L, or Fast Cure). With the raft and supports still intact, place printed parts in the curing unit with the raft side down. Post-cure the parts in the validated curing unit using settings established in the Manufacturing Guide.
To maintain dimensional accuracy and biocompatibility, specific post-curing instructions must be followed.
Allow the Form Cure, Form Cure L, or Fast Cure units to cool down to room temperature between cure cycles.
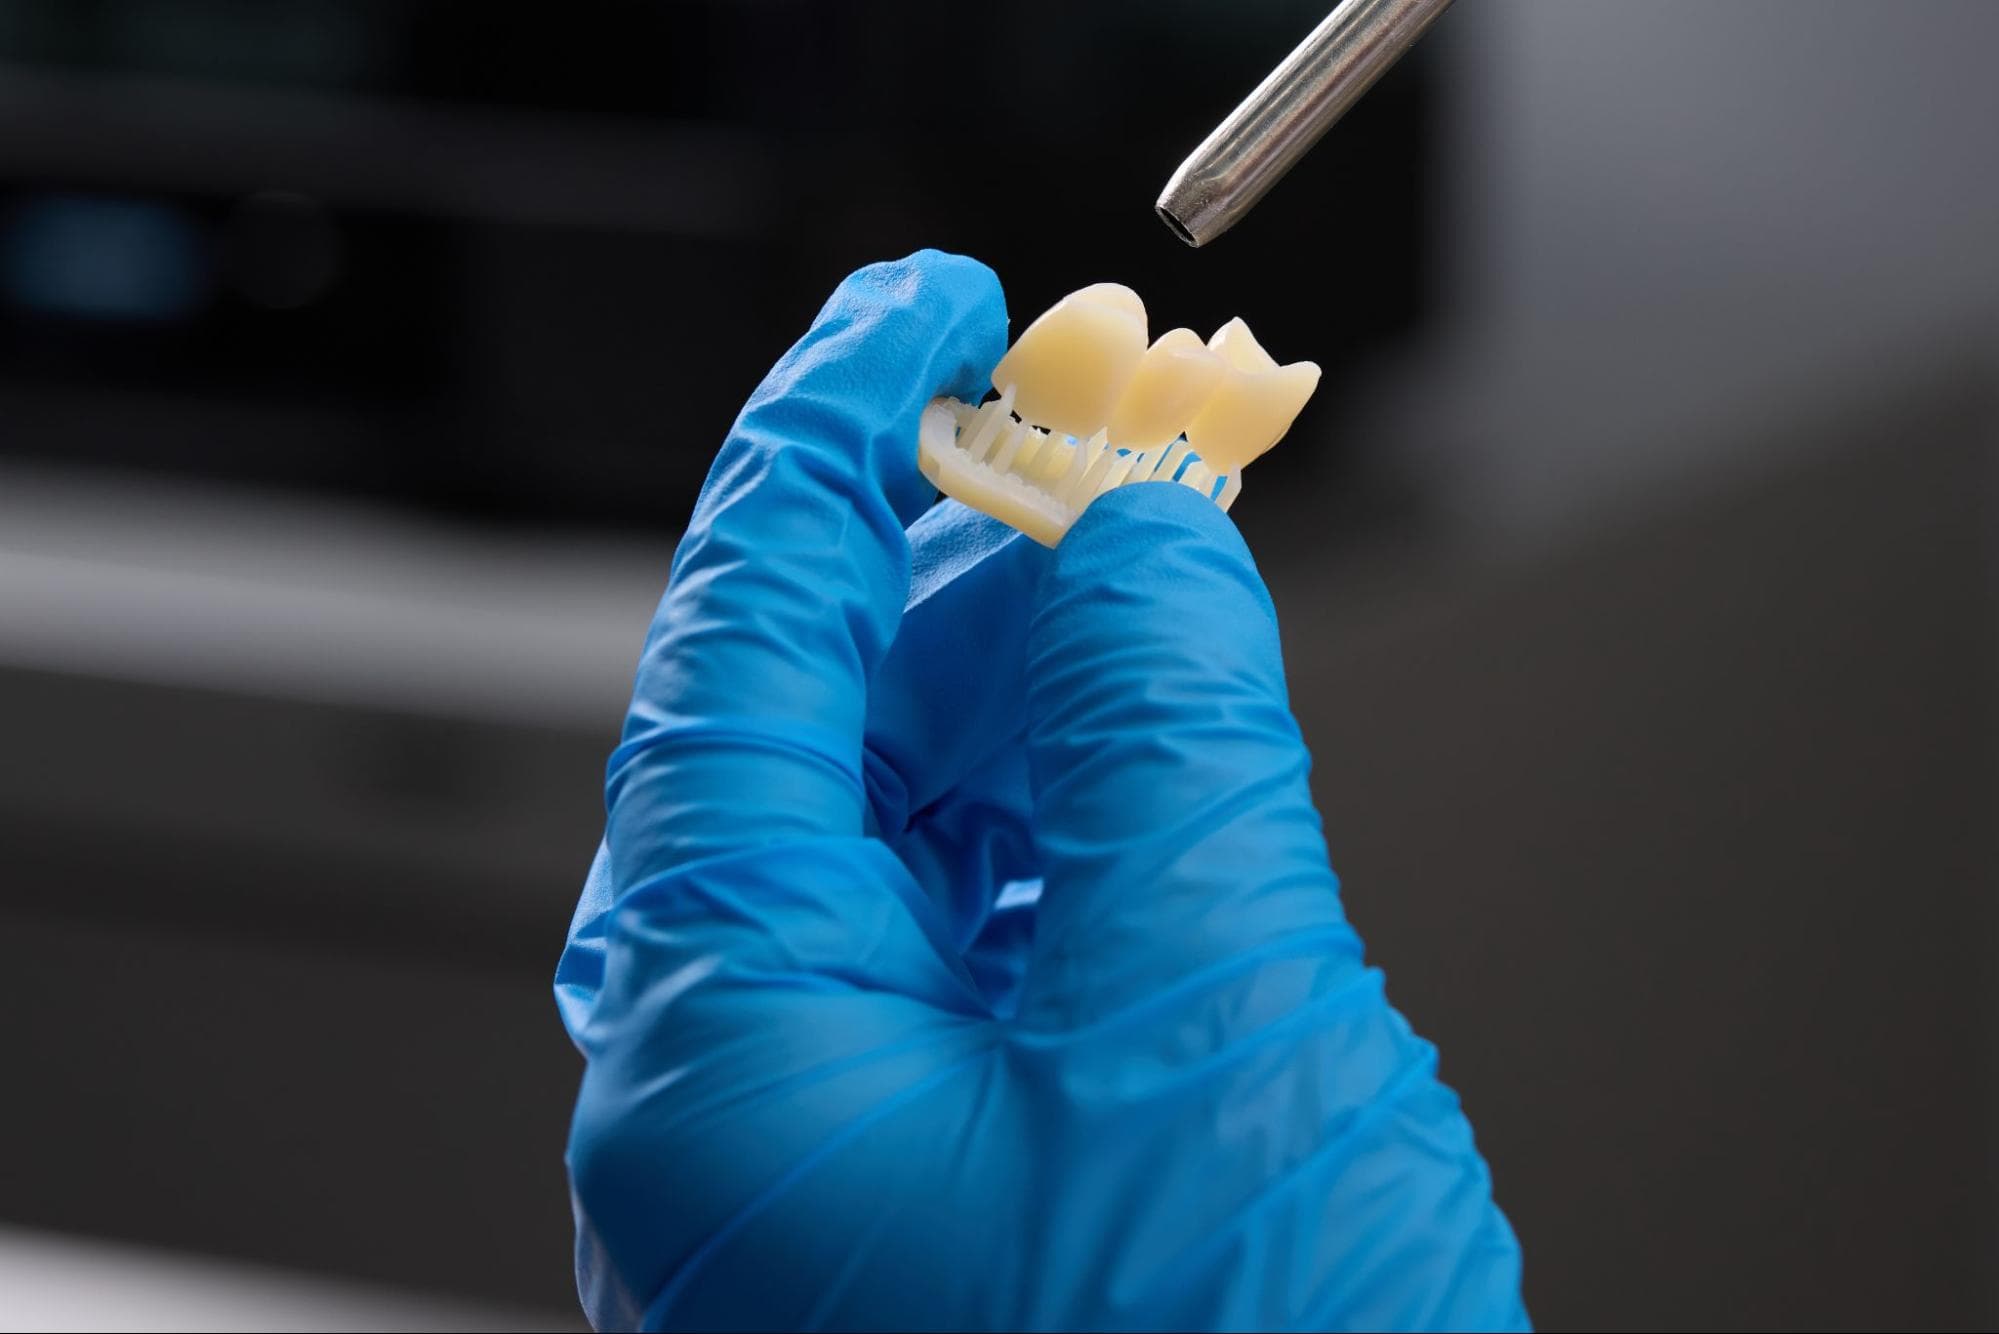
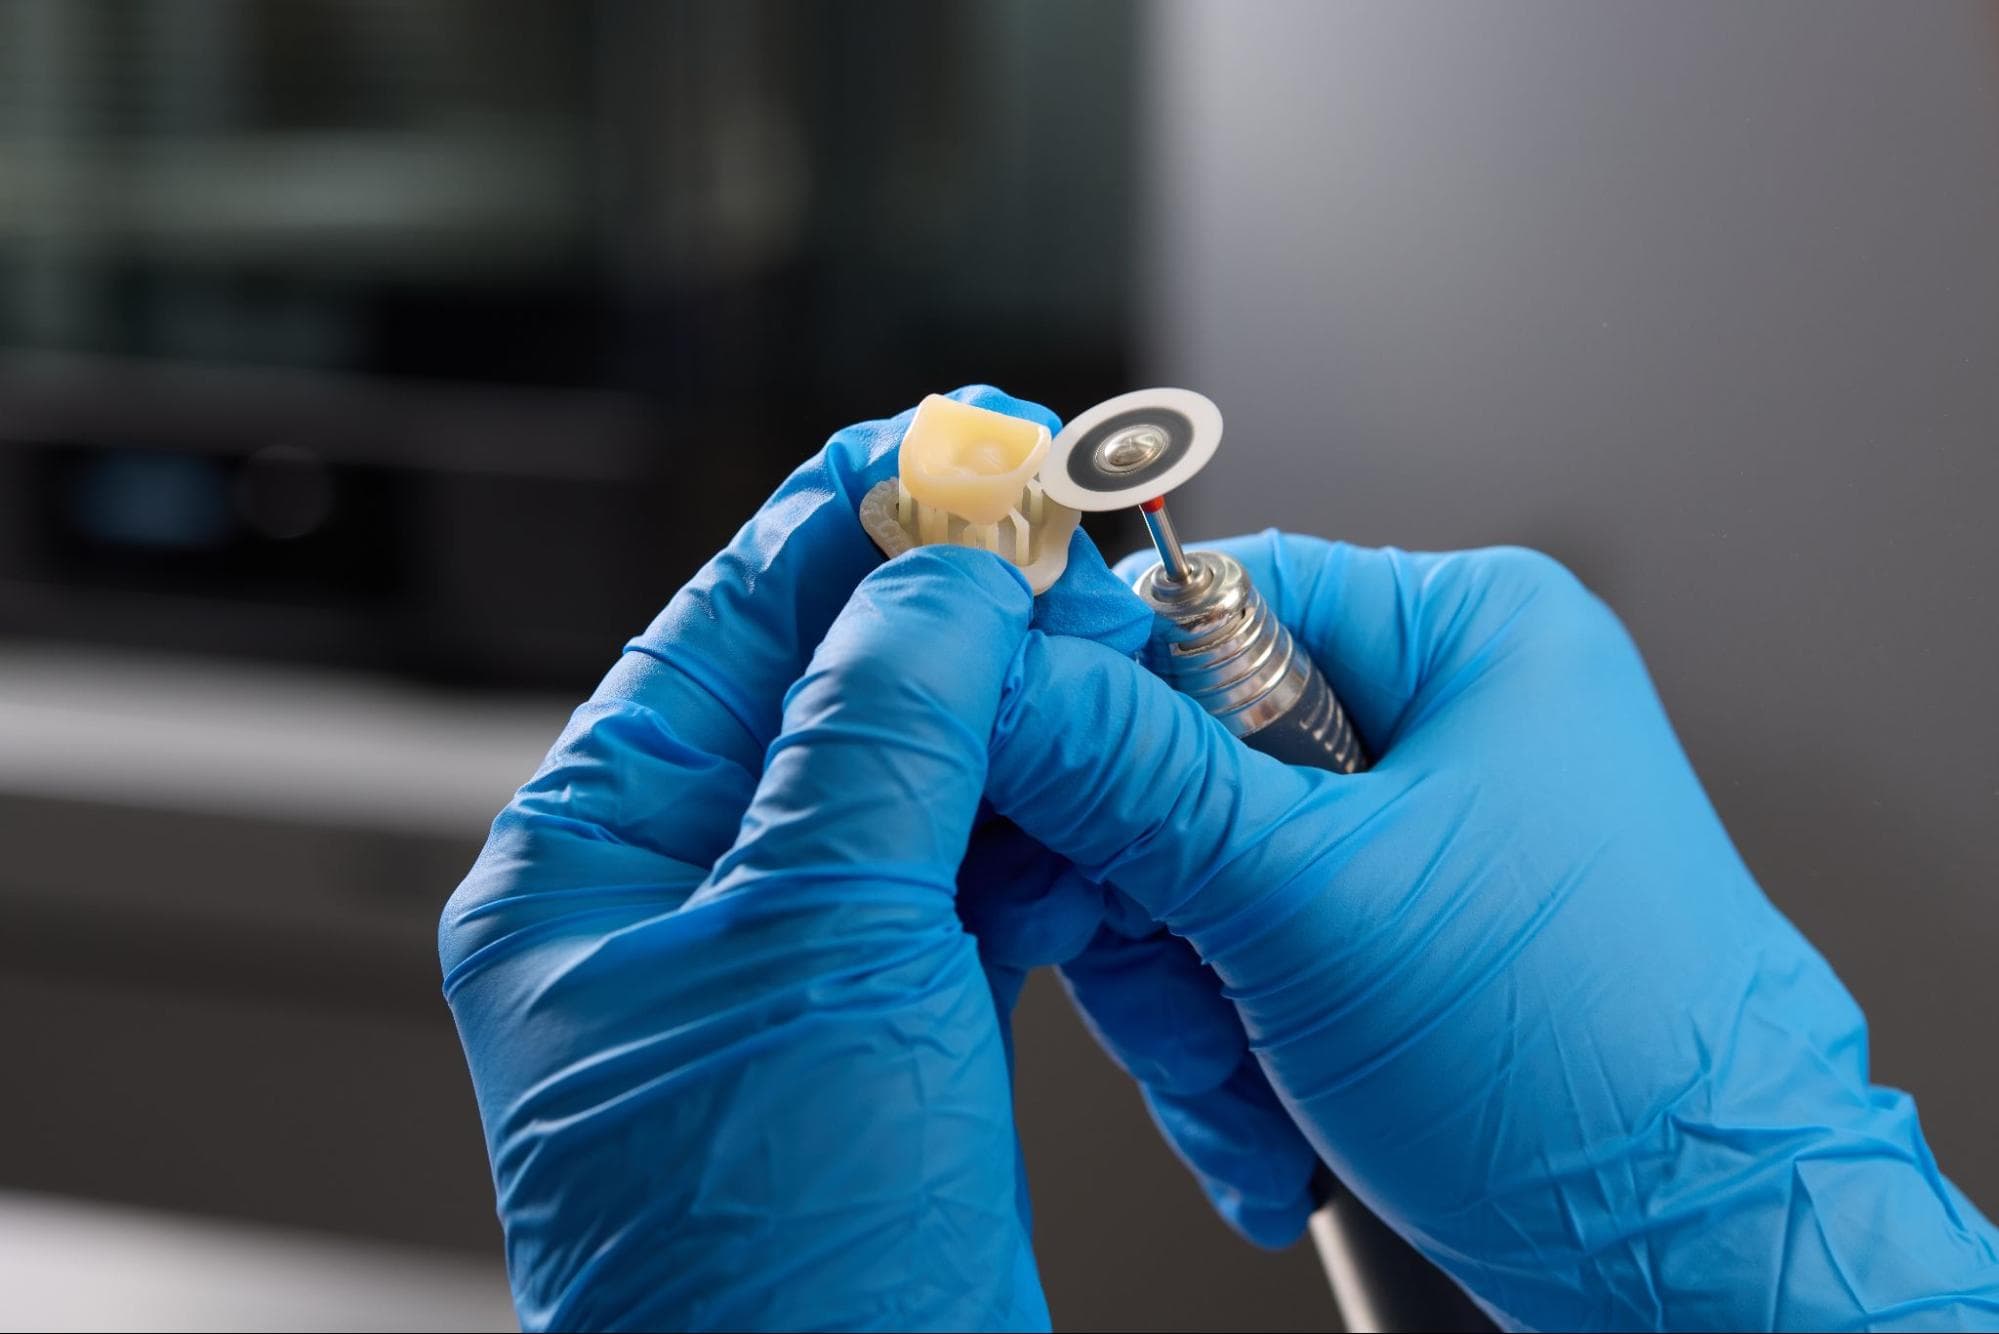
4.5 Support Removal
Once the parts have been completely cured, remove the raft and supports from the appliance. Do not rip off supports to avoid chipping. Use a low-speed dental handpiece, cutting disc, or other appropriate finishing tools.
Inspect the appliance afterward. Discard and reprint it if any damage or cracks are detected.
Note: While ripping the supports from the part might be quicker, it can leave divots in the part or damage the part. We recommend cutting the supports off individually.
Check printed part fit and finish, and contour as needed using a dental handpiece and carbide rotary burs.
4.6 Finishing
Post-cured parts must be polished or glazed prior to use.
A high gloss shine can be achieved with traditional polishing tools and materials used for acrylics and composites.
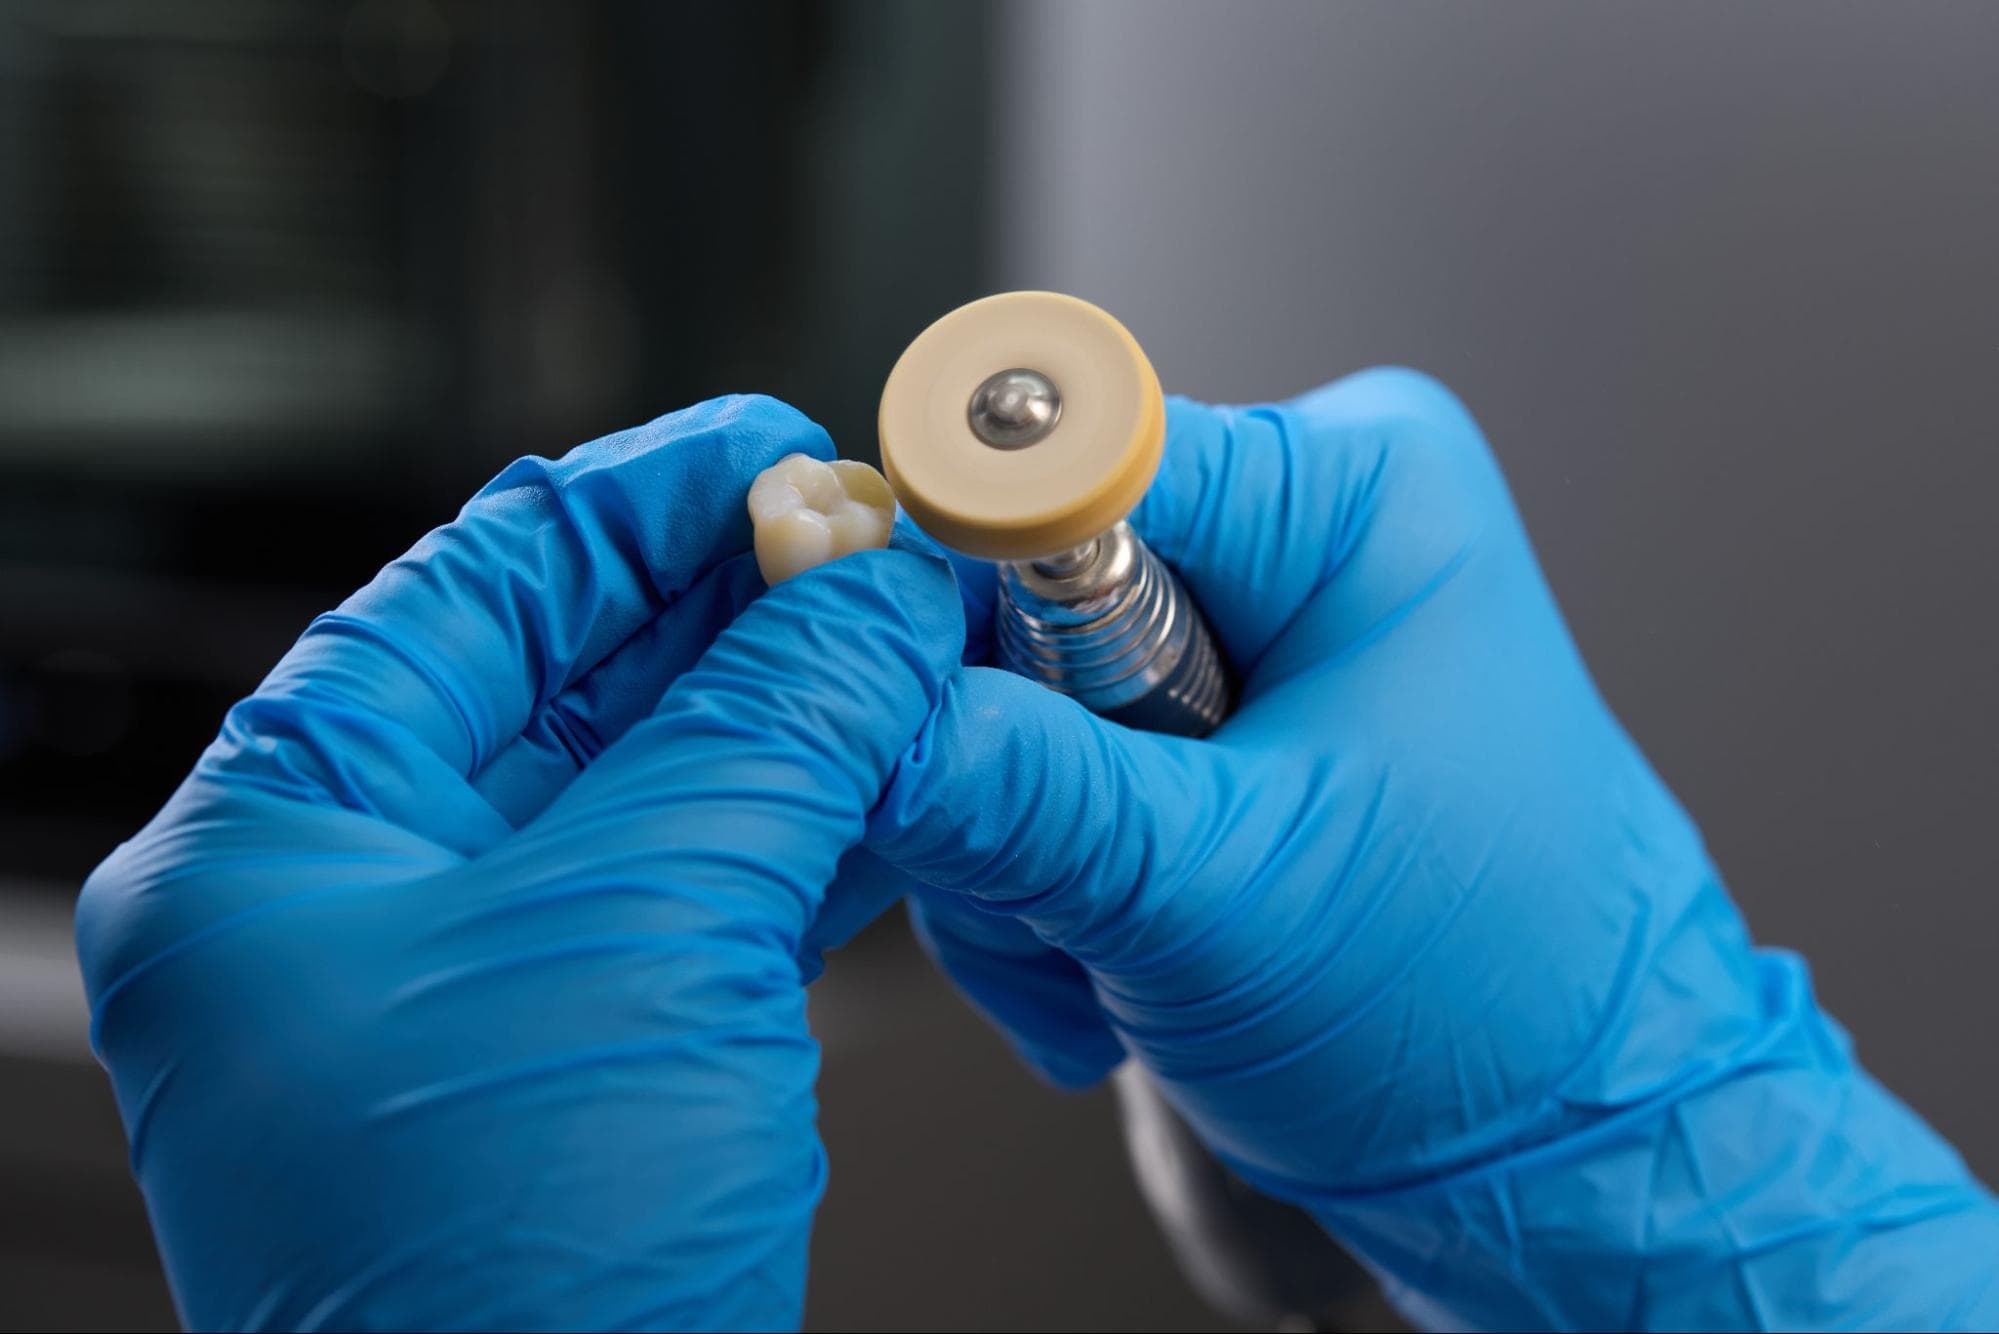
For example, polish the appliance at low speeds using a rag wheel on a lathe with pumice. Finish polishing at high speeds using a polishing compound.
Rinse with water or steam clean.
Tip: A steam cleaner can effectively clean polished parts but may slightly reduce their shine due to inorganic substances in the steam. We recommend using a mild detergent in warm water with an ultrasonic bath for optimal results.
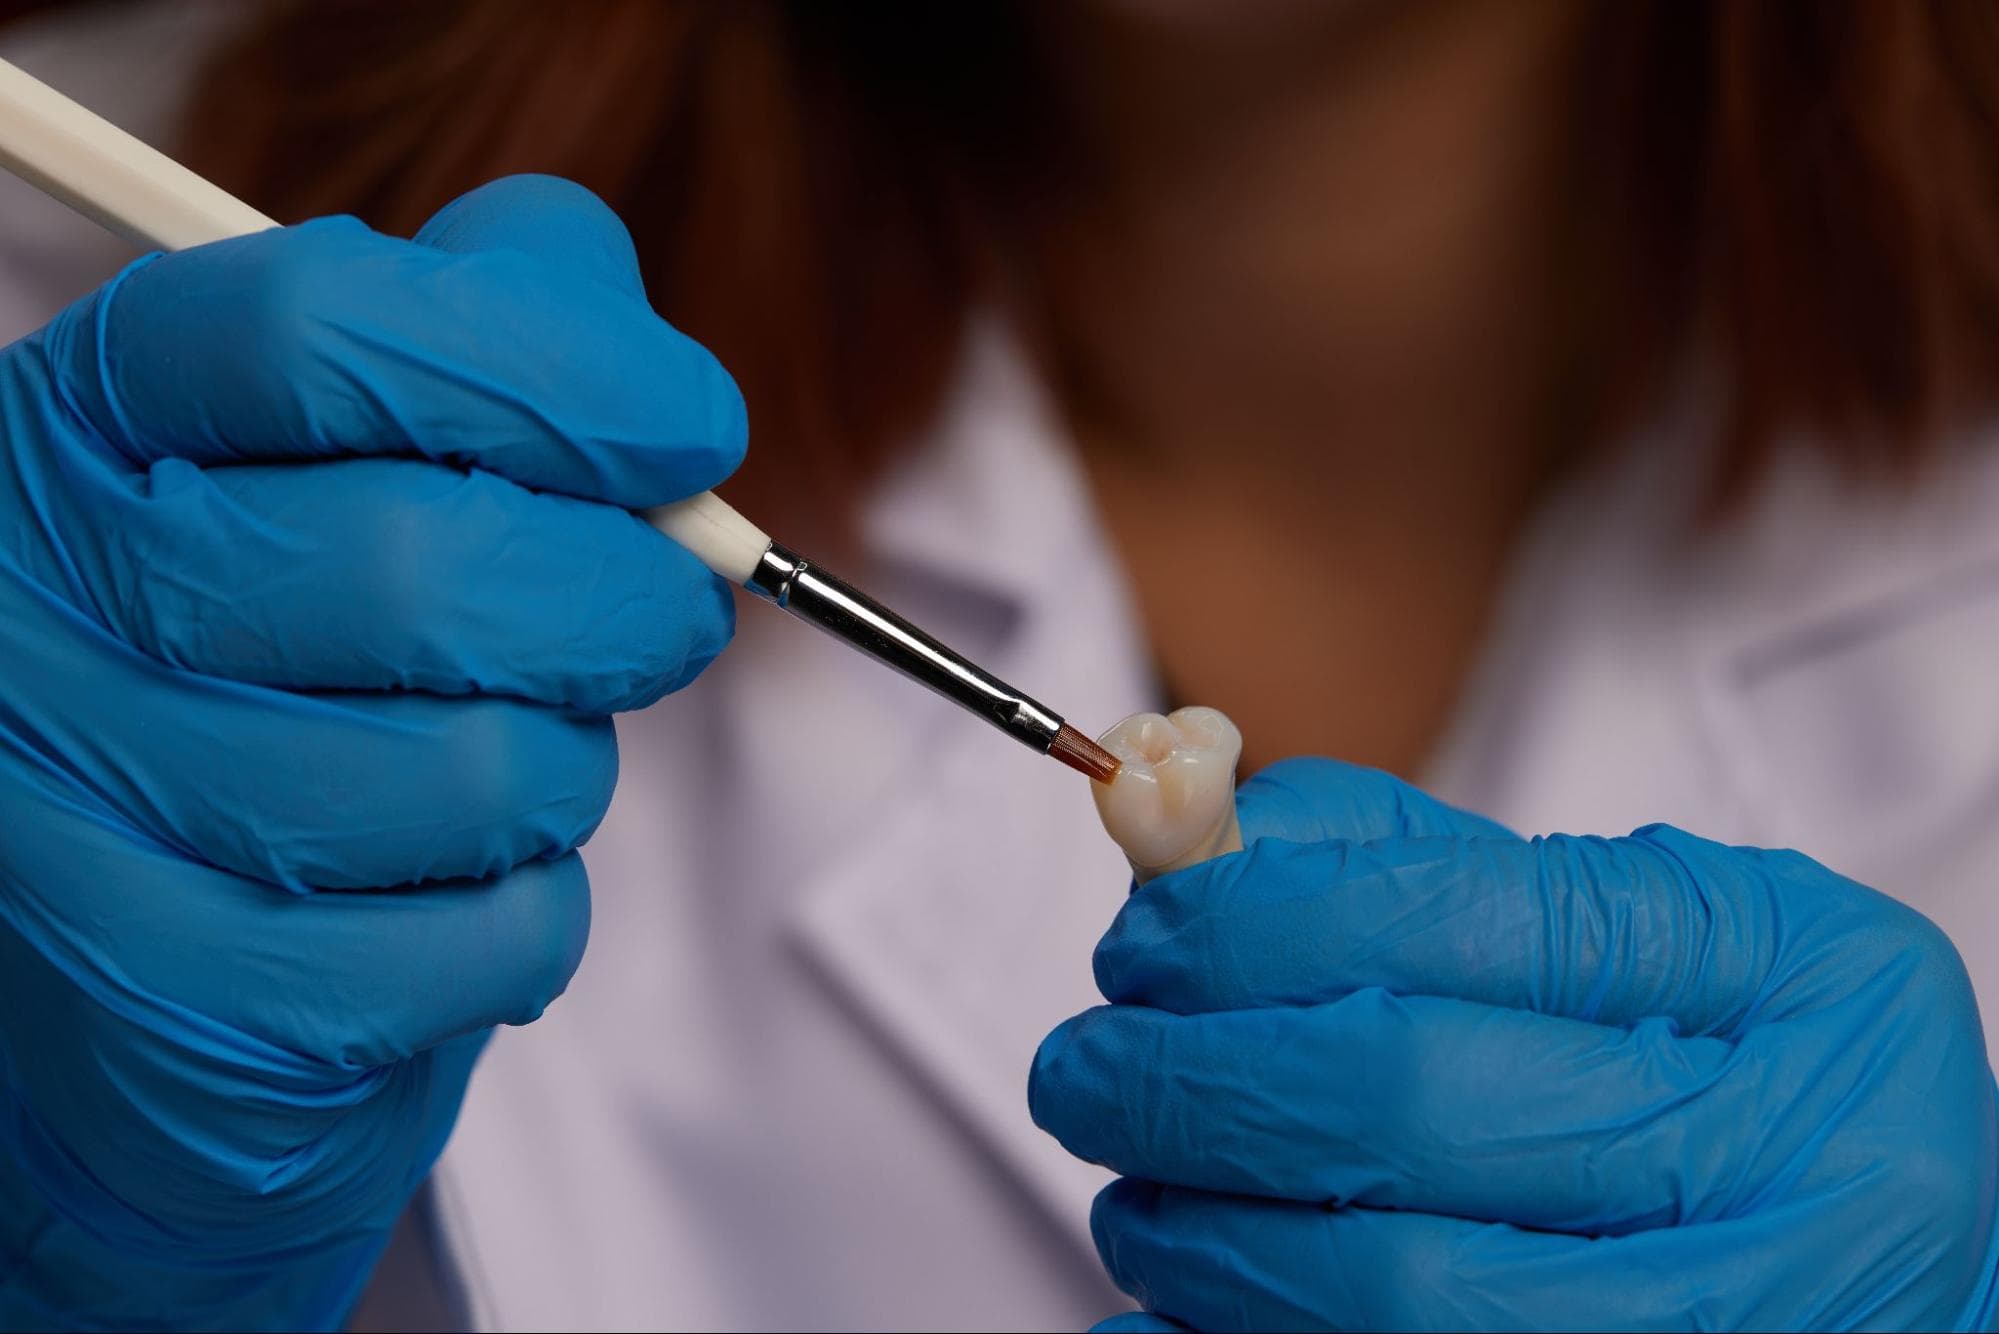
Further customization of the appliance is possible by using pink composite for the gum portion or light-cured glaze and pigments for the tooth portion (e.g. GC Optiglaze, VITA Akzent LC, Shofu Lite Art). Follow the instructions from the material manufacturer.
Avoid overheating the parts during polishing.
Inspect the printed parts again. Discard and reprint if any cracks or damage are detected.
5. Appliance Use
5.1 Cleaning
Fully post-processed parts can be cleaned using neutral soap and room-temperature water.
After cleaning, always inspect parts for any cracks. Discard if any damage or cracks are detected.
5.2 Disinfection
Parts printed with Premium Teeth Resin may be cleaned and disinfected according to facility protocols.
Our tested method of disinfection involves soaking the finished parts in fresh 70% IPA for five minutes.
After disinfection, inspect parts for cracks to ensure the integrity of the printed restorations or appliances.
5.3 Storage
Store in a cool, dry place out of direct sunlight until the clinical appointment. Excess light exposure over time may affect the color and performance of printed parts.
Store the cartridges at 10–25 °C (50–77 °F). Do not exceed 25 °C (77 °F) when in storage. Keep away from ignition sources.
5.4 Appliance Use
For temporary full-arch implant-supported appliances, prepare the surface around the implant holes following the implant cement manufacturer instructions.
Note: Do not screw an implant-supported restoration directly onto the printed part; the screw should always sit on a metal component, such as a Ti-base.
Provisional restorations can be cemented to the patient’s tooth using conventional temporary cement. Always follow the manufacturer's instructions for the temporary cement agent.
5.5 Disposal
1. Any cured resin is non-hazardous and may be disposed of as regular waste.
-
Follow facility protocols for waste that may be considered biohazardous.
2. Liquid resin should be disposed of following government regulations (community, regional, national).
- Contact a licensed professional waste disposal service to dispose of liquid resin.
- Do not allow waste to enter storm or sewer drainage systems.
- Avoid release into the environment.
- Contaminated packaging should be disposed of as an unused product.
Explore Dental Resources
Explore Formlabs Dental resources for in-depth guides, step-by-step tutorials, white papers, webinars, and more.