
When printing with biocompatible resins, a dedicated build platform, resin tank, and resin mixer are needed to ensure biocompatibility.
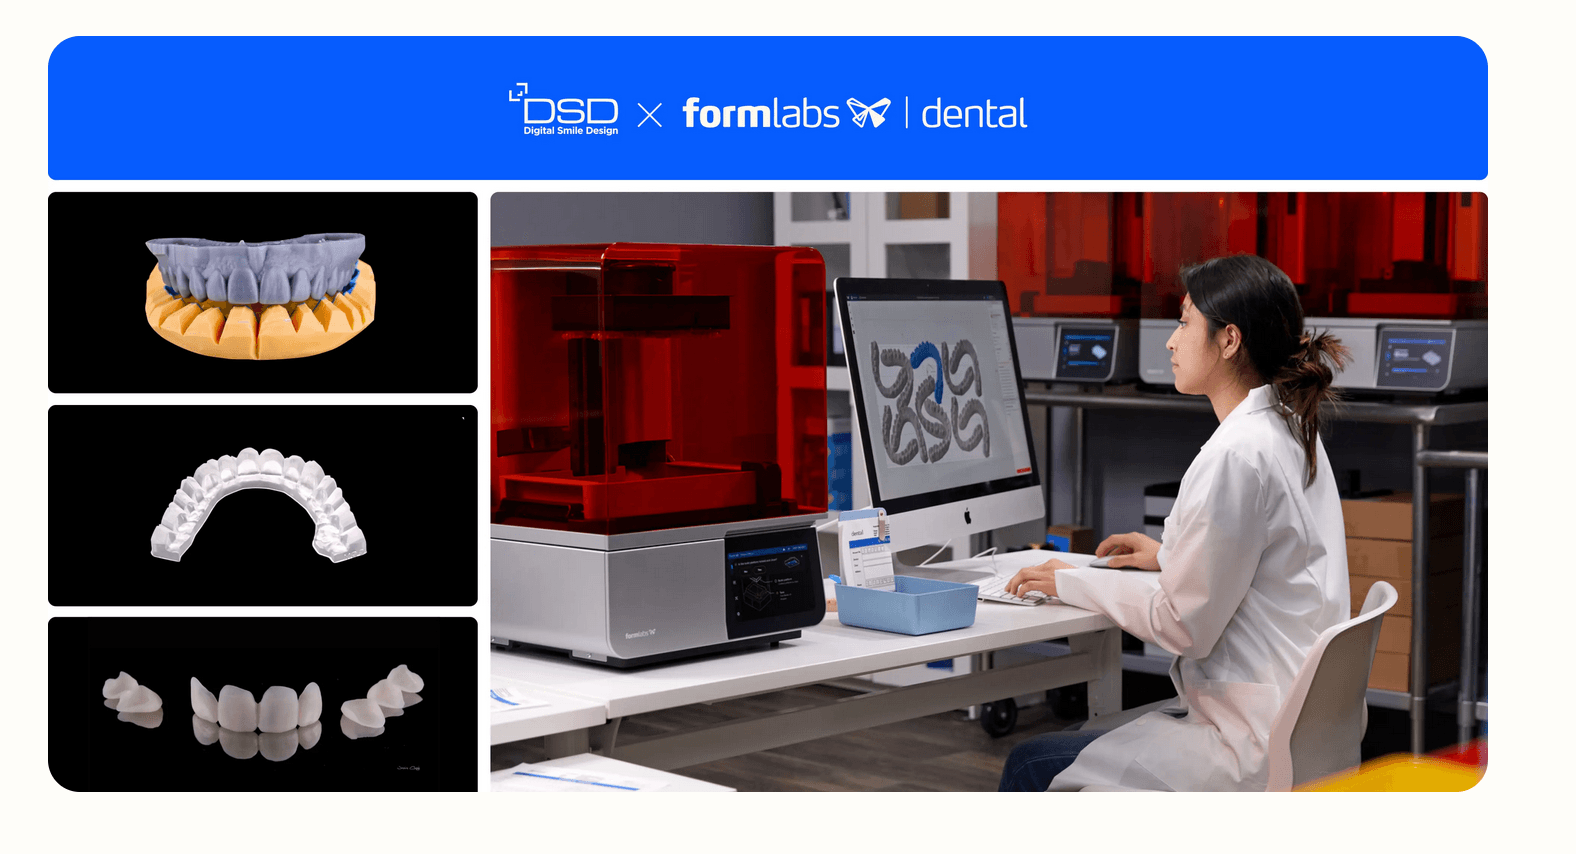
WHITE PAPER
The Mock-Up: An Ultimate Guide to Mastering All 3D Printing Options
This white paper explores the evolution of mock-up fabrication in digital dentistry, presenting three applicable 3D printing protocols that cater to different clinical needs and levels of accuracy:
-
Traditional model production to create a PVS index
-
3D printing the index directly using IBT Flex Resin
-
Printing the mock-up itself with tooth-colored biocompatible resins
Each approach offers unique benefits. By outlining the full workflow and providing guidance on how to choose the most suitable method, this guide equips dental professionals with the tools to deliver efficient, predictable, and patient-centered mock-up solutions.
The Mock-Up: An Ultimate Guide to Mastering All 3D Printing Options
Download as PDFThis white paper explores the evolution of mock-up fabrication in digital dentistry, presenting three applicable 3D printing protocols that cater to different clinical needs and levels of accuracy:
-
Traditional model production to create a PVS index
-
3D printing the index directly using IBT Flex Resin
-
Printing the mock-up itself with tooth-colored biocompatible resins
Each approach offers unique benefits. By outlining the full workflow and providing guidance on how to choose the most suitable method, this guide equips dental professionals with the tools to deliver efficient, predictable, and patient-centered mock-up solutions.
About This Guide
Formlabs Dental and Digital Smile Design (DSD) have joined forces to redefine what’s possible in modern dentistry. Since 2019, this collaboration has brought together DSD’s pioneering vision in comprehensive guided dentistry and Formlabs Dental’s leadership in advanced dental 3D printing technologies. By combining clinical innovation with cutting-edge manufacturing tools, we've been working to develop the next generation of digital workflows and practical solutions for dental professionals.
As part of this joint effort, we’ve explored and tested a variety of protocols to create the best-in-class mock-ups, essential tools for diagnostic, clinical, and communication purposes. DSD has continuously pushed the boundaries of what 3D printing can offer in the dental space, providing invaluable feedback that has shaped product development and inspired new clinical applications. Meanwhile, Formlabs Dental has delivered the materials, hardware, and reliability to turn these ideas into tangible, everyday solutions.
Together, we have witnessed the significant evolution of the mock-up technique. What once began with printing physical models to create PVS indexes has now advanced to the direct printing of biocompatible, end-use appliances. Today, 3D printing offers incredibly flexible approaches, streamlining workflows and enhancing patient outcomes.
This guide presents three proven protocols for using 3D printing to fabricate mock-ups, offering flexible, efficient, and innovative options to suit a wide range of clinical needs. Below, we explain:
-
How to choose the best 3D printing workflow depending on the type of mock-up you need to produce
-
Provide guidance on selecting the right approach
-
Walk you through the full 3D printing process from design to final outcome
This comprehensive guide is the result of many years of collaborative work. It has been prepared after multiple intensive sessions, extensive testing, and valuable insights gained from practical application, including during DSD Clinical Courses. The authors, Dr. Luken de Arbeloa and Dr. Elisa Praderi, have dedicated years to bringing these concepts together into this consolidated resource.
Get in Touch
Whether you need to produce occlusal splints in-house, or are looking for high-throughput production of dental models, we're here to help. Get in touch with a dental expert to find the right solution for your business.
The Concept Around the Mock-up
The mock-up has long been a cornerstone of restorative and esthetic dentistry, a trusted tool to help patients visualize potential outcomes. In recent years, DSD has redefined its role. By integrating psychology, 3D design, and structured clinical workflows, DSD transformed the mock-up into a powerful bridge between patient motivation and clinical execution. No longer just a visual aid, the mock-up is now a communication tool, a motivational driver, and a technical reference — all depending on the timing and intent within the treatment journey.
At the core of the DSD approach is the understanding that mock-ups serve two very different purposes: motivation and technical execution. These are separated by a key clinical moment: case acceptance.
If we look at the DSD Workflow, the listed steps are followed:
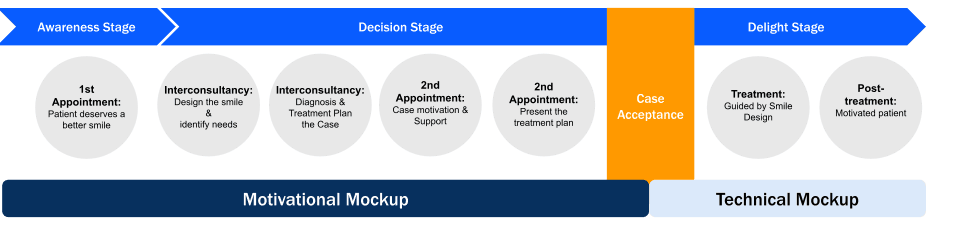
Based on the above, we can identify that we would use different types of mock-ups for different phases and purposes.
Types of Mock-ups
Motivational Mock-up: Creating the Emotional Connection With the Patient

The motivational mock-up is designed to inspire and engage the patient before case acceptance. It serves as an emotional tool to help the patient visualize their future smile, build trust, and understand the value of the proposed treatment. At this stage, clinical accuracy is not the priority as we are strictly focusing on motivation only.
From a design and 3D printing perspective, the designed mock-up is intentionally bulky and fully additive, with no preparation guides or fine anatomical detail, as it isn’t intended to support technical decisions. The typical workflow involves printing a model used to fabricate a PVS index and using bis-acryl resin to transfer that design to the patient’s mouth.
Since this mock-up is used primarily for photos or social-distance visualization, ultra-high precision isn’t required — layer heights of 100 to 200 μm are more than adequate. This makes it ideal for fast prints using cost-effective materials. For example, we can print a model in 160 or 200 μm layer height with Form 4B in less than 10 mins.
Another alternative that has appeared most recently is the use of biocompatible tooth-colored resins for the production of ‘the shell’. For example, we can print the motivational mock-up using Premium Teeth Resin at 100 μm that will take 20 minutes. This process becomes more efficient as there are less steps involved and less material consumption.
Technical Mock-up: Technical Decisions and Clinical Execution
Once the patient has accepted the treatment plan, the focus shifts to the technical mock-up, which plays a crucial role in supporting clinical decision-making and ensuring precise treatment execution.
Unlike the motivational mock-up, the technical version is more refined and functional, featuring accurate anatomical contours that closely match the planned final result. It guides important clinical steps such as crown lengthening, tooth preparation depth, and soft tissue management.
The workflow may include direct printed shells or detailed mock-ups transferred using printed indexes. Precision is critical at this stage, requiring high-resolution 3D printing and careful material selection to ensure reliable handling and fit. Ultimately, the technical mock-up validates and guides the clinical protocol, helping dental professionals execute complex restorative procedures with confidence, consistency and predictability.
The following table summarizes the concepts of the different types of mock-ups:
|
Motivational Mock-up |
Technical Mock-up |
|
|
The moment |
Before case acceptance |
After case acceptance |
|
The design |
Adapted design to allow placement in the mouth over the existing pre-op situation |
Ideal design to guide clinical procedures and the final outcome |
|
The purpose |
|
|
|
The material |
Bis-acryl or shell |
Bis-acryl or shell |
The Evolution of the Mock-up: From Past To Present
The DSD team has already prepared valuable guides that offer a thorough analysis of the mock-up's concept and the evolution of the technique. For more detailed information, you can refer to “The Complete Guide to the DSD Mockup Success Formula.”
|
Historically Used Protocols |
||||||
|
Direct Mock-up Technique |
Indirect/Direct Mock-up Technique |
Fully Indirect Mock-up Technique |
||||
|
Fully direct manual approach |
Prefabricated direct composite shells |
Indirect/direct manual |
DSD Mock-up |
Fully indirect handmade shell |
Fully indirect digital snap-on |
DSD Shell |
Direct Mock-up Technique
Case by Dr. Galip Gurel
From: "The Complete Guide to the DSD Mockup Success Formula"
1. Fully Direct Manual Approach: where composite is used directly in the patient’s mouth to do the smile design. The challenge here is that the clinician must have a great sense of facial esthetics. This step can be time-consuming and labor-intensive, and it may be challenging to convey its value to the patient and justify the time investment at this stage.
Case by Dr. Paulo Kano
From: "The Complete Guide to the DSD Mockup Success Formula"
2. Prefabricated Direct Composite Shells: Historically, one of the key analog approaches was the direct mock-up technique, developed by Dr. Paulo Kano. This method uses prefabricated composite shells that are positioned directly in the patient’s mouth. The process involves manual waxing upon a model, followed by copying the model’s texture using silicone PVS index to create these composite shells. While effective, this technique is very time-consuming and requires considerable manual skill to execute properly.
Indirect/Direct Mock-up Technique
Case by Dr. Christian Coachman
From: "The Complete Guide to the DSD Mockup Success Formula"
1. Indirect/Direct Manual: An initial impression of the current patient situation is needed, followed by a manual wax-up on a model that may be the product of the measurements from a 2D DSD Design. The waxed-up model must be transferred to the patient’s mouth using a PVS silicone index filled with bis-acryl resin. The shape and texture in these cases is applied manually by the dental technician imitating the anatomy of the teeth and the aesthetic result depends on the correct interpretation of the 2D DSD Design.
Case by Dr. Ricardo Brito
From: "The Complete Guide to the DSD Mockup Success Formula"
2. DSD Mock-up: This is an evolution of the indirect/direct manual technique, substituting the manual wax-up for a digital one. The main benefits are:
-
The creation of the Motivational Mock-up or wax-up after completing a DSD Ideal Design
-
The overlapping of the .STL files with the patient’s face and real tooth textures
As there is an intermediate digital step, the mock-up is done in the second appointment.
To create the mock-up, the design is 3D printed as a model and a silicone index or vacuum tray created from it. The way to bring this design to the patient’s mouth is exactly the same as the previous mock-up technique using a PVS silicone index, which in this case is a copy of the Motivational 3D Printed Model using bis-acryl.
Fully Indirect Mock-up Technique
Wax-up and mock-up performed by Well Lab, São Paulo
From: "The Complete Guide to the DSD Mockup Success Formula"
1. Fully Indirect Handmade Shell: This mock-up is fully fabricated in the dental lab based on a handmade wax-up and without the involvement of a patient. From this, removable acrylic or bis-acrylic shells are produced manually on a model by copying the wax-up. The device requires adequate thickness and connector size to resist the path of insertion without breaking.
Wax-up and mock-up performed by Well Lab, São Paulo
From: "The Complete Guide to the DSD Mockup Success Formula"
2. Fully Indirect Digital Snap-On: This mock-up is achieved using a digital wax-up. The project is adapted in CAD/CAM software giving it the same characteristics as the fully indirect handmade shell including adequate thickness and strong connectors to resist the path of insertion. This usually makes these devices more bulky, less delicate, and less aesthetic. However, it can be used as an orthopaedic/functional device to equilibrate the bite.

DSD Shell mock-up by Dr. Luken de Arbeloa
From: "The Complete Guide to the DSD Mockup Success Formula"
3. DSD Shell: Due to the evolution of technology, this fully indirect mock-up technique is different from the traditional DSD Mock-up technique in the way the design is transferred to the patient’s mouth.
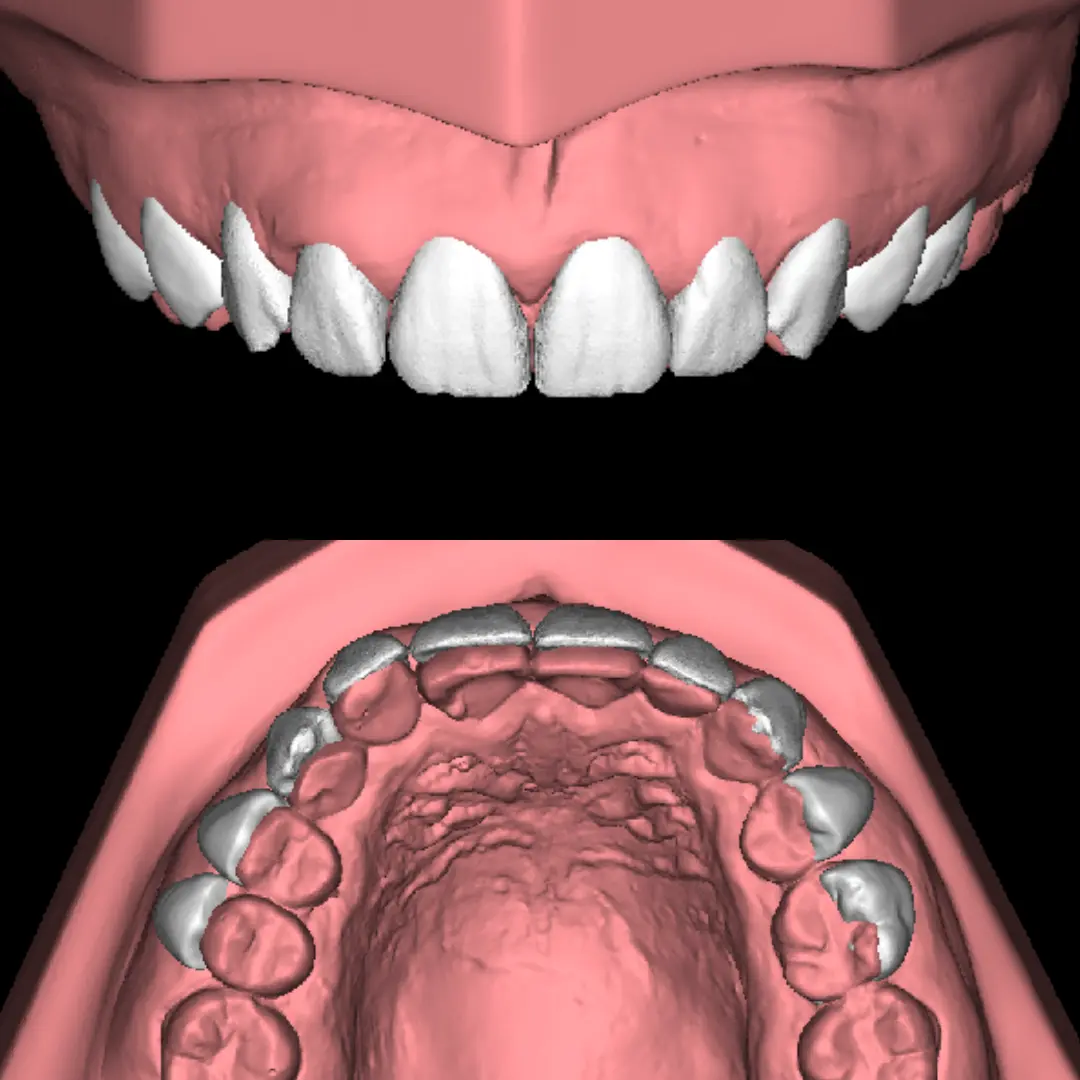
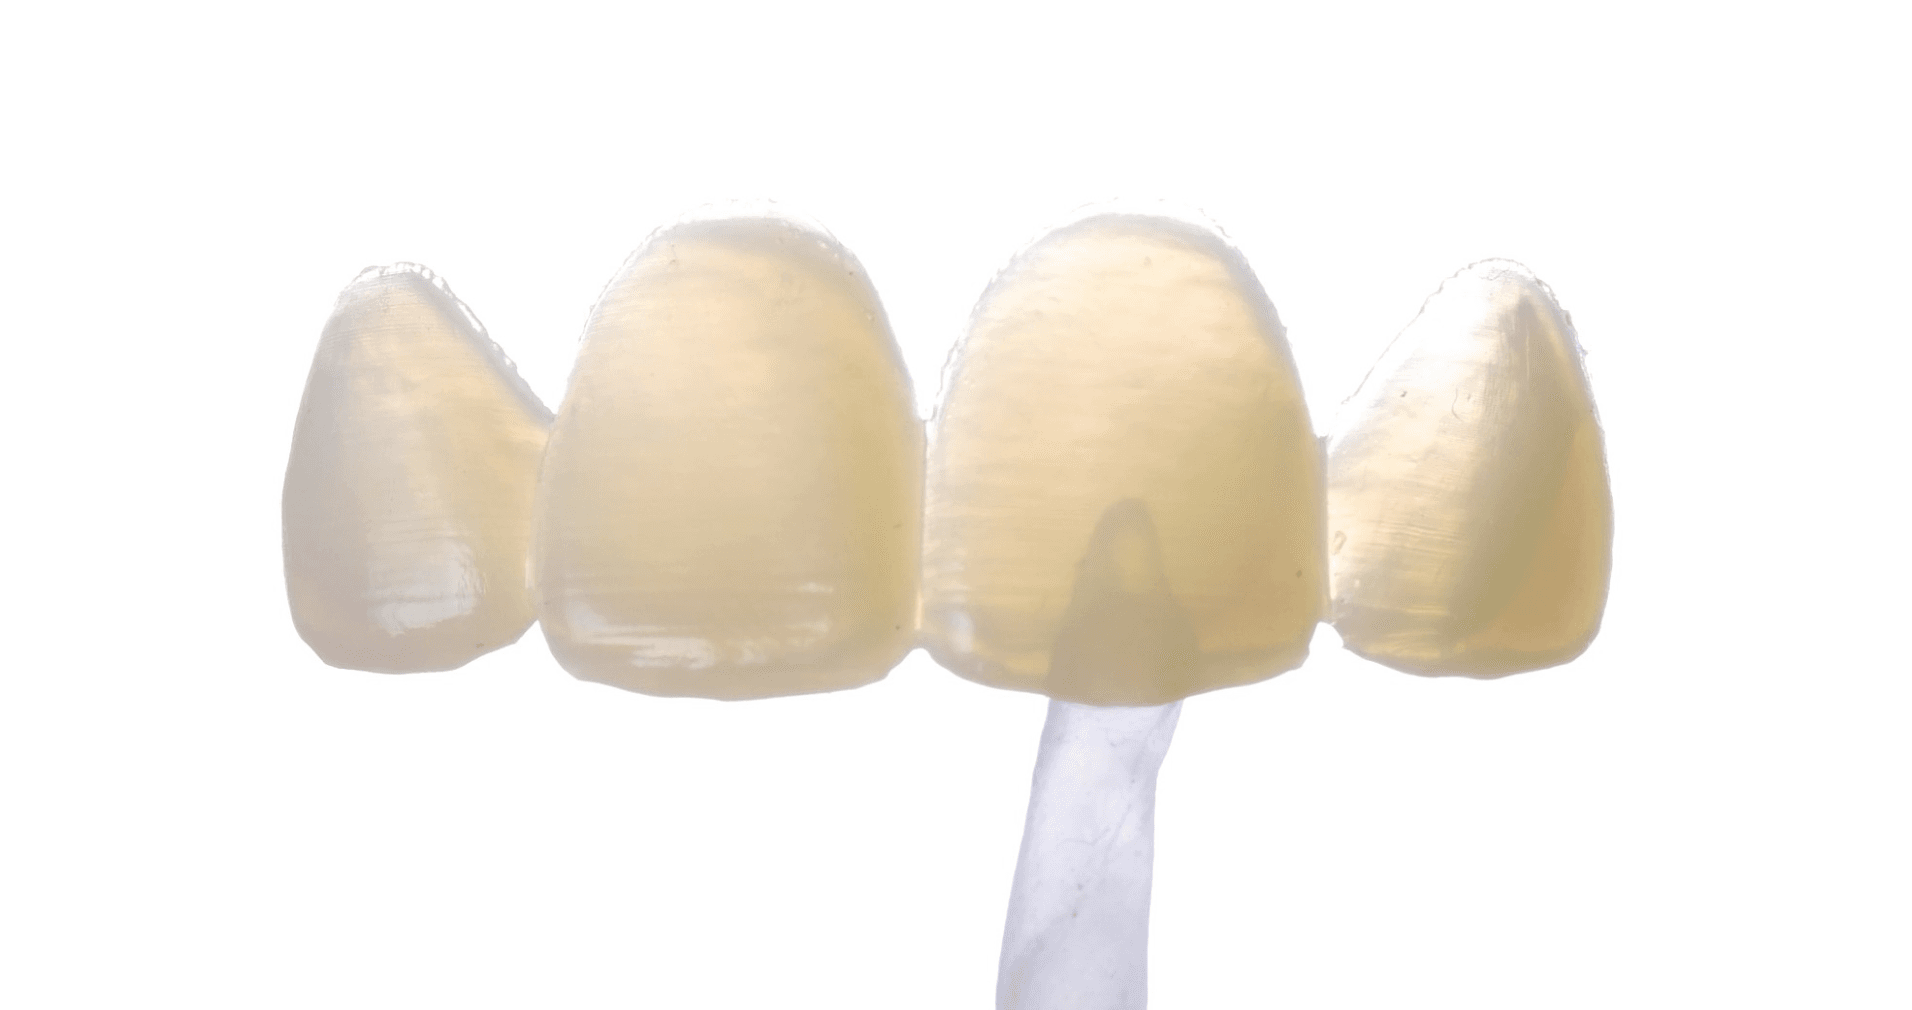
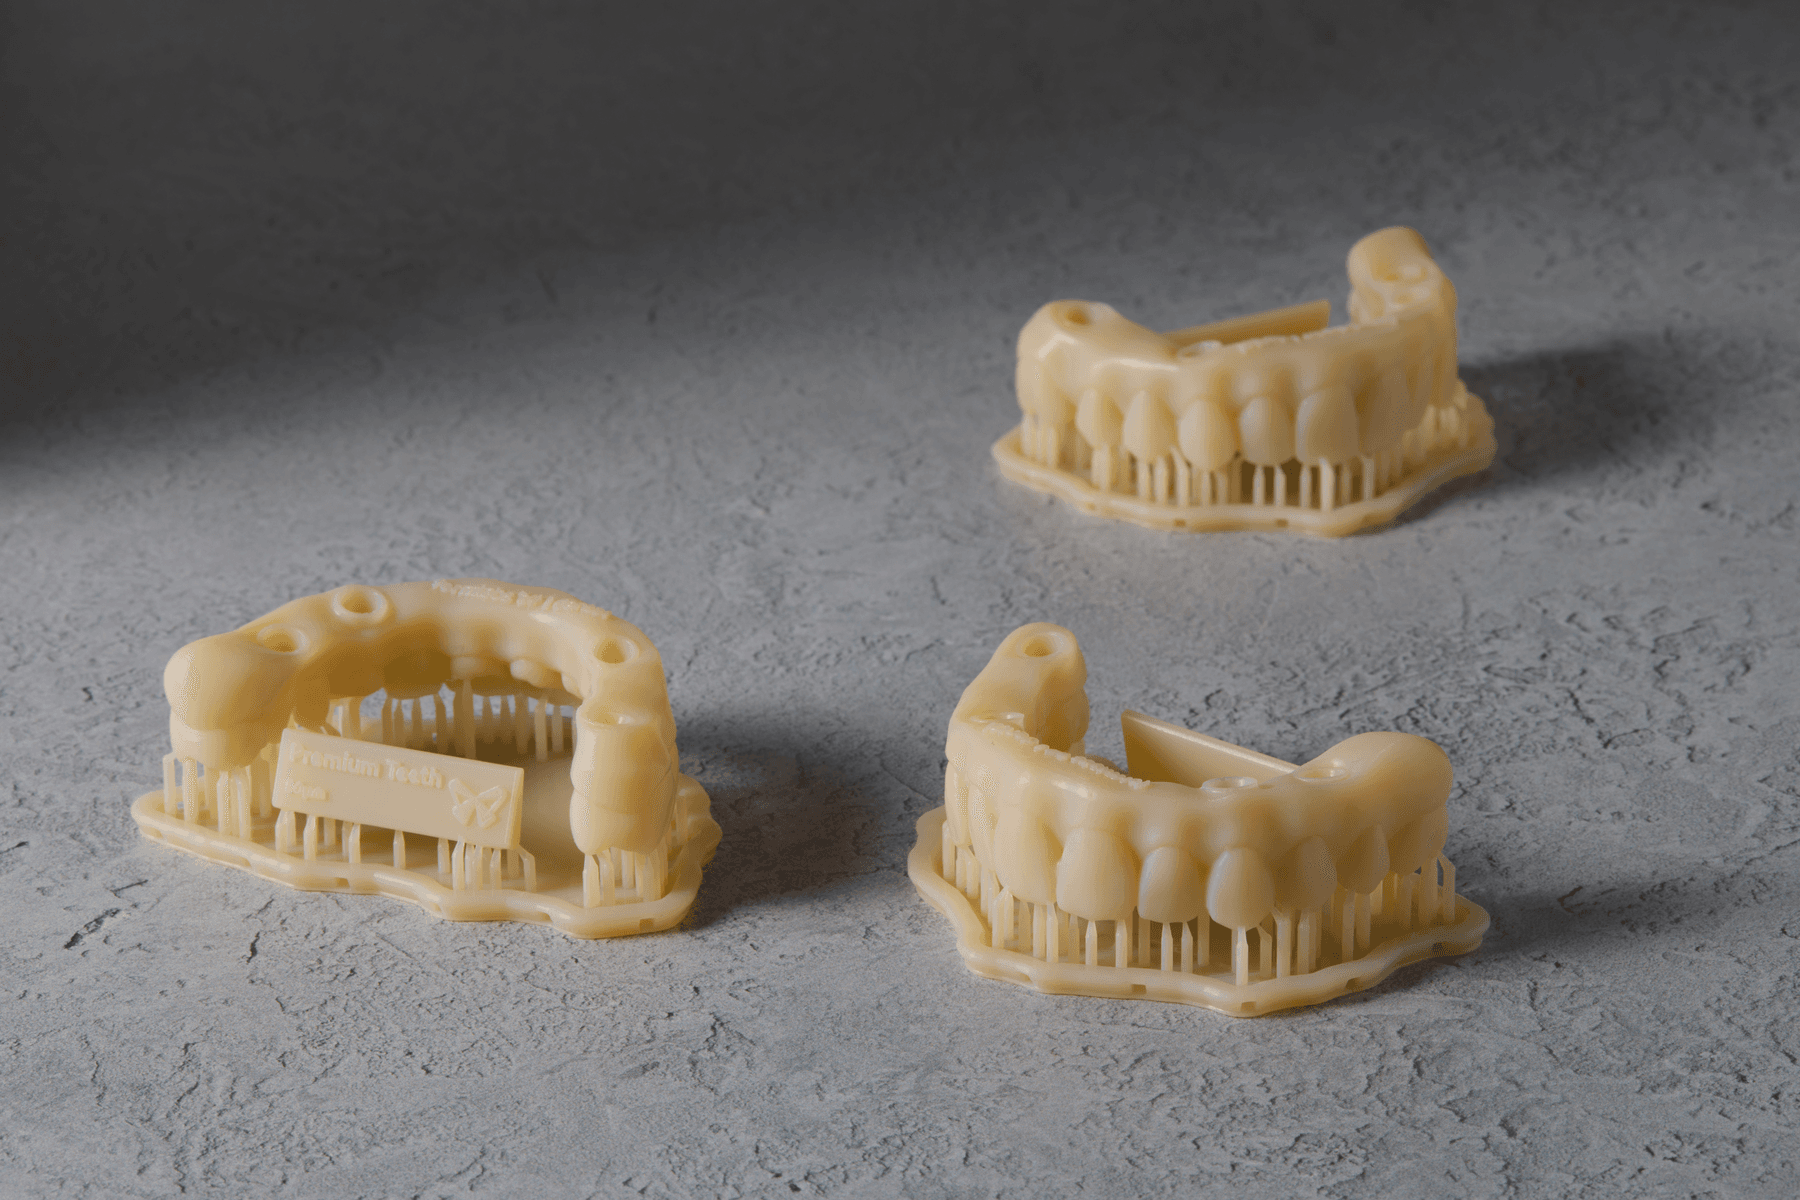
Taking advantage of 3D printing technology, a biocompatible tooth-colored resin is used to print the mock-up. The design is created by modifying the 3D DSD Ideal Design into a Motivational Design. This 3D printed mock-up is ready to be placed in the patient’s mouth without the need for a silicone index. It consists of three very fine sections that are then adhered to the teeth with flowable composite, obtaining a result that is facially integrated with natural textures and adequate color, and which is quick and easy to place.
Modern Mock-up Options Using 3D Printing
3D Printing Empowered Mock-up Techniques
Indirect/Direct Mock-up Technique
The DSD Mock-up
In the current landscape, the DSD mock-up represents a hybrid analog-digital method. After designing the smile digitally, the model is 3D printed, and a PVS silicone index is created for transferring the mock-up intraorally with bis-acryl resin. This technique combines the precision of digital design with the familiar analog transfer process.
Indirect/Direct Mock-up Technique
Printed Index
A more recent innovation is printing the transfer index directly using a flexible biocompatible material (eg. IBT Flex Resin). This eliminates the need to print a physical model, streamlining the workflow by saving both time and materials. This method retains the clinical effectiveness of the traditional transfer while introducing digital efficiency.
Fully Indirect Mock-up
DSD Shells
The fully indirect mock-up has embraced digital fabrication through the production of 3D printed shells using biocompatible, tooth-colored resins. These digitally fabricated mock-ups offer excellent aesthetics, precision, and cost efficiency. Their quality and convenience have made them a favorite among clinicians looking for a completely digital solution to mock-up fabrication.
Request a Free Sample Part
See and feel Formlabs quality firsthand. We’ll ship a free 3D printed sample part printed on the Form 4B to your office.
Overview of 3D Printing Protocols for the Production of the Mock-up
Protocol 1: Model Production Used to Fabricate a PVS Index
The foundational DSD mock-up. A printed model which is used to create a PVS index, transferred to the mouth with bis-acryl resin.

Protocol 2: Printed Index With IBT Flex Resin
Skip the model entirely. Print a flexible index directly, simplifying the workflow and reducing material use.
Protocol 3: Printed Mock-up Shell With Biocompatible Tooth-Colored Resins
A fully digital, totally indirect mock-up. High-precision, aesthetic, and ideal for chairside try-ins or as a mid-term provisional.
From a 3D printing perspective, each method has a specific recommended material and approach. Motivational mock-ups require less precision (layer heights of 100–200 μm are sufficient), while technical mock-ups demand maximum accuracy and material fidelity (50 μm).
By understanding the purpose behind each type of mock-up and applying the right 3D printing strategy, dental professionals can elevate both patient engagement and clinical outcomes, combining emotion and precision like never before.
In the full digital workflow utilizing 3D printing, the following steps are covered:
|
Data Acquisition |
Plan & Design |
3D Printing Production |
Clinical Execution |
||||
|
Intraoral scanning, photography, videos |
CAD design |
Material selection |
Nesting in PreForm® Dental |
3D Printing |
Post-processing: wash. dry, post-cure |
Finishing part to use clinically |
Using the printed appliance for clinical execution |

Decision Factors for Choosing the 3D Printing Approach
In addition to connecting the motivational and technical mock-ups to the right 3D printing materials and strategies, there are other questions that dental professionals need to ask themselves to confirm they are in the right position to adopt each workflow.
|
Protocol 1: Model production used to fabricate a PVS index |
Protocol 2: 3D Printed index with IBT Flex Resin |
Protocol 3: Printed mock-up shell with tooth-colored resin |
|
|
Material classification |
Non-biocompatible resin |
Biocompatible resin Class I (US & EU) |
Biocompatible resin Class II (US) & Class IIa (EU) |
|
Type of mock-up |
Motivational |
Technical |
Motivational Technical |
|
Resin regional availability |
Available globally |
||
|
Production time |
Short: print a model in less than 10 min |
Long: takes the longest to print |
Intermediate: can print in ~20 min |
|
Efficiency level |
Intermediate: requires time to print the model and fabricate the traditional silicone index upon the model |
Low: requires time to design the index in the CAD software |
High: printed shell can be used intraorally |
|
CAD steps involved |
1. Digital wax-up |
|
|
|
Level of CAD expertise |
Intermediate |
High |
Intermediate |
|
Protocol level of complexity |
Low |
High |
Intermediate |
|
Material observations |
N/A |
|
|
Advantages and Challenges of Each Protocol
|
Protocol 1: Model Production used to fabricate a PVS index |
Protocol 2: Printed index with IBT Flex Resin |
Protocol 3: Printed mock-up shell with tooth-colored resins |
|
|
Advantages |
|
|
|
|
Challenges |
|
|
|
Protocol 1: Model Production Used To Fabricate a PVS Index
The first option is to print the wax-up model, which professionals can then use to fabricate the PVS index.
Tools needed to do this protocol:
|
Digital Capturing and Design |
Digital Design |
Digital Production |
Clinical Tools |
|
Intraoral scanner Digital camera |
CAD software for doing the smile design |
Accessories: IPA (99%) Protective equipment |
PVS Scalpel Bis-acryl resin Probe Tweezers Gloves Black marker Pink composite (if necessary) |
Protocol 1: Model Production used to fabricate a PVS Index
Workflow Steps
|
First appointment: Data acquisition |
Plan and design |
3D Print and post-process the printed model |
Fabricate the index |
Clinical execution |
|
Intraoral scanning Photography Videos |
Design the mock-up and export the model with a wax-up for printing |
Material selection Nesting 3D Printing Post-processing |
Use the model to fabricate the PVS index and cut the index |
Use PVS index to do the mock-up using bis-acryl resin |

1. Design Considerations
-
The wax-up will be done on the imported data that was acquired in the first appointment with the intraoral scanner and digital pictures and videos.
-
For the motivational mock-up, the wax-up design should be only additive and designed mainly in the buccal area.
-
For the technical mock-up, the wax-up is done following the traditional principles, looking for proper function and performance.
-
There are different softwares available that you can use to do the digital wax-ups such as 3shape, exocad, NemoTec, among others.
2. Material Selection
When analyzing the 3D printing workflow, one of the important steps is selecting which model resin to use.
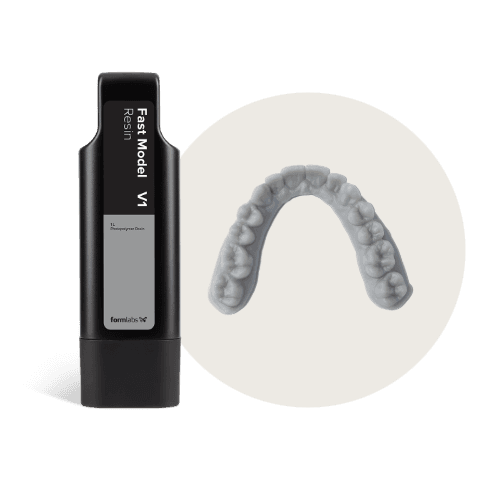
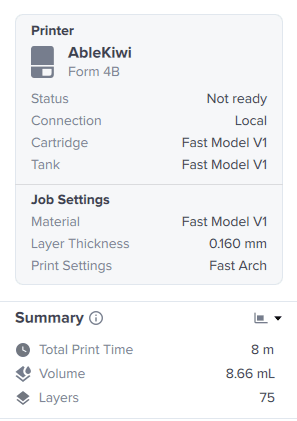
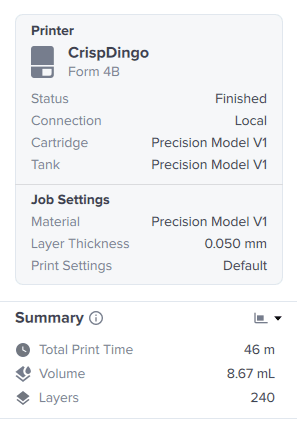
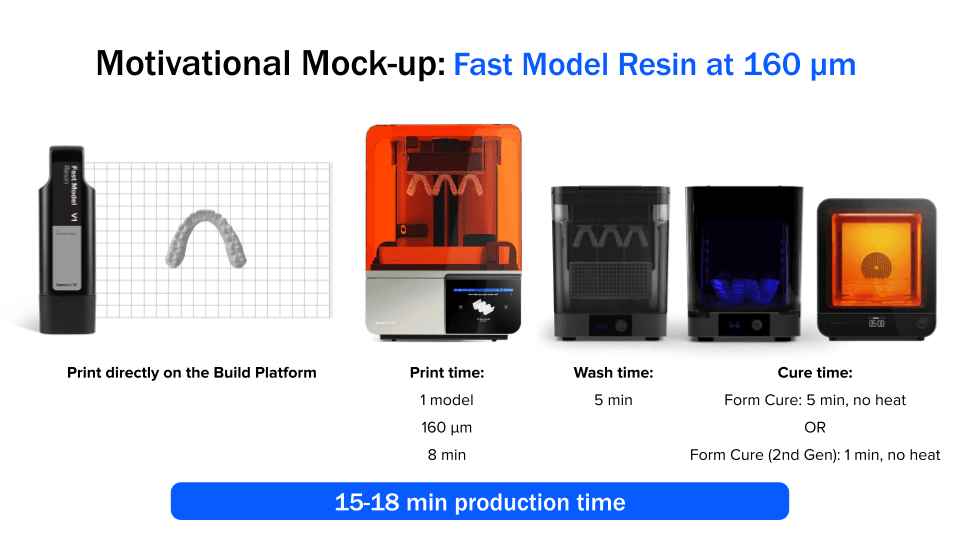
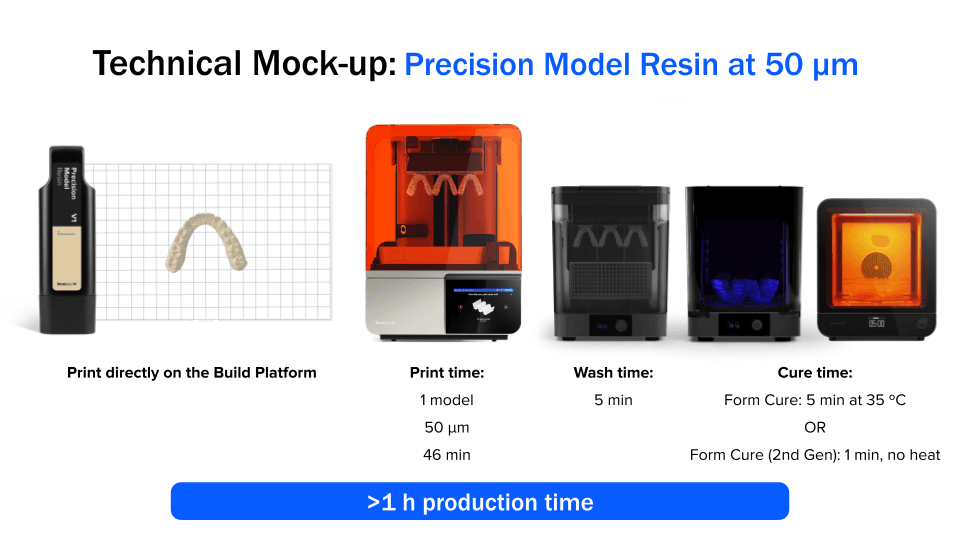
There are different model materials available from Formlabs Dental which can fulfill this application including Fast Model Resin, Grey Resin V5, and Precision Model Resin. In order to select the right material, it’s important to analyze the requirements for each application.
-
For motivational mock-ups, we need a fast solution as the objective is printing a model with the wax-up that doesn’t need to be the most precise option. Based on this criteria, the best option is to use Fast Model Resin. This material enables the printing of models in 100, 160, and 200 μm layer height settings. Any of these layer height options work for motivational mock-ups. It’s up to the dental professional to define the layer height based on their personal preferences.
-
For technical mock-ups, we need a solution that provides a smooth surface finish and precision so we can accurately transfer the planned design to the patient’s mouth. In this case, Precision Model Resin printed at a 50 μm layer height setting would offer the best surface accuracy. The PVS indexes produced upon these models will accurately transfer the anatomical features and textures designed.
Though there are other materials available such as Grey Resin V5 and White Resin V5, these are less versatile for other dental applications. Additionally, neither offers the speed of Fast Model Resin nor the precision of Precision Model Resin.
The following table summarizes the main differentiating points between Fast Model Resin and Precision Model Resin.
|
Formlabs Resin |
Fast Model Resin |
Precision Model Resin |
|
Ideal for |
Printing a model to create a PVS index for a motivational mock-up. |
Printing a model to create a PVS index for a technical mock-up. |
|
Other uses of the material |
|
|
|
Color |
Light Grey |
Beige |
|
Cost of cartridge |
$79 (€99) |
$/€ 129 |
|
Cost per part |
$/€ 1-3 |
$/€ 2-4 |
|
Layer height recommended and estimated print time for one model *Please note that print times may vary depending on the geometry and height of the models |
Wax-up model for motivational mock-up: 200 μm: 8 min* 160 μm: 9 min* Other layer height option: 100 μm: 22 min* |
Wax-up model for technical mock-up: 50 μm: 49 min* Other layer height options: 100 μm: 20 min* 25 μm: 2 h 45 min * |
|
Post-processing time |
Wash:
Dry Cure (choose one):
|
Wash:
Dry Cure (choose one):
|
|
What type of mock-up can I use this for? |
Motivational mock-up: You can print a model in as little as 8 minutes. Use any of the layer heights for this purpose. For fastest results, use 200 μm or 160 μm. |
Motivational mock-up: Use 100 μm Technical mock-up: Use 50 μm |
|
Guidance for choosing the right resin |
If speed is important, this should be your go-to resin. |
If you are looking to get the highest precision and accuracy, this material is the best choice. Don’t choose this material if speed is fundamental for you and print time is a concern. If you are looking to have one resin that can fulfill the needs of highly accurate restorative models as well as printing models for doing the wax-up, then you can choose this resin. |
When considering the motivational mock-up, Fast Model Resin is the ideal choice as it combines the fastest print speed, 160 or 200 μm layer height setting, and reduced material cost.
3. Nesting in PreForm Dental
When preparing the models to print, there are a number of considerations including the type of model being printed, print orientation, and layer height.
3.1 Model Type
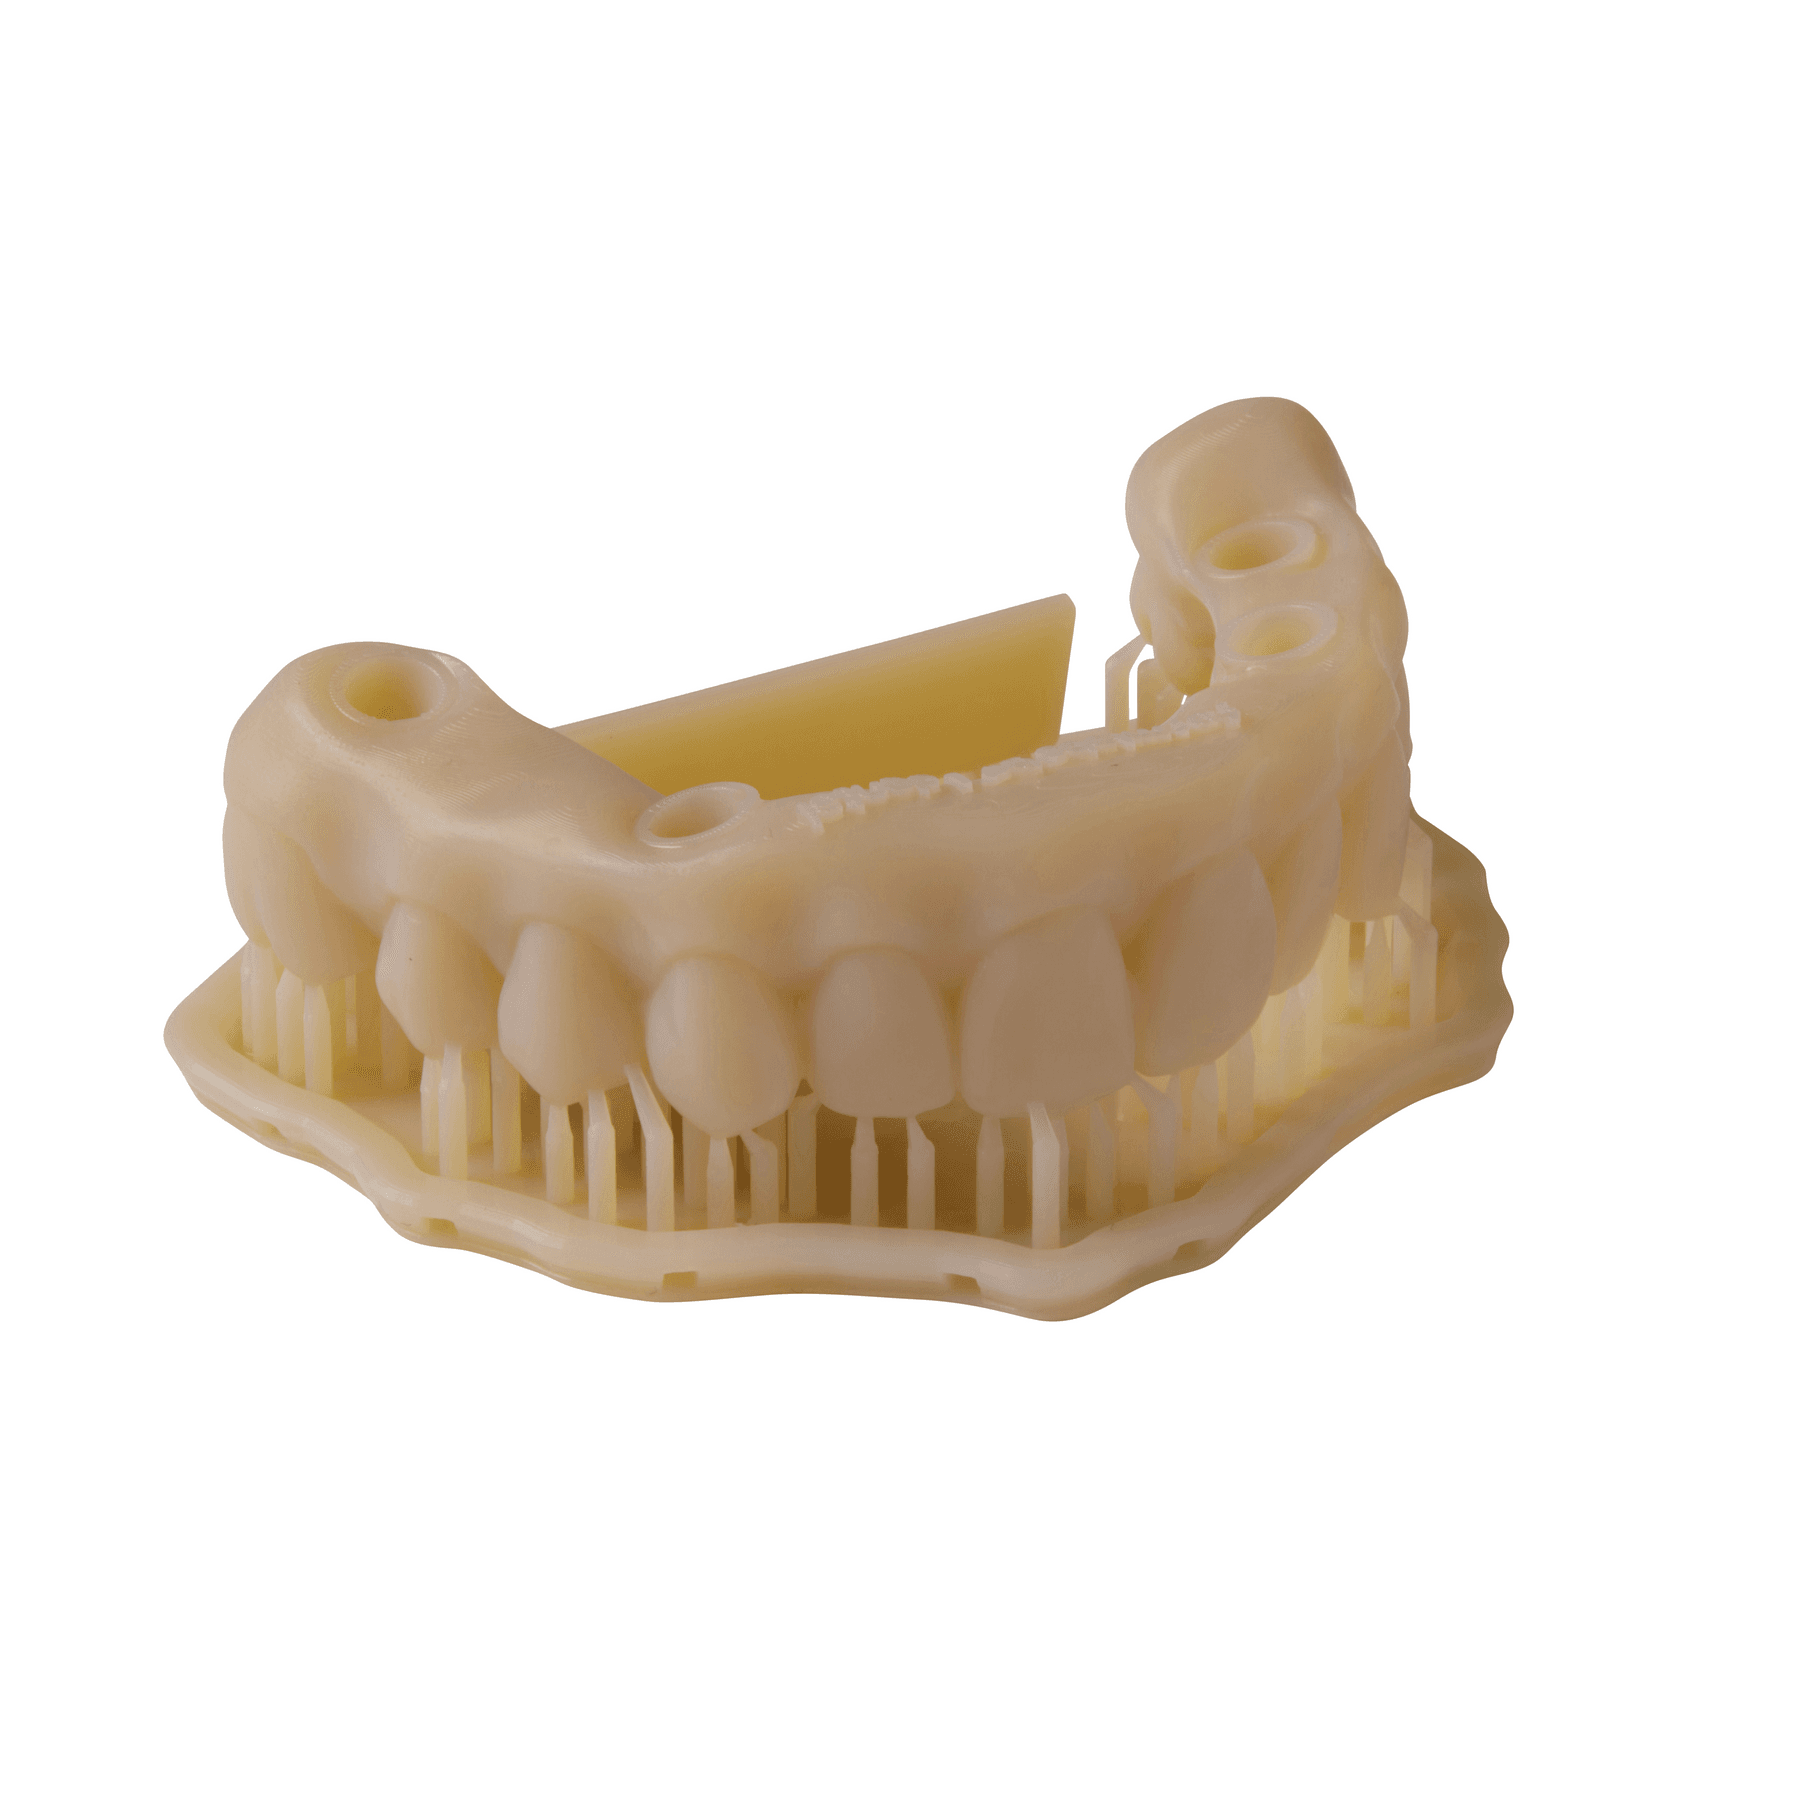
The design of a model, including whether it is solid, hollow, or honeycomb, impacts its print orientation and the minimum wall thickness required for successful printing. For hollow or honeycomb models, it may be necessary to add drain holes to the base design. This helps to minimize the suction cup effect that can occur when printing these types of models directly on the build platform. The following table compares the advantages and disadvantages of printing each model.
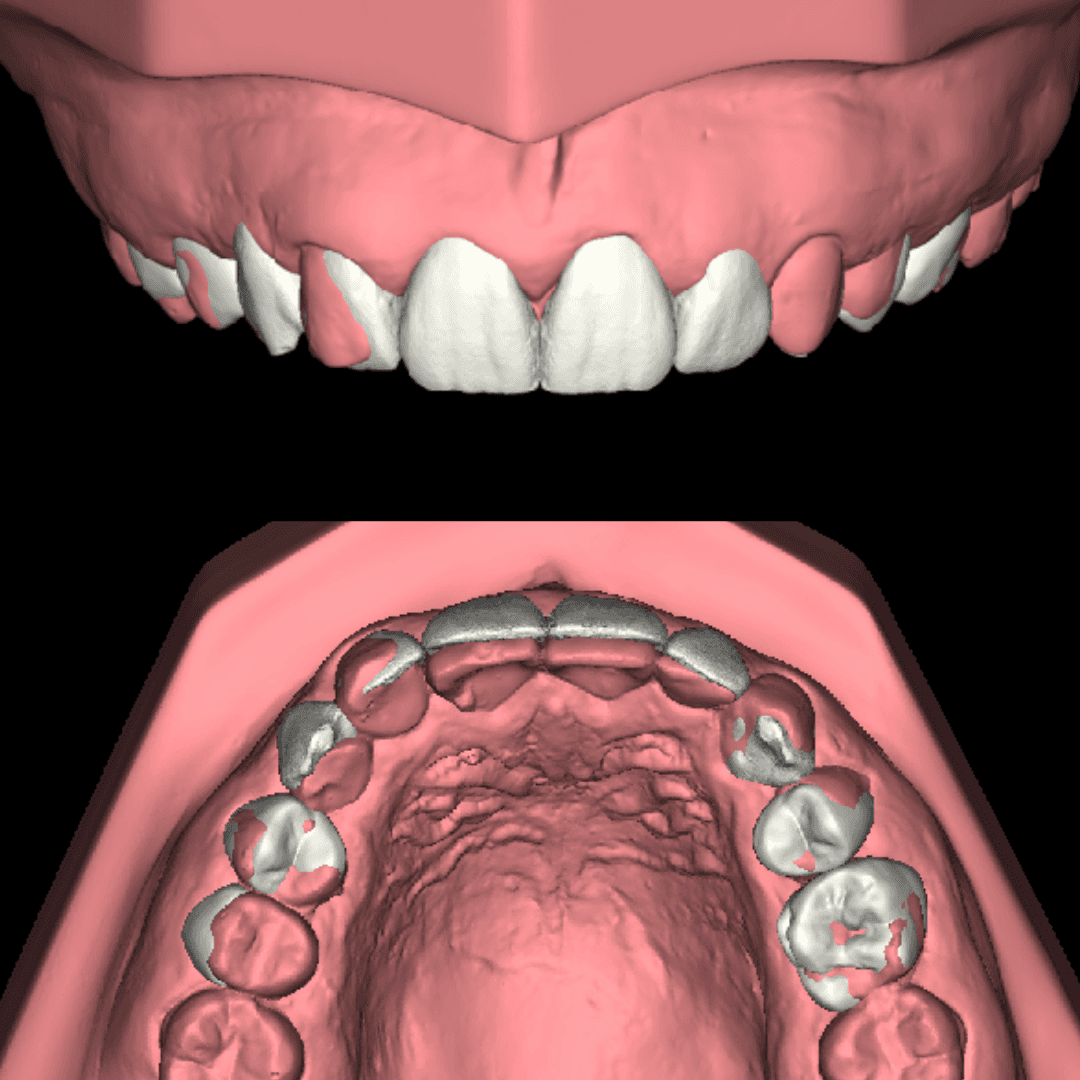
A Solid Model
A Hollow Model
A Honeycomb Model
|
Type |
Solid: Model is filled |
Hollow: Model is empty |
Honeycomb: Model has a honeycomb structure |
|
Safe to print directly on the build platform, which will also be the fastest printing option. The base height can be reduced as the model is completely filled. No drain holdes needed. |
Requires less resin to print the part. |
Requires less resin to print the part compared to solid models. |
|
|
Pros |
Can be printed directly on the build platform if the model has a minimum wall thickness of 3 mm and drain holes. |
||
|
Cons |
Some extra resin is used to print the interior part of the model. |
More prone to deformations if minimum wall thickness is not followed. Higher risk of print failure if no drain holes are added when printing models directly to the build platform. |
|
|
Observations |
This is the preferred design as the model is completely filled and uniform. It’s also self-supported. |
Requires a minimum wall thickness of 3 mm. Drain holes are required if printing the model directly on the build platform. |
|
3.2 Print Orientation
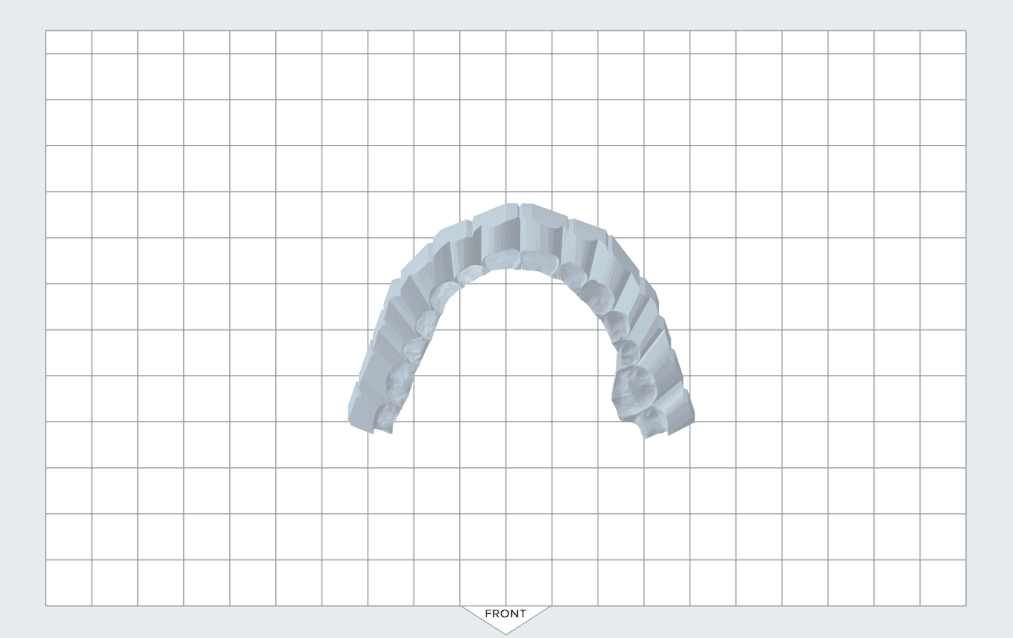
Print orientation is one of the variables that affects print time, the number of models that can fit in one build, and the direction the layers are built. When printing models, there are two possible options:
-
Printing the models flat against the build platform with their base directly on the build platform surface.
-
Printing models vertically or angled with support structures.
Each option offers different advantages and disadvantages, which are summarized below.
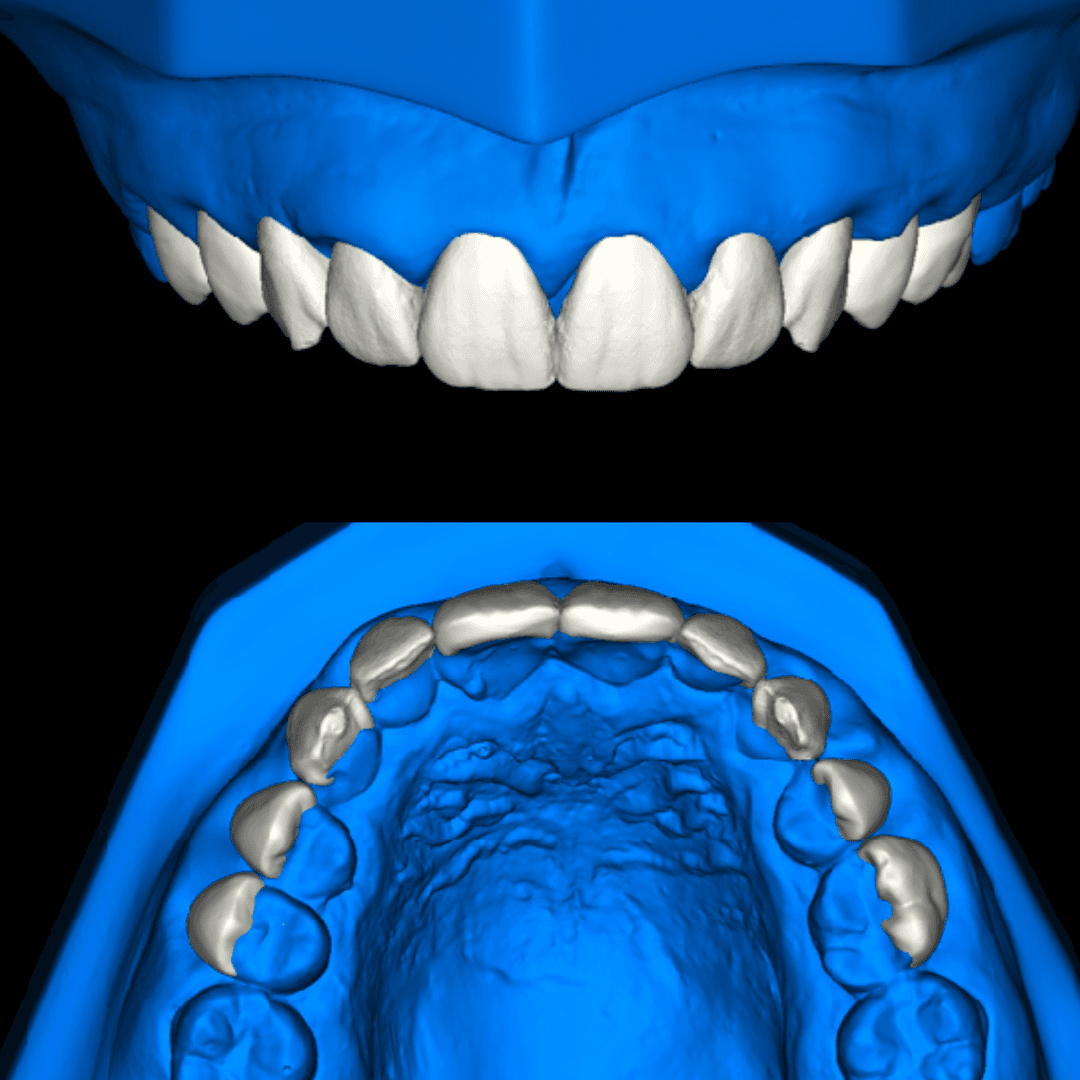
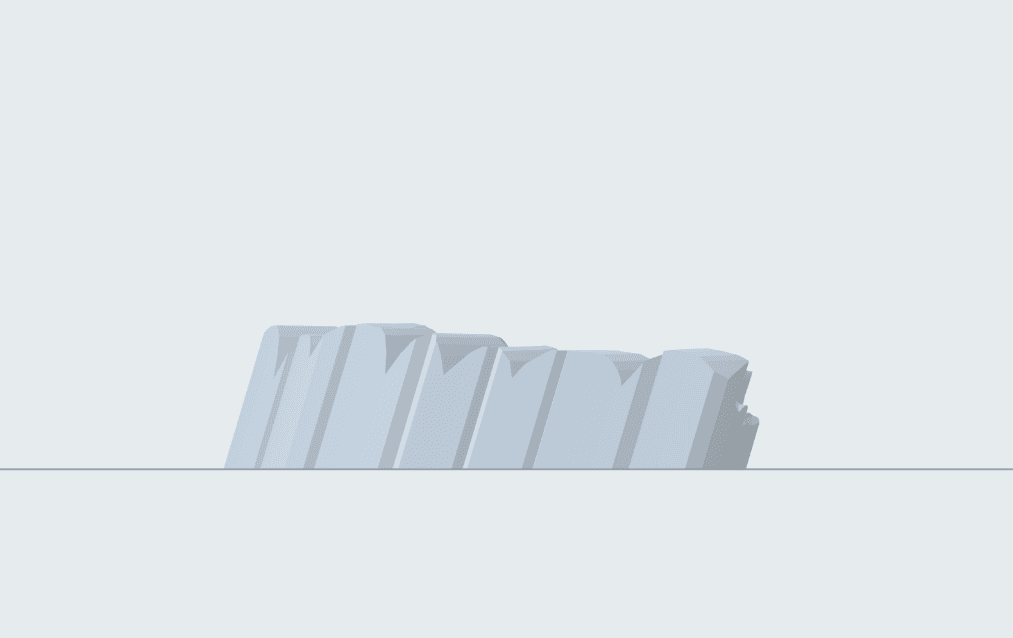
A model printed vertically (left) versus flat against the build platform (right).
|
Print orientation |
Flat against the build platform |
Vertical or angled |
|
Pros |
Fastest to print (under 10 min) Self-supported model: No supports are needed, less resin consumed Very accurate |
Takes longer to print (35 min) Requires support structures to print the models, more resin used for these structures |
|
Cons |
Limits the amount of models you can fit on one build platform (11 models) |
Maximizes the space and allows combining several models (21 models) |
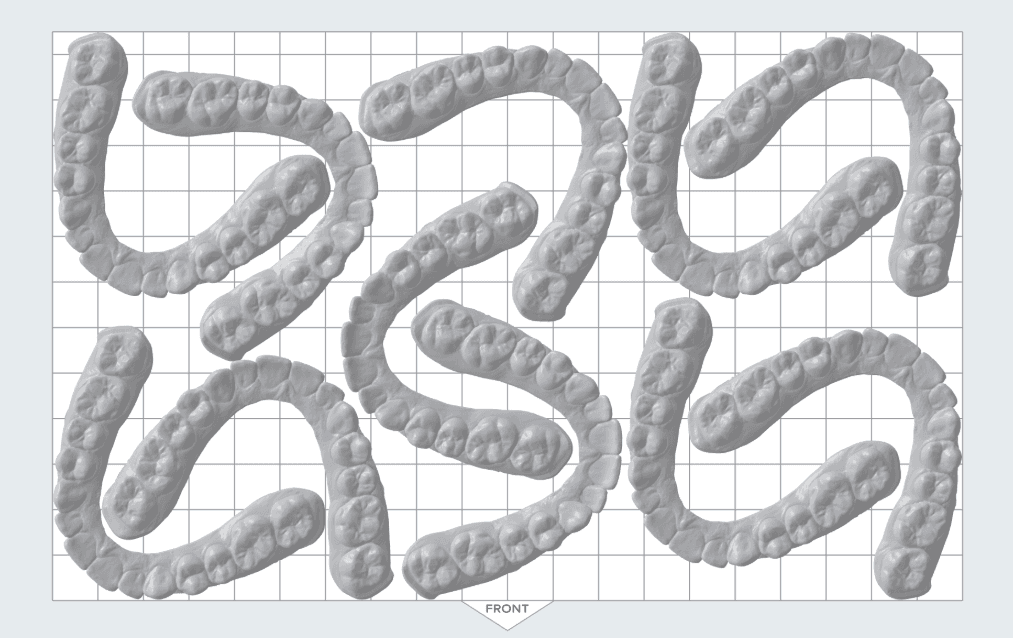
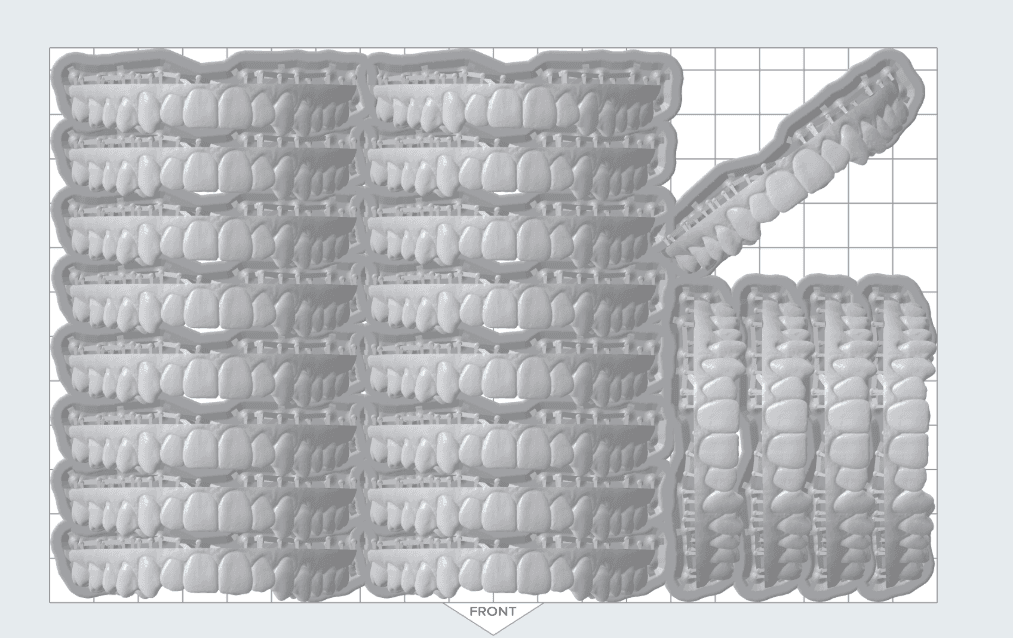
A full build platform of horizontally oriented models (left) versus vertically oriented models (right).
3.3 Layer Height
Fast Model Resin and Precision Model Resin offer different layer height options, as illustrated in the comparative table. Clinicians can select the material based on the mock-up type, desired print time, or cost per part, while also considering the optimal layer height. It's important to remember that layer height directly influences print time and surface finish. The table below provides a summary of these concepts.
|
Layer height |
50 μm |
100 μm |
160 μm |
200 μm |
|
Mock-up type |
Technical |
Motivational |
Motivational |
Motivational |
|
Print speed |
Slowest |
Intermediate |
Fast |
Fastest |
|
Surface finish |
Smoothest surface finish Excellent for accurate transfer of all details |
Smooth surface |
Smooth surface with some visible layer lines |
Less smooth surface with some visible layer lines but works for a motivational mock-up |
|
Available with Precision Model Resin |
✓ |
✓ |
- |
- |
|
Available with Fast Model Resin |
- |
✓ |
✓ |
✓ |
What Would Be the Ideal Setup?
For both motivational mock-ups and technical mock-ups, the best recommendation is to print models that are solid and placed with their base directly on the build platform. The layer height selection would be dependent on the type of mock-up needed and professional preference.
Ideal Set-Up for Motivational Mock-up
Parameters
-
Fast Model Resin
-
160 μm
-
Solid model
-
Printed directly on the Build Platform
Ideal Set-Up for Technical Mock-up
Parameters
-
Precision Model Resin
-
50 μm
-
Solid model
-
Printed directly on the Build Platform
4. 3D Printing and Post-Processing
Following material selection and nesting in PreForm Dental, the parts are printed and post-processed. The 3D printing workflow involves several steps: printer setup, washing, drying, and post-curing. The total production time, including these final steps, varies per material used.
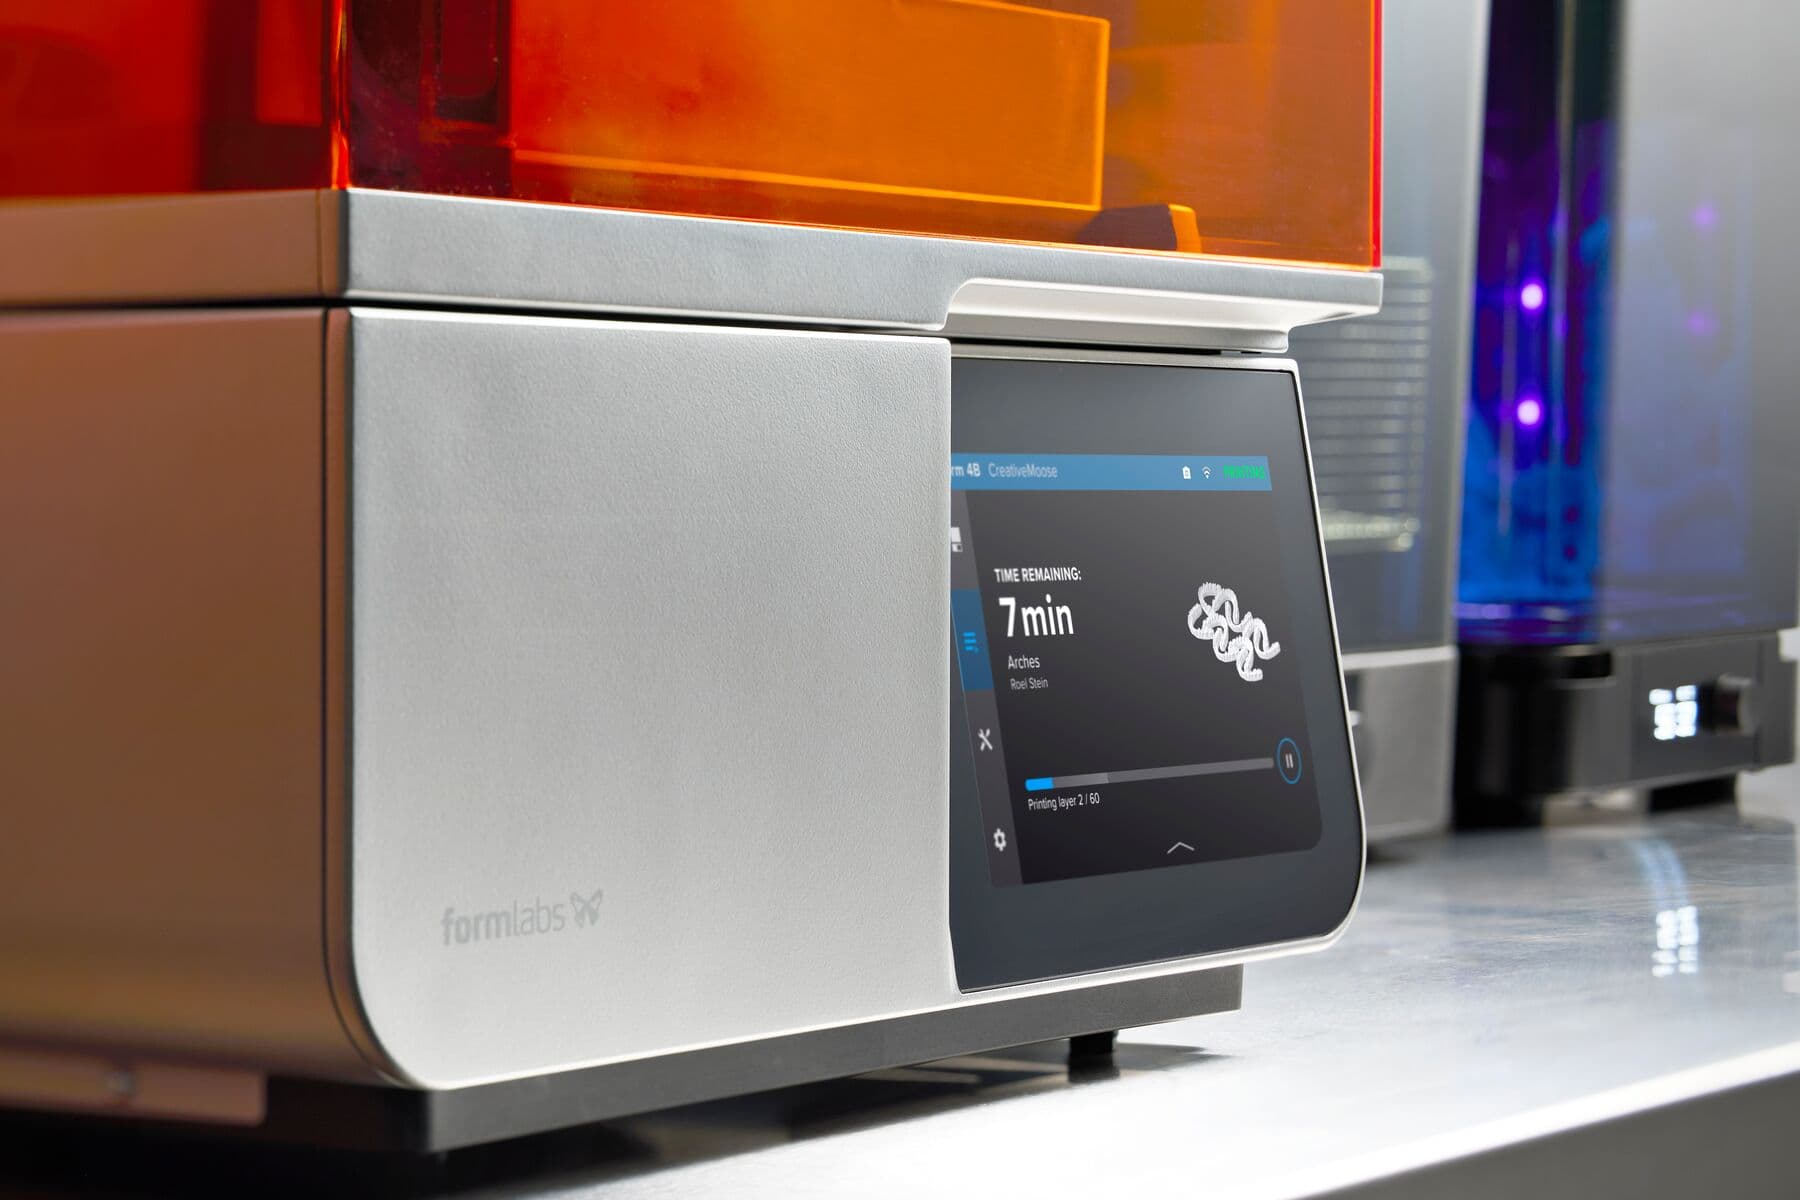
4.1 Setting up Form 4B
When printing with the Form 4B 3D printer, the following are required: a resin tank, resin mixer, build platform, and resin cartridge of the selected material. Once these are correctly inserted the print job can be sent from PreForm Dental to the printer.
4.2 Post-processing
After the print job is completed, models must be post-processed.
First, parts are removed from the Flex Build Platform using the quick release technology. This enables users to streamline part removal and avoid breaking or damaging models.
Parts are then washed in IPA (99%) at high speed in the Form Wash (2nd Generation) and then dried with compressed air. Lastly, parts are cured in the Form Cure for a specific time and temperature (see the material instructions). The following graphics summarize the overall process and final production time.
5. Clinical Execution
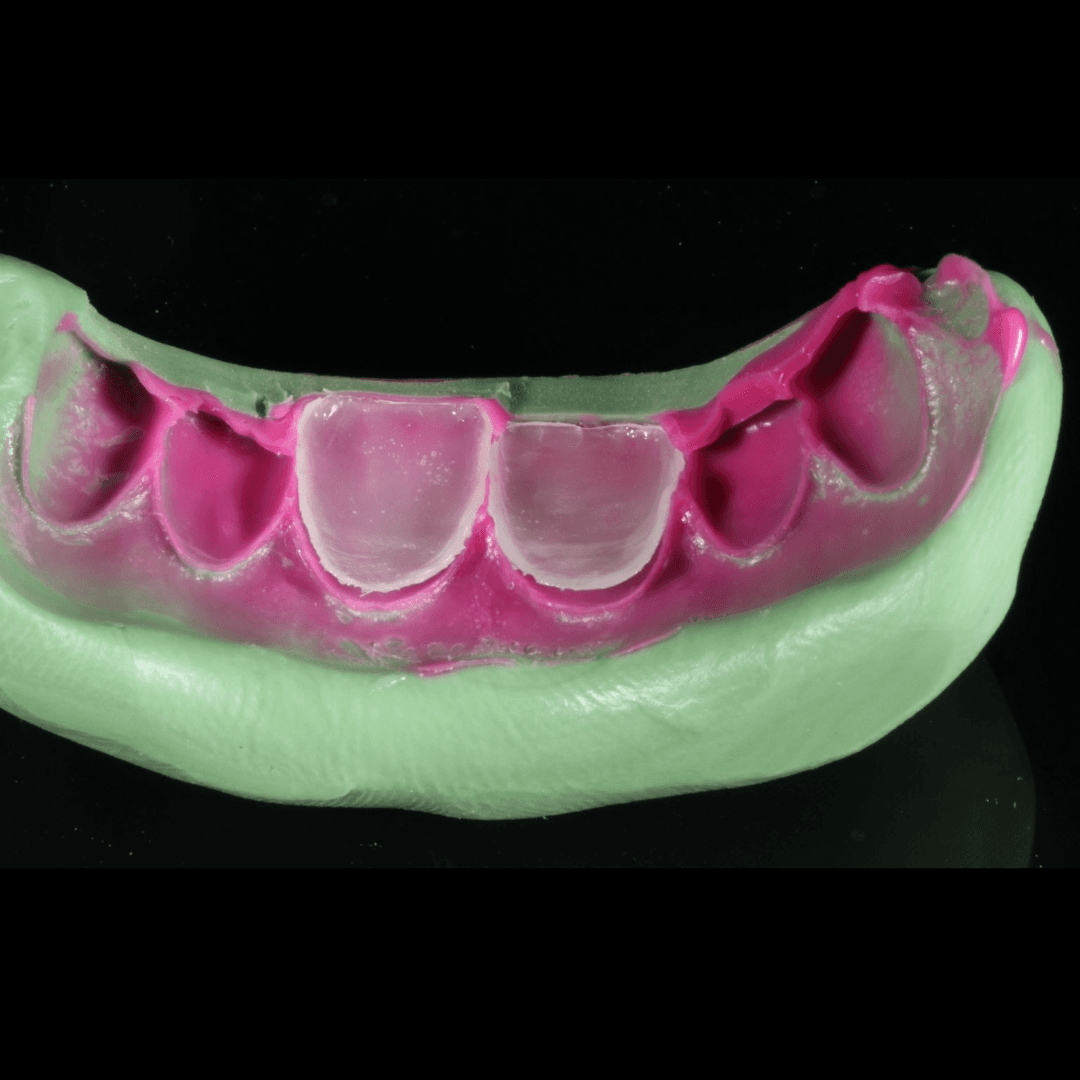
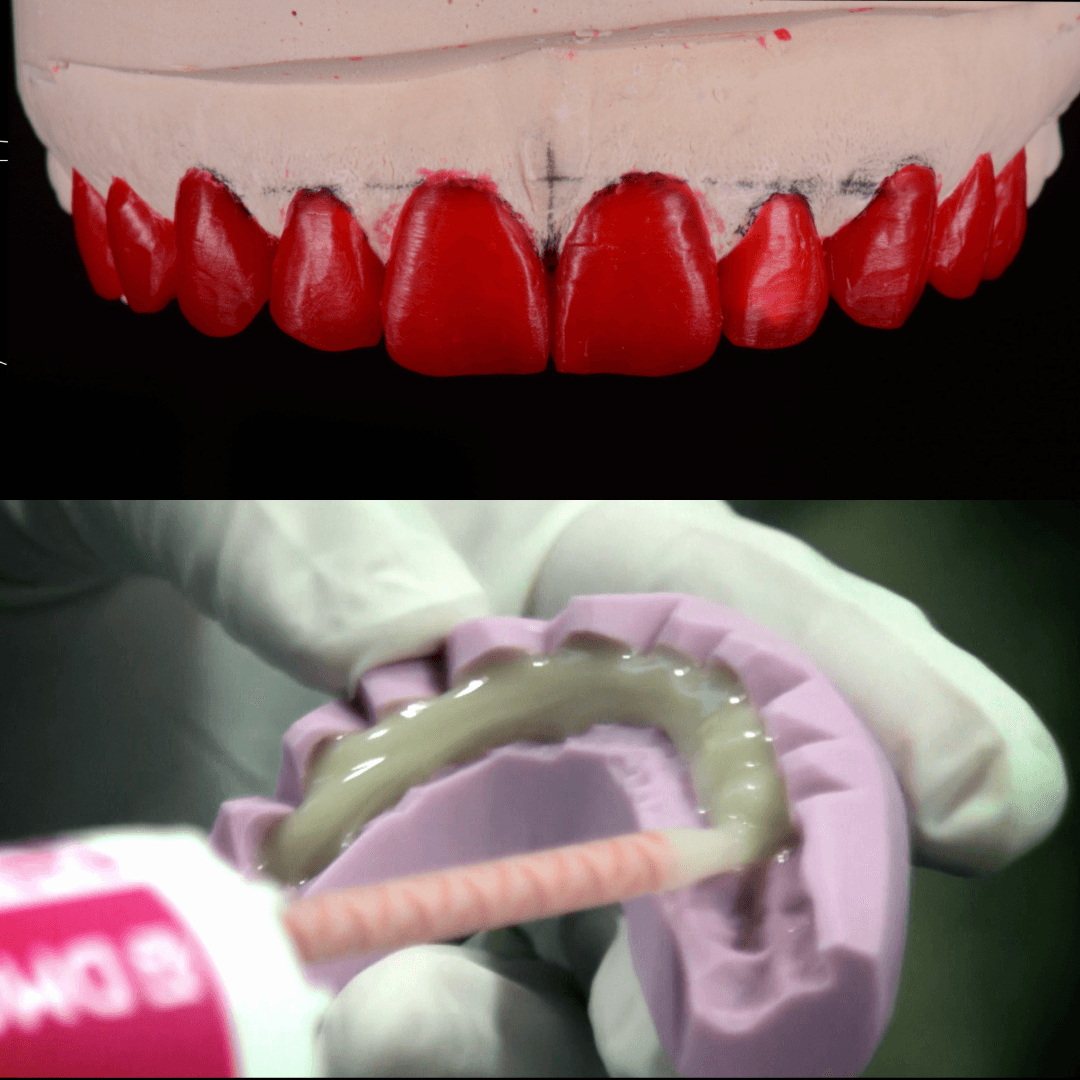
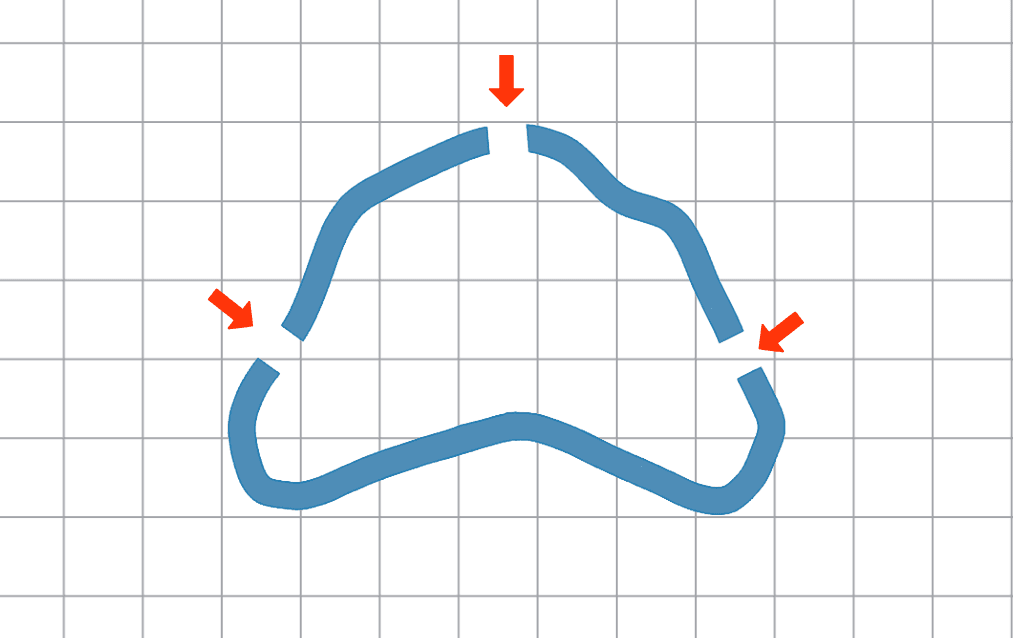
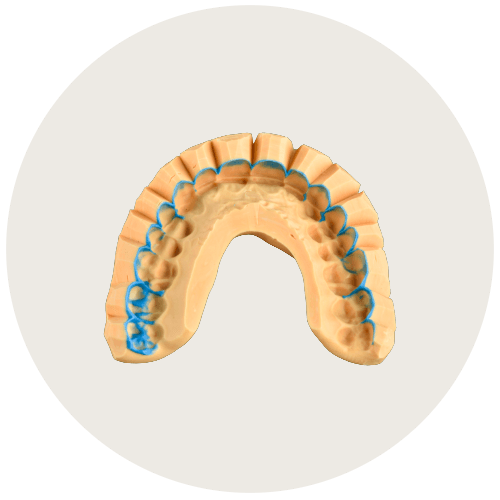
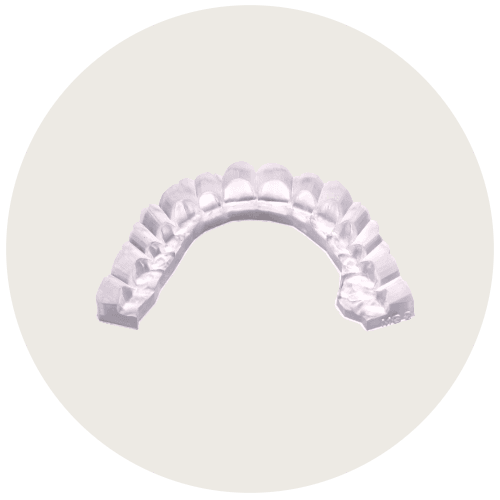
The silicone (PVS) index can be created directly on the printed model. There is no need to apply any separating agent to the model. It’s important to bear in mind the thicknesses of the PVS material in each section. Also, the cuts of the index need to be properly done as shown in the following sequence.
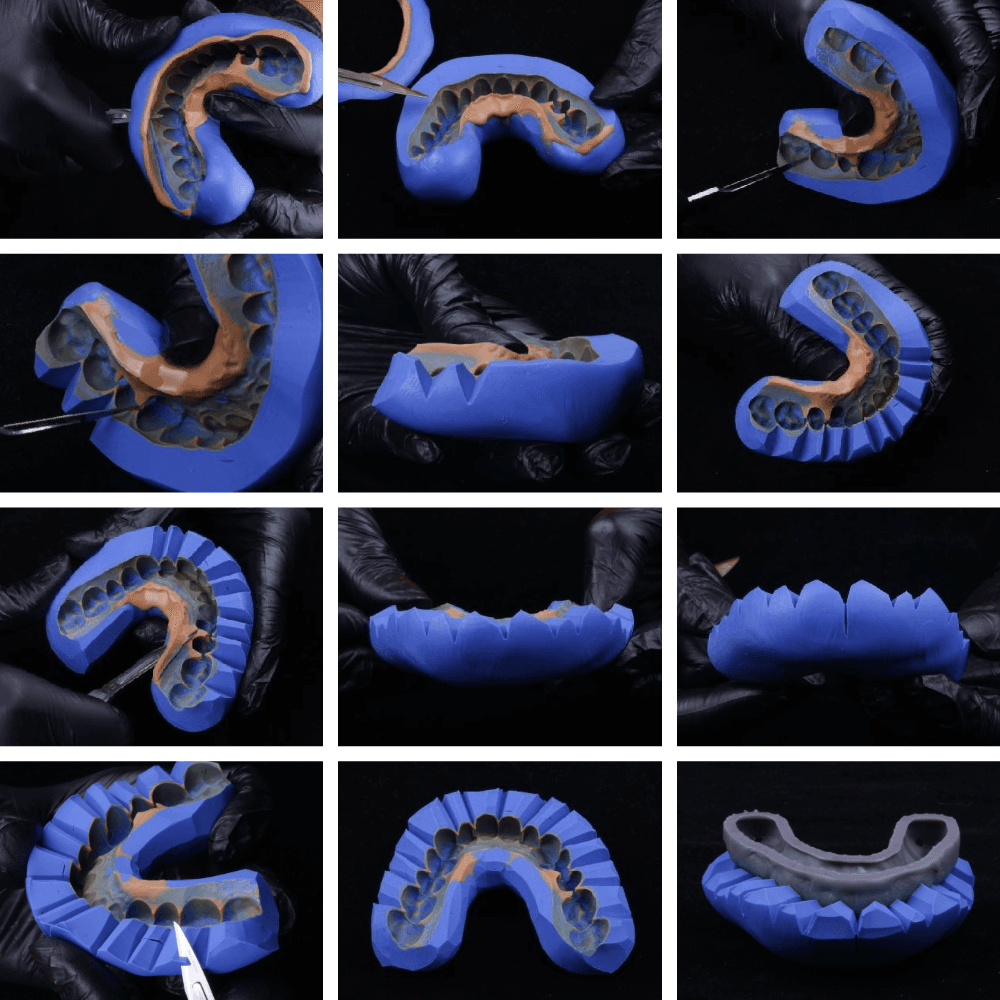
Once the index is created, it will be used to do the mock-up in the patient’s mouth. The full clinical procedure can be seen in the "The Complete Guide to the DSD Mockup Success Formula".
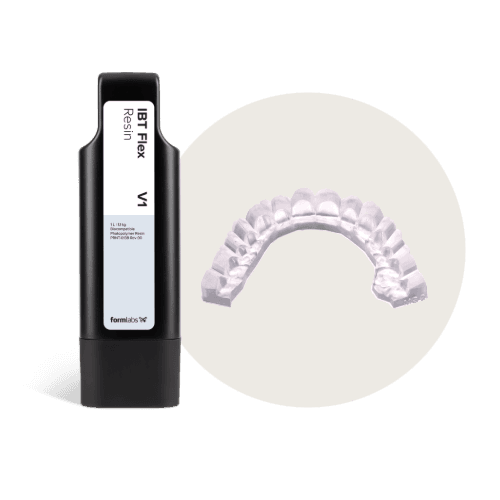
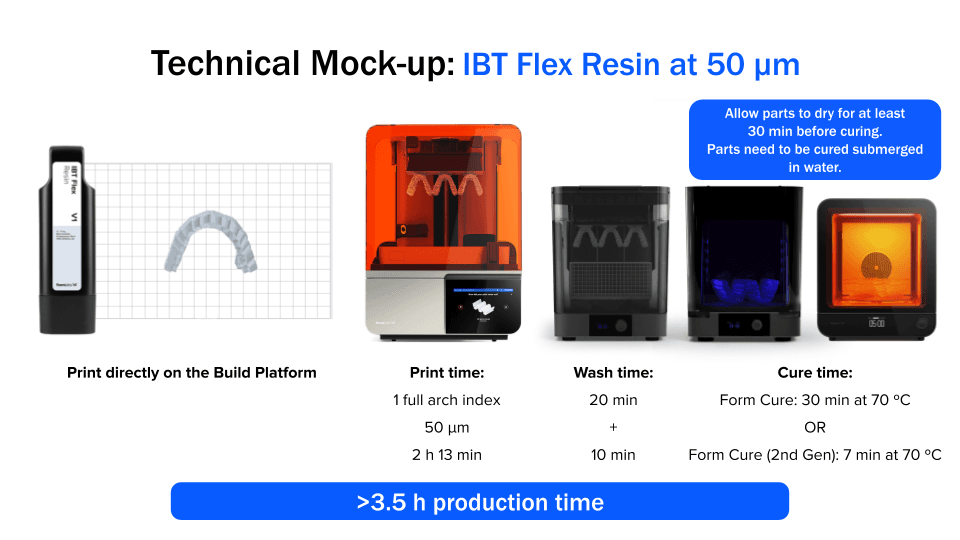
Protocol 2: Printed Index With IBT Flex Resin
Another 3D printing option that works for both motivational and technical mock-ups is to print the index with a biocompatible resin to transfer the designed wax-up to do the mock-up in the patient’s mouth.
Tools needed to do this protocol:
|
Digital Capturing and Design |
Digital Design |
Digital Production |
Clinical Tools |
|
Intraoral scanner Digital camera |
CAD software for doing the smile design and to design the index |
Accessories: IPA (99%) Protective equipment |
Bis-acryl resin Probe Tweezers Gloves Black marker Pink composite (if necessary) |
Protocol 2: Printed Index With IBT Flex Resin
Workflow steps
|
First appointment: Data acquisition |
Plan and design |
3D Print and post-process the printed index |
Delivery |
|
Intraoral scanning, photography, and videos |
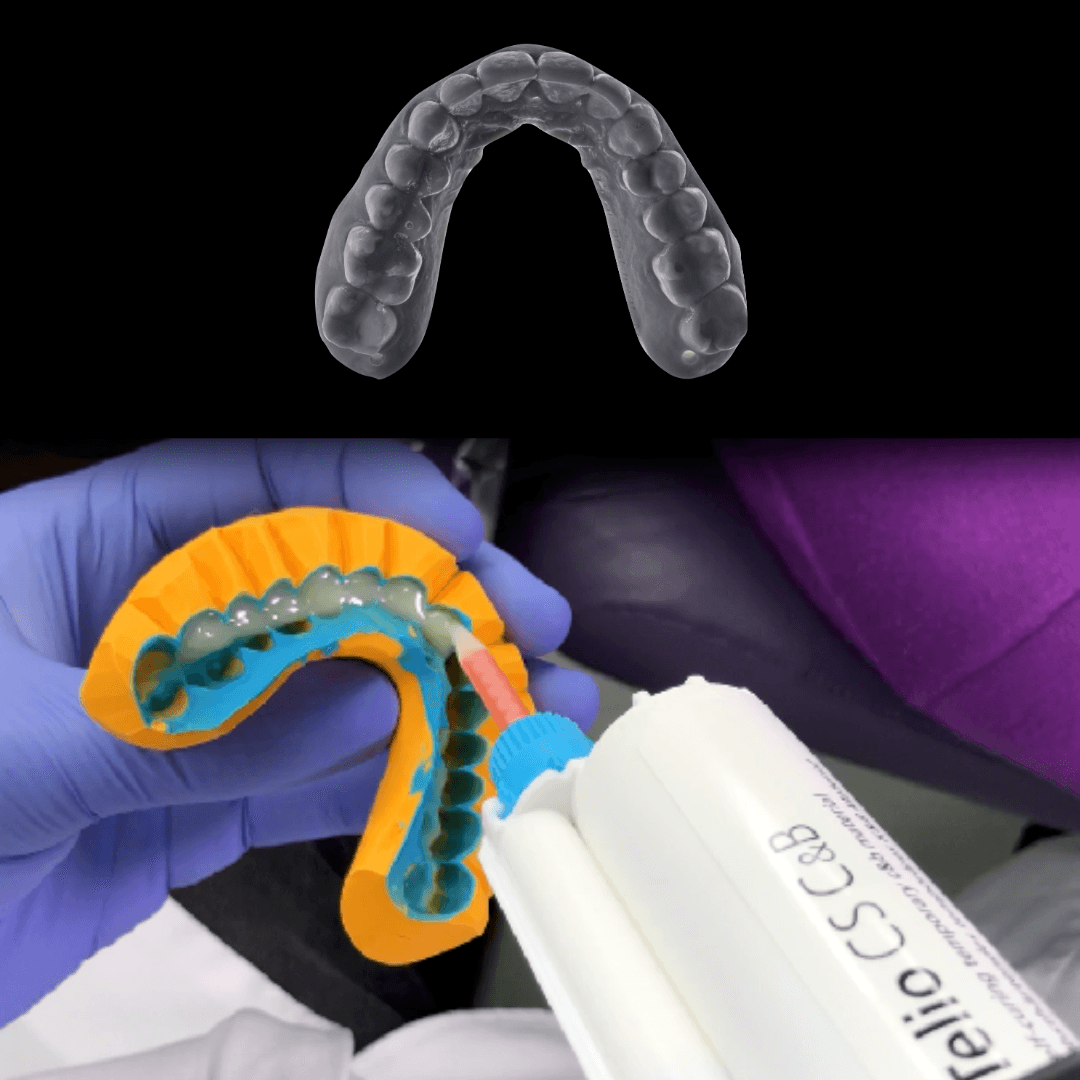
1. Design the wax-up on the patient’s scan. 2. Create the index design around the wax-up and export as an STL. |
Print the index using IBT Flex Resin. |
Use the printed index to do the mock-up using bis-acryl resin. |
1. Design Considerations
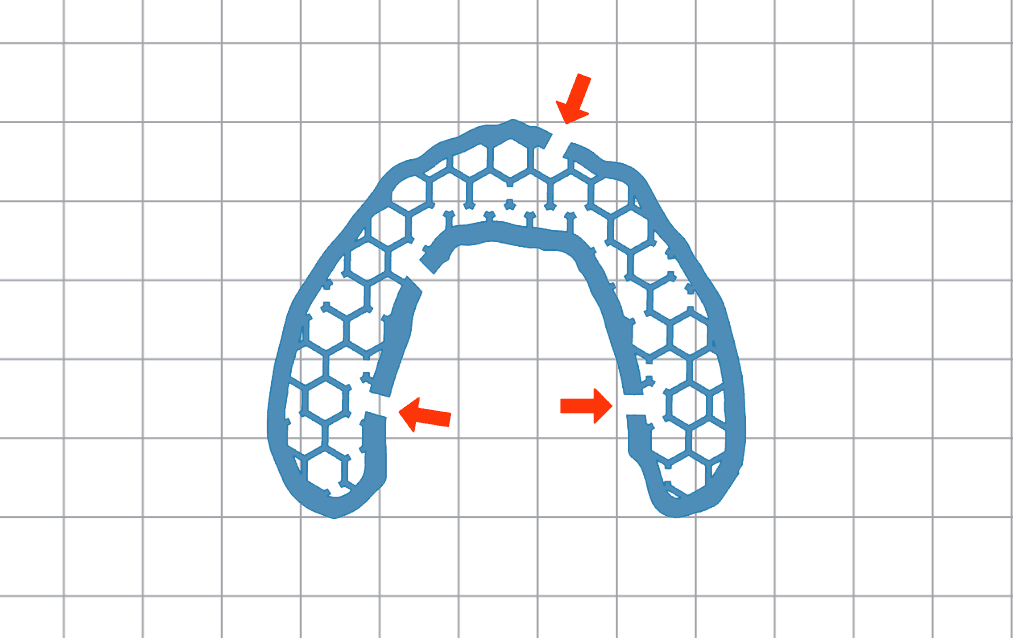
In this case, follow similar steps to those in protocol one during the design phase. Do the wax-up on the intraoral data that was captured from the patient. After the wax-up is done, the design of the index can be done upon it. Important parameters to bear in mind while doing the design of the digital index:
-
Minimum thickness: The walls of the index need to be 4-5 mm thick.
-
Limits: Adjust the design to fit perfectly in the cervical area.
-
Undercuts and interproximal areas: Observe the undercuts you have and need. This technique enables replicating undercuts in a very reliable way.
-
Offset from teeth: This needs to be zero.
-
Flat plane: The part of the index that will be facing toward occlusal needs to be designed with a flat surface so it can be printed directly to the build platform.
-
Extension: For motivational mock-ups, design a full-arch index. Define the palatal cut in a precise way to facilitate the cleaning process (removal of excesses of the bis-acryl resin).

2. Material Selection
The material indicated for this purpose is IBT Flex Resin, a biocompatible resin used to print flexible parts for short-term use. The main properties of the material can be found in the following table:
|
Formlabs Resin |
IBT Flex Resin |
|
Ideal for |
Printing the index for motivational or technical mock-up |
|
Other uses of the material |
A Class I biocompatible resin for producing appliances for short term use:
|
|
Color |
Clear |
|
Cost of cartridge |
$249/L (€239/L) |
|
Cost per part |
$/€ 3-5 |
|
Layer height recommended and estimated print time for one full-arch index *Please note that print times may vary depending on the geometry and height of the parts. |
Motivational mock-up: 100 μm: 1 h 7 min* Technical mock-up: 50 μm: 3 h 28 min* |
|
Post-processing time |
Wash:
Dry (allow parts to dry for 30 min before curing) Post-cure: Submerge parts in a transparent container filled with water and place inside the cure unit. Cure units that you can use and their parameters are:
|
|
What type of mock-up can I use this for? |
Motivational mock-up: 100 μm Provides the fastest print with this material but will have more visible layer lines than 50 μm Technical mock-up: 50 μm Provides the best surface finish for the most accurate transfer of the designed textures intraorally |
|
Guidance for choosing the right resin |
Dental professionals should verify regional availability of this material here. |
3. Nesting
When designing one of the planes of the tray to be flat, the parts shall be placed with this surface directly on the build platform. This will provide the fastest print speed as the model is self-supported.
4. 3D Printing and Post-Processing
Following nesting in PreForm Dental, the parts are printed and post-processed. The 3D printing workflow involves several steps: printer setup, printing, washing, drying, and post-curing. Total production time varies depending on the layer height chosen for printing.
4.1 Setting up Form 4B
Insert a build platform, resin tank, resin mixer, and IBT Flex Resin cartridge in the printer. Once the printer is set up, send the print job from PreForm Dental to the printer.
4.2 Post-processing
Post-processing of parts printed with biocompatible resins requires following the steps established in the Manufacturing Guide.
Wash:
-
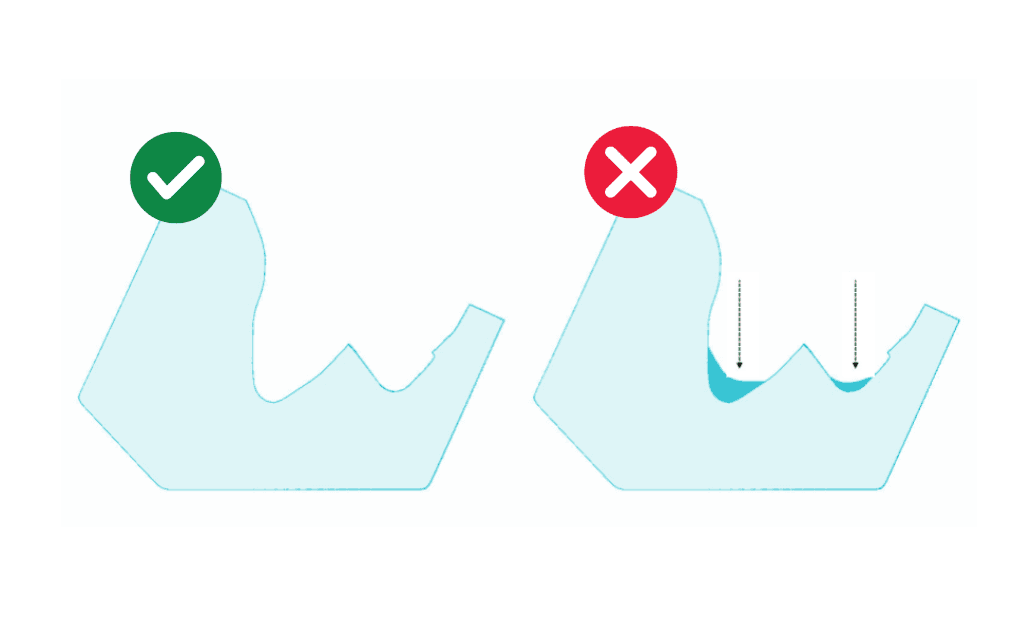
After parts are removed from the build platform, they need to be washed in IPA (99%) in the Form Wash (2nd Generation) at High Speed in two steps (20 min + 10 min). It’s important to use a dedicated Form Wash for washing parts printed with IBT Flex Resin (the wash should not be used for parts printed in other materials) and follow the exact timing as presented in the Manufacturing Guide.
-
Immediately after washing, it’s important to dry the printed parts with compressed air to ensure that there is no remaining IPA or resin on the printed part, especially in the intaglio surface. This is critical to ensure proper fit of the appliance during the clinical execution. The following picture shows how an insufficient wash can alter the intaglio surface.
-
Allow parts to dry for at least 30 minutes before proceeding to post-curing.
Cure: Parts need to be finally cured in the Form Cure (1st Generation) or Form Cure (2nd Generation) for the time and at the temperature in the IBT Flex Resin Manufacturing Guide. This final step will ensure parts are ready to be used. The following graphics summarize the overall process and production time.

5. Clinical Execution
In this case, the index is going to be used just like a traditional PVS index with bis-acryl resin. No separating agent is required when using bis-acryl resin with the printed index. However, users should always confirm extraorally that their chosen bis-acryl material does not bond to the printed parts before intraoral application.
How does this material and protocol compare to a traditional PVS index?
In the digital workflow, we have full control over the thickness of the material, allowing us to create precise, efficient designs in just 15–20 minutes. This not only improves accuracy but also leads to better clinical results with minimal excess. One key advantage is the precision in the palatal area, making it easier to clean and manage during placement. Excess material can easily be removed from both the buccal and palatal surfaces, so when the guide is removed, the mock-up is already clean and complete. For optimal flexibility and handling, the buccal area should maintain a thickness of around 4.5 mm. With this approach, we can produce a printed guide that is both flexible and accurate, perfectly replicating what we used to achieve with a traditional silicone (PVS) index. The major difference lies in control: digitally, we can fine-tune the buccal thickness and make virtual cuts in the occlusal and palatal areas, resulting in easier clean-up and more efficient use of material.
|
Technique |
Silicone Index |
Printed Index |
|
Cost |
€/$ 4-6 |
€/$ 2-5 (a full tray) |
|
Production time |
~3 h + guides |
~3.5 h (depending on the layer height) |
|
Possible mistakes |
Material selection Tray selection to place the silicone for thickness control Distortions and bubbles Incorrect cuts of the silicone index |
Inadequate design of the guides Failures in post-processing protocol |
|
Standardization of the result |
Thickness control is not standardized The quantity of material is not precisely controllable |
The results will be standardized, since what is designed in CAD will be obtained |
|
Precision & surface resolution |
The quality of the index is completely dependent on the skills of the operator It requires the extra step of printing the model, then handmade silicone PVS index manufacturing |
The quality of the index depends on the layer height selected and the thoroughness of the post-processing protocol No need to print models |
|
Dependence |
Knowledge, experience, and skill are necessary to correctly manufacture guides |
Need a good design of the guides, and a Form 4B ecosystem and IBT Flex Resin |
Protocol 3: Printed Mock-up Shell With Tooth-Colored Resins
An alternative to create the mock-up that utilizes 3D printing is to print the shell directly with a tooth-colored resin. The development of biocompatible resins enables this technique and speeds up the process.
Tools needed to do this protocol:
|
Digital Capturing and Design |
Digital design |
Digital Production |
Clinical Tools |
|
Intraoral scanner Digital camera |
CAD software for doing the smile design + to design the shells |
OR BEGO™ VarseoSmileⓇ TriniQⓇ Resin Accessories: IPA (99%) Protective equipment |
Flowable composite Light curing device Probe Explorer tool Tweezers Gloves Black marker |

Protocol 3: Printed Mock-up Shell with Tooth-Colored Resins
Workflow Steps
|
First appointment: Data acquisition |
Plan and Design |
3D Print and post-process the printed shells |
Delivery |
|
Intraoral scanning, photography, and videos |
Design the wax-up on the patient’s scan, create the shells, and export the STLs for the three sections. |
Print the shell using Premium Teeth Resin or BEGO™ VarseoSmileⓇ TriniQⓇ Resin. |
Use flowable composite to set the printed shell in place. |
1. Design Considerations
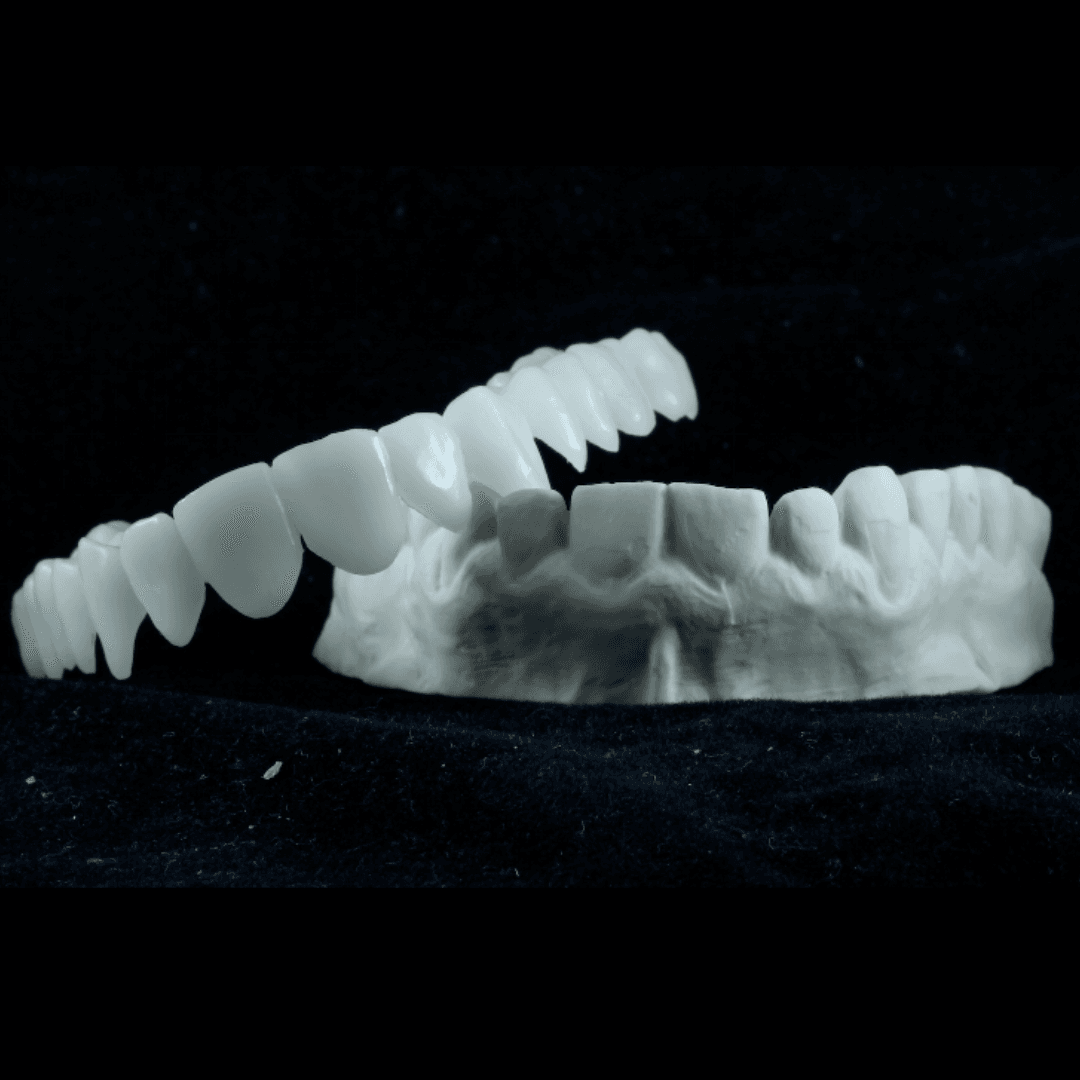
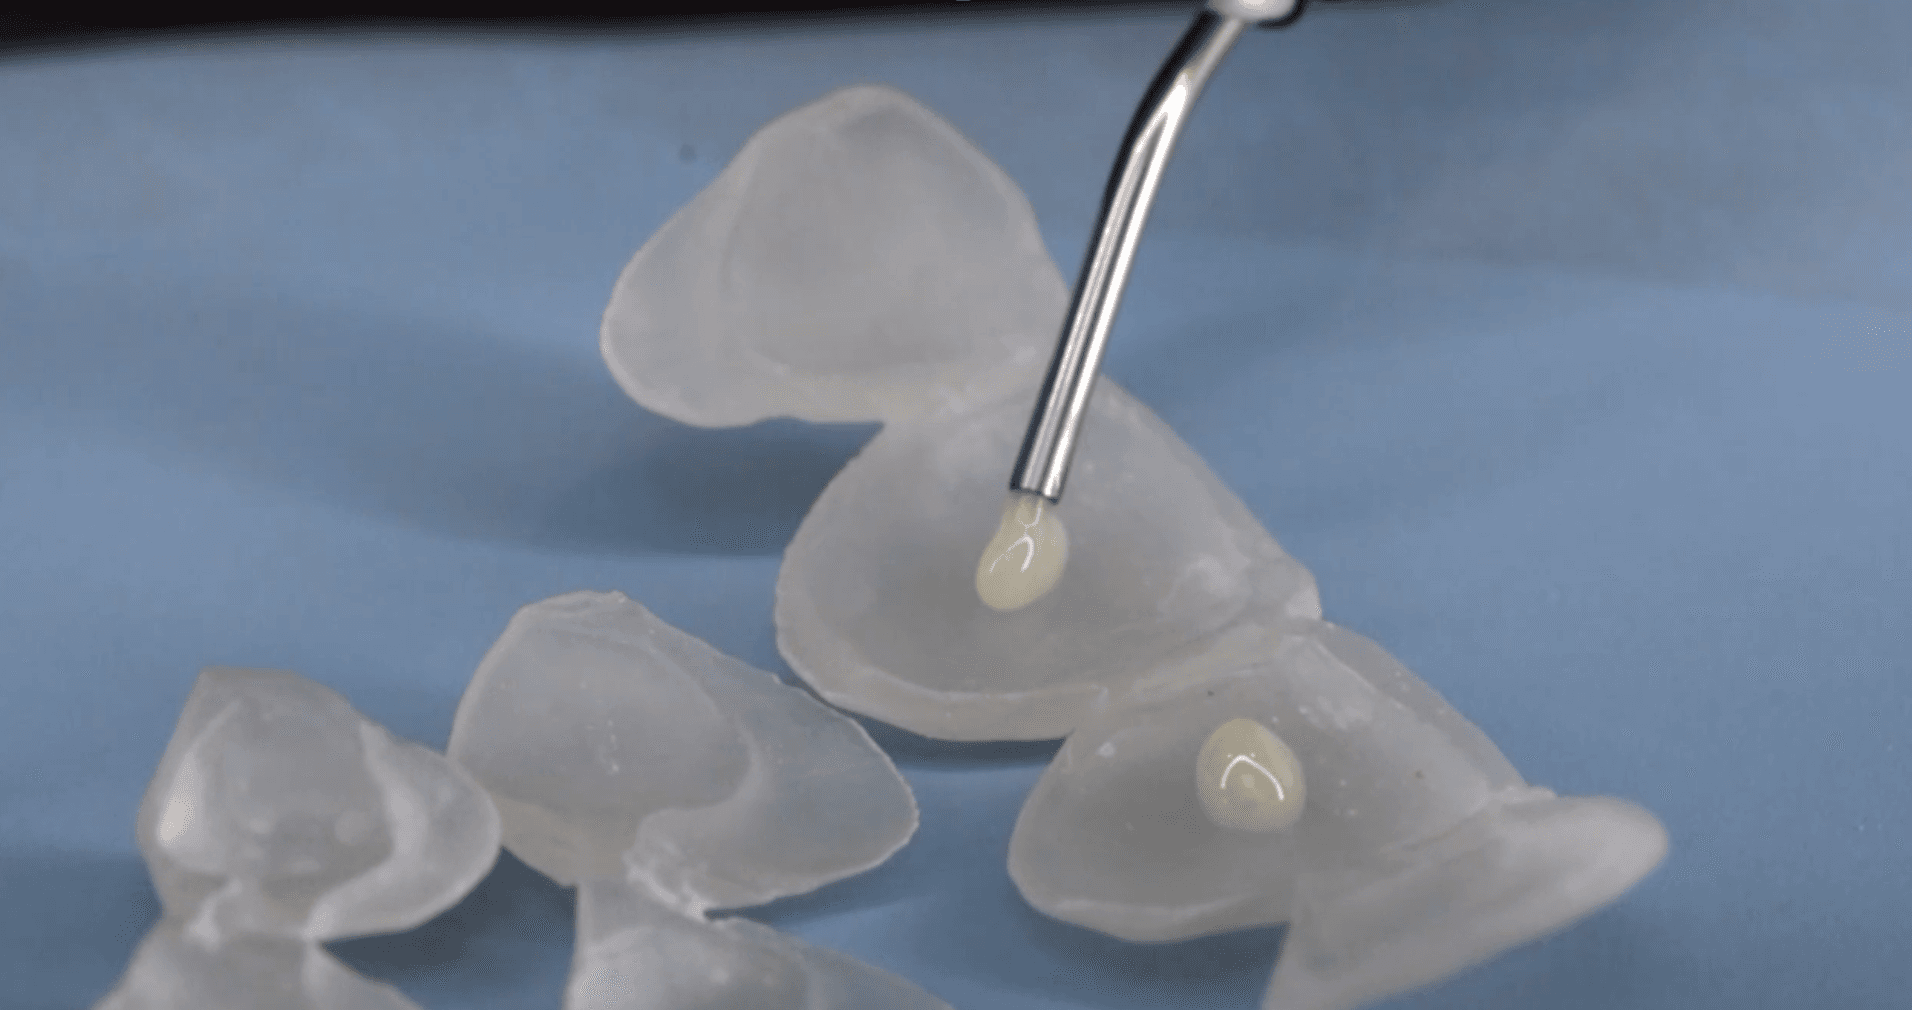
In this case, we are focusing on producing the shell for the motivational mock-up. The shell is only an additive design. The process begins with a design split into three separate STL files, representing distinct sections of the arch (anterior, and two posteriors). Why three? Traditional full-arch shells (like in the early DSD workflows) often cracked or failed upon insertion, especially when arch anatomy varied. By dividing the shell into three sections, fit is far more reliable — no model, no index, just print and place.

Picture by Dr. Jesús Creagh
2. Material Selection
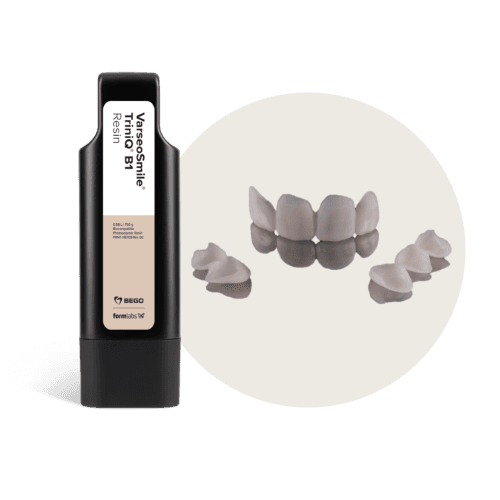
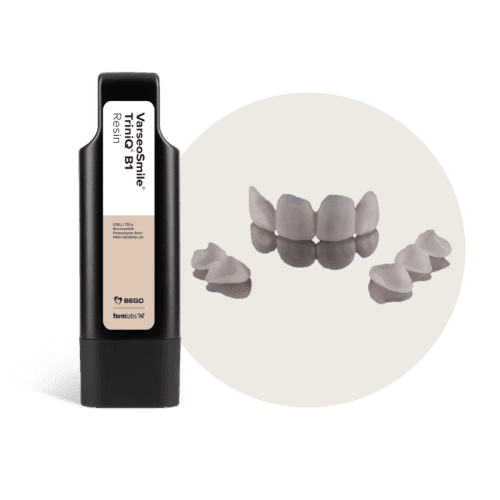
There are two tooth-colored resins available from Formlabs Dental to print using Form 4B: Premium Teeth Resin and BEGO™ VarseoSmileⓇ TriniQⓇ Resin. The differences of these two materials can be found in the following table.
|
Resin |
Premium Teeth Resin |
BEGO™ VarseoSmileⓇ TriniQⓇ Resin |
|
Ideal for |
Printing the shell for motivational or technical mock-up |
|
|
Other uses of the material |
A nano-ceramic filled biocompatible material with enhanced aesthetics and translucency. Indicated for denture teeth, temporary full-arch implant-supported restorations (All-on-X appliances), temporary single units (crowns, inlays, onlays, and veneers), and up to seven-unit temporary bridges. Class II (US), Class IIa (EU). |
A versatile ceramic-filled biocompatible material, indicated for temporary and permanent single units (crowns, inlays, onlays, and veneers) and bridges (up to three units for permanent indications), and denture teeth. Class II (US), Class IIa (EU). |
|
Shades |
Bleach A2, A3, B1 |
A2, A3, B1 |
|
Cost of cartridge |
$550/kg (€540/kg) |
$599/kg (€579/kg) |
|
Cost per part |
$/€ <1 |
$/€ 1.20-2 |
|
Layer height recommended and estimated print time for three shells (one full arch) *Please note that print times may vary depending on the geometry and height of the parts |
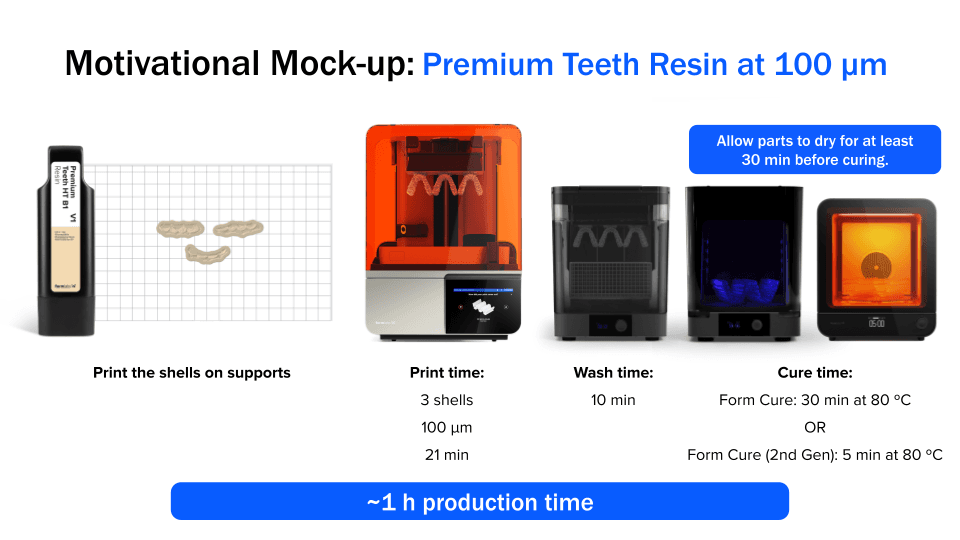
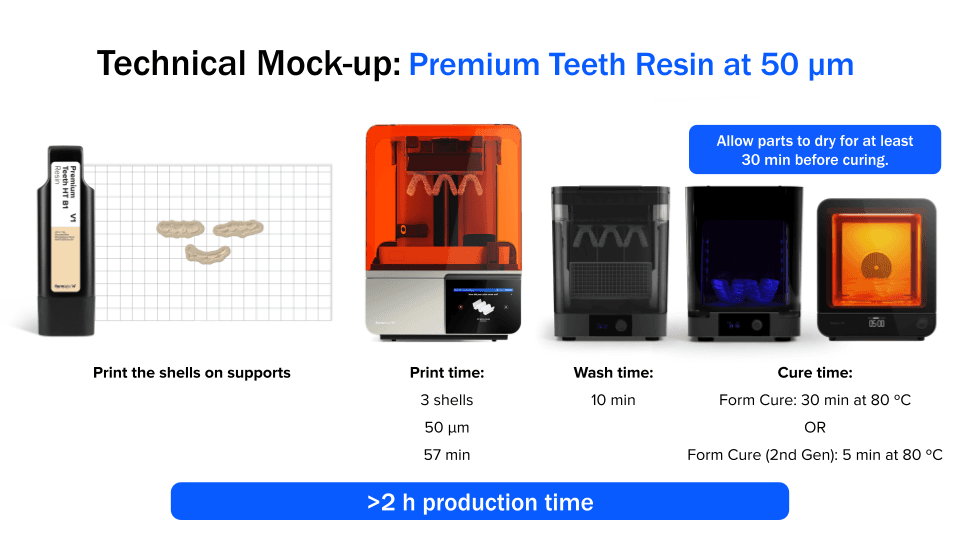
Motivational mock-up: 100 µm, 21 min* Technical mock-up: 50 µm, 57 min* |
Motivational mock-up: 100 µm, 30 min* Technical mock-up: 50 µm, 1 h 33 min* |
|
Post-processing time |
Follow the Manufacturing Guide Wash: Form Wash (2nd Generation): Wash for 10 min or until clean Cure: Form Cure (2nd Generation): 5 min at 80 °C. OR Form Cure (1st Generation)/Form Cure L: 30 min at 80 °C |
Follow the official recommendations Wash: Form Wash (2nd Generation): Wash for 3 min and spray with fresh IPA Cure: Form Cure (2nd Generation): 10 min at 60 °C OR Form Cure (1st Generation)/Form Cure L: 2x 20 min at 60 ºC |
|
What type of mock-up can I use this for? |
Motivational Mock-up: print at 100 µm Technical Mock-up: print at 50 µm |
|
|
Guidance for choosing the right resin |
If you want to print mock-ups and indications, such as All-on-X appliances, provisional restorations, or teeth for dentures, then this resin would be a good fit. If you are looking for a material with high translucency, this would be the best fit. Dental professionals should verify regional availability of this material here. |
If you are looking into printing permanent restorations as well as provisional ones, then this resin would be a good choice. Users must use the Flex Build Platform to print with this material. Dental professionals should verify regional availability of this material here. |
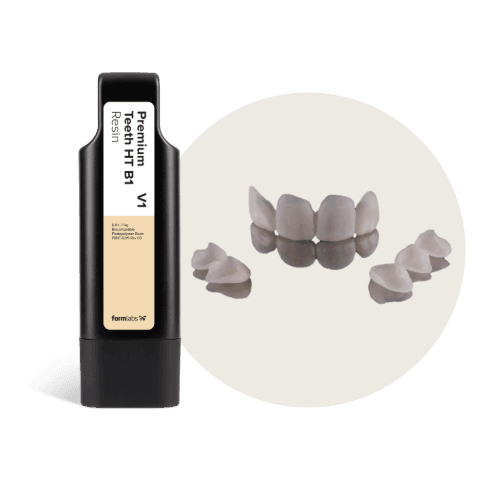
For printing the shells, Premium Teeth Resin is the recommended choice as it provides translucency and natural aesthetics, especially in the B1 shade. The results out of the printer are already impressive, with a nice surface finish that polishes nicely with minimal effort.
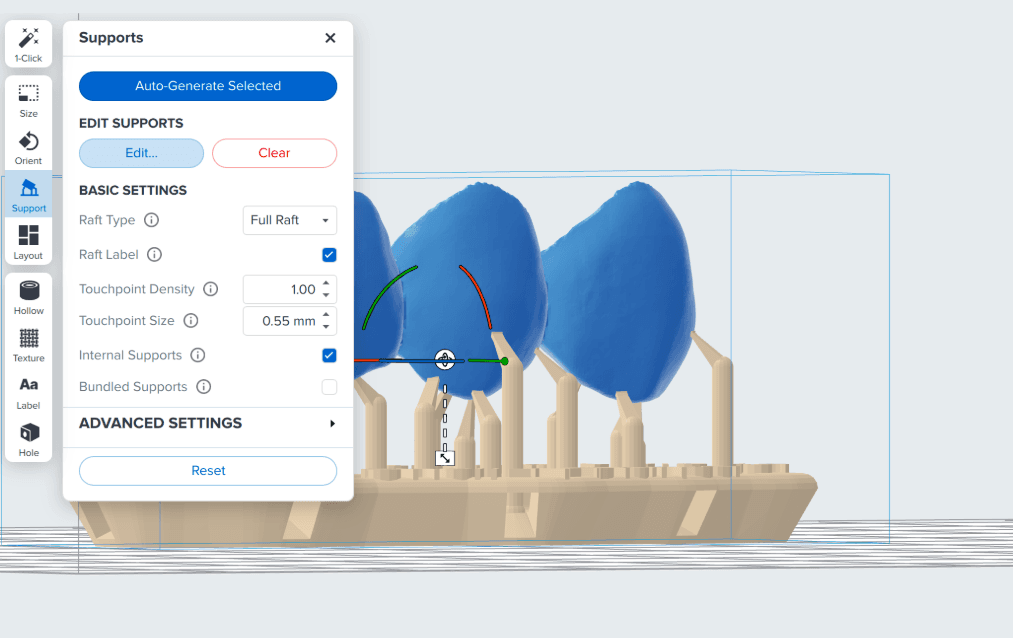
3. Nesting in PreForm Dental
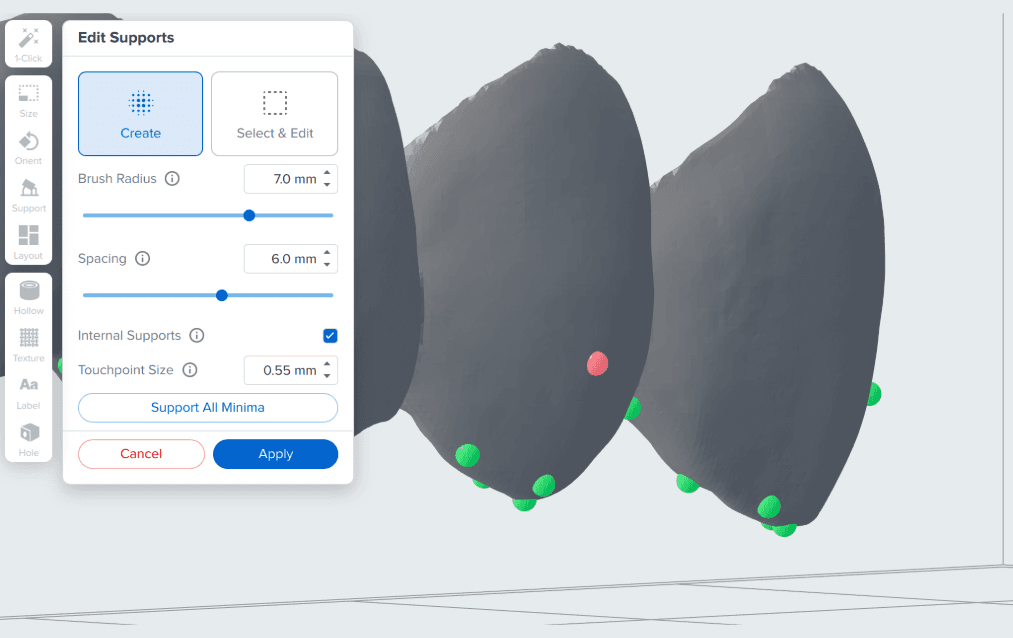
In this case, the shells need to be oriented so that their incisal edges and cusps face towards the build platform. Then, supports can be automatically generated using Support > Auto-Generate All.
Confirm that you don’t have any support structures in undesired areas. You can remove these manually under the Supports menu by clicking Edit and selecting the support you want to remove.
4. 3D Printing and Post-Processing
Following nesting in PreForm Dental, the parts are printed and post-processed. The 3D printing workflow involves several steps: printer setup, printing, washing, drying, and post-curing. Total production time varies depending on the layer height chosen for printing.
4.1 Setting up Form 4B
Insert a build platform, resin tank, resin mixer, and Premium Teeth Resin cartridge in the printer. Once the printer is set up, send the print job from PreForm Dental to the printer.
When printing with biocompatible resins, a dedicated build platform, resin tank, and resin mixer are needed to ensure biocompatibility.
4.2 Post-processing
After the print job is completed, the next step to follow is post-processing which includes removing the parts from the build platform, washing, drying, and post-curing. Post-processing of parts printed with biocompatible resins requires following the steps as established in the Premium Teeth Manufacturing Guide.
Wash:
-
After parts are removed from the build platform, they need to be washed in IPA (99%) in the Form Wash (2nd Generation) at High Speed for 10 minutes or until clean. It’s important to use a dedicated Form Wash for washing parts printed with Premium Teeth Resin. This Form Wash should not be shared with other materials and the exact timing presented in the Manufacturing Guide should be followed.
-
Immediately after washing, dry the printed parts with compressed air to ensure that there is no remaining IPA or resin on the printed part, especially in the intaglio surface. This is critical to ensure proper fit of the shell during the clinical execution.
-
Allow parts to air dry at room temperature for at least 30 minutes.
Cure:
-
Parts need to be post-cured in the Form Cure (1st Generation) or Form Cure (2nd Generation) for the specific time and temperature as established in the Manufacturing Guide. This final step will ensure parts are ready to be used clinically.
The following graphics summarize the overall process and final production time.
4.3 Part Finishing
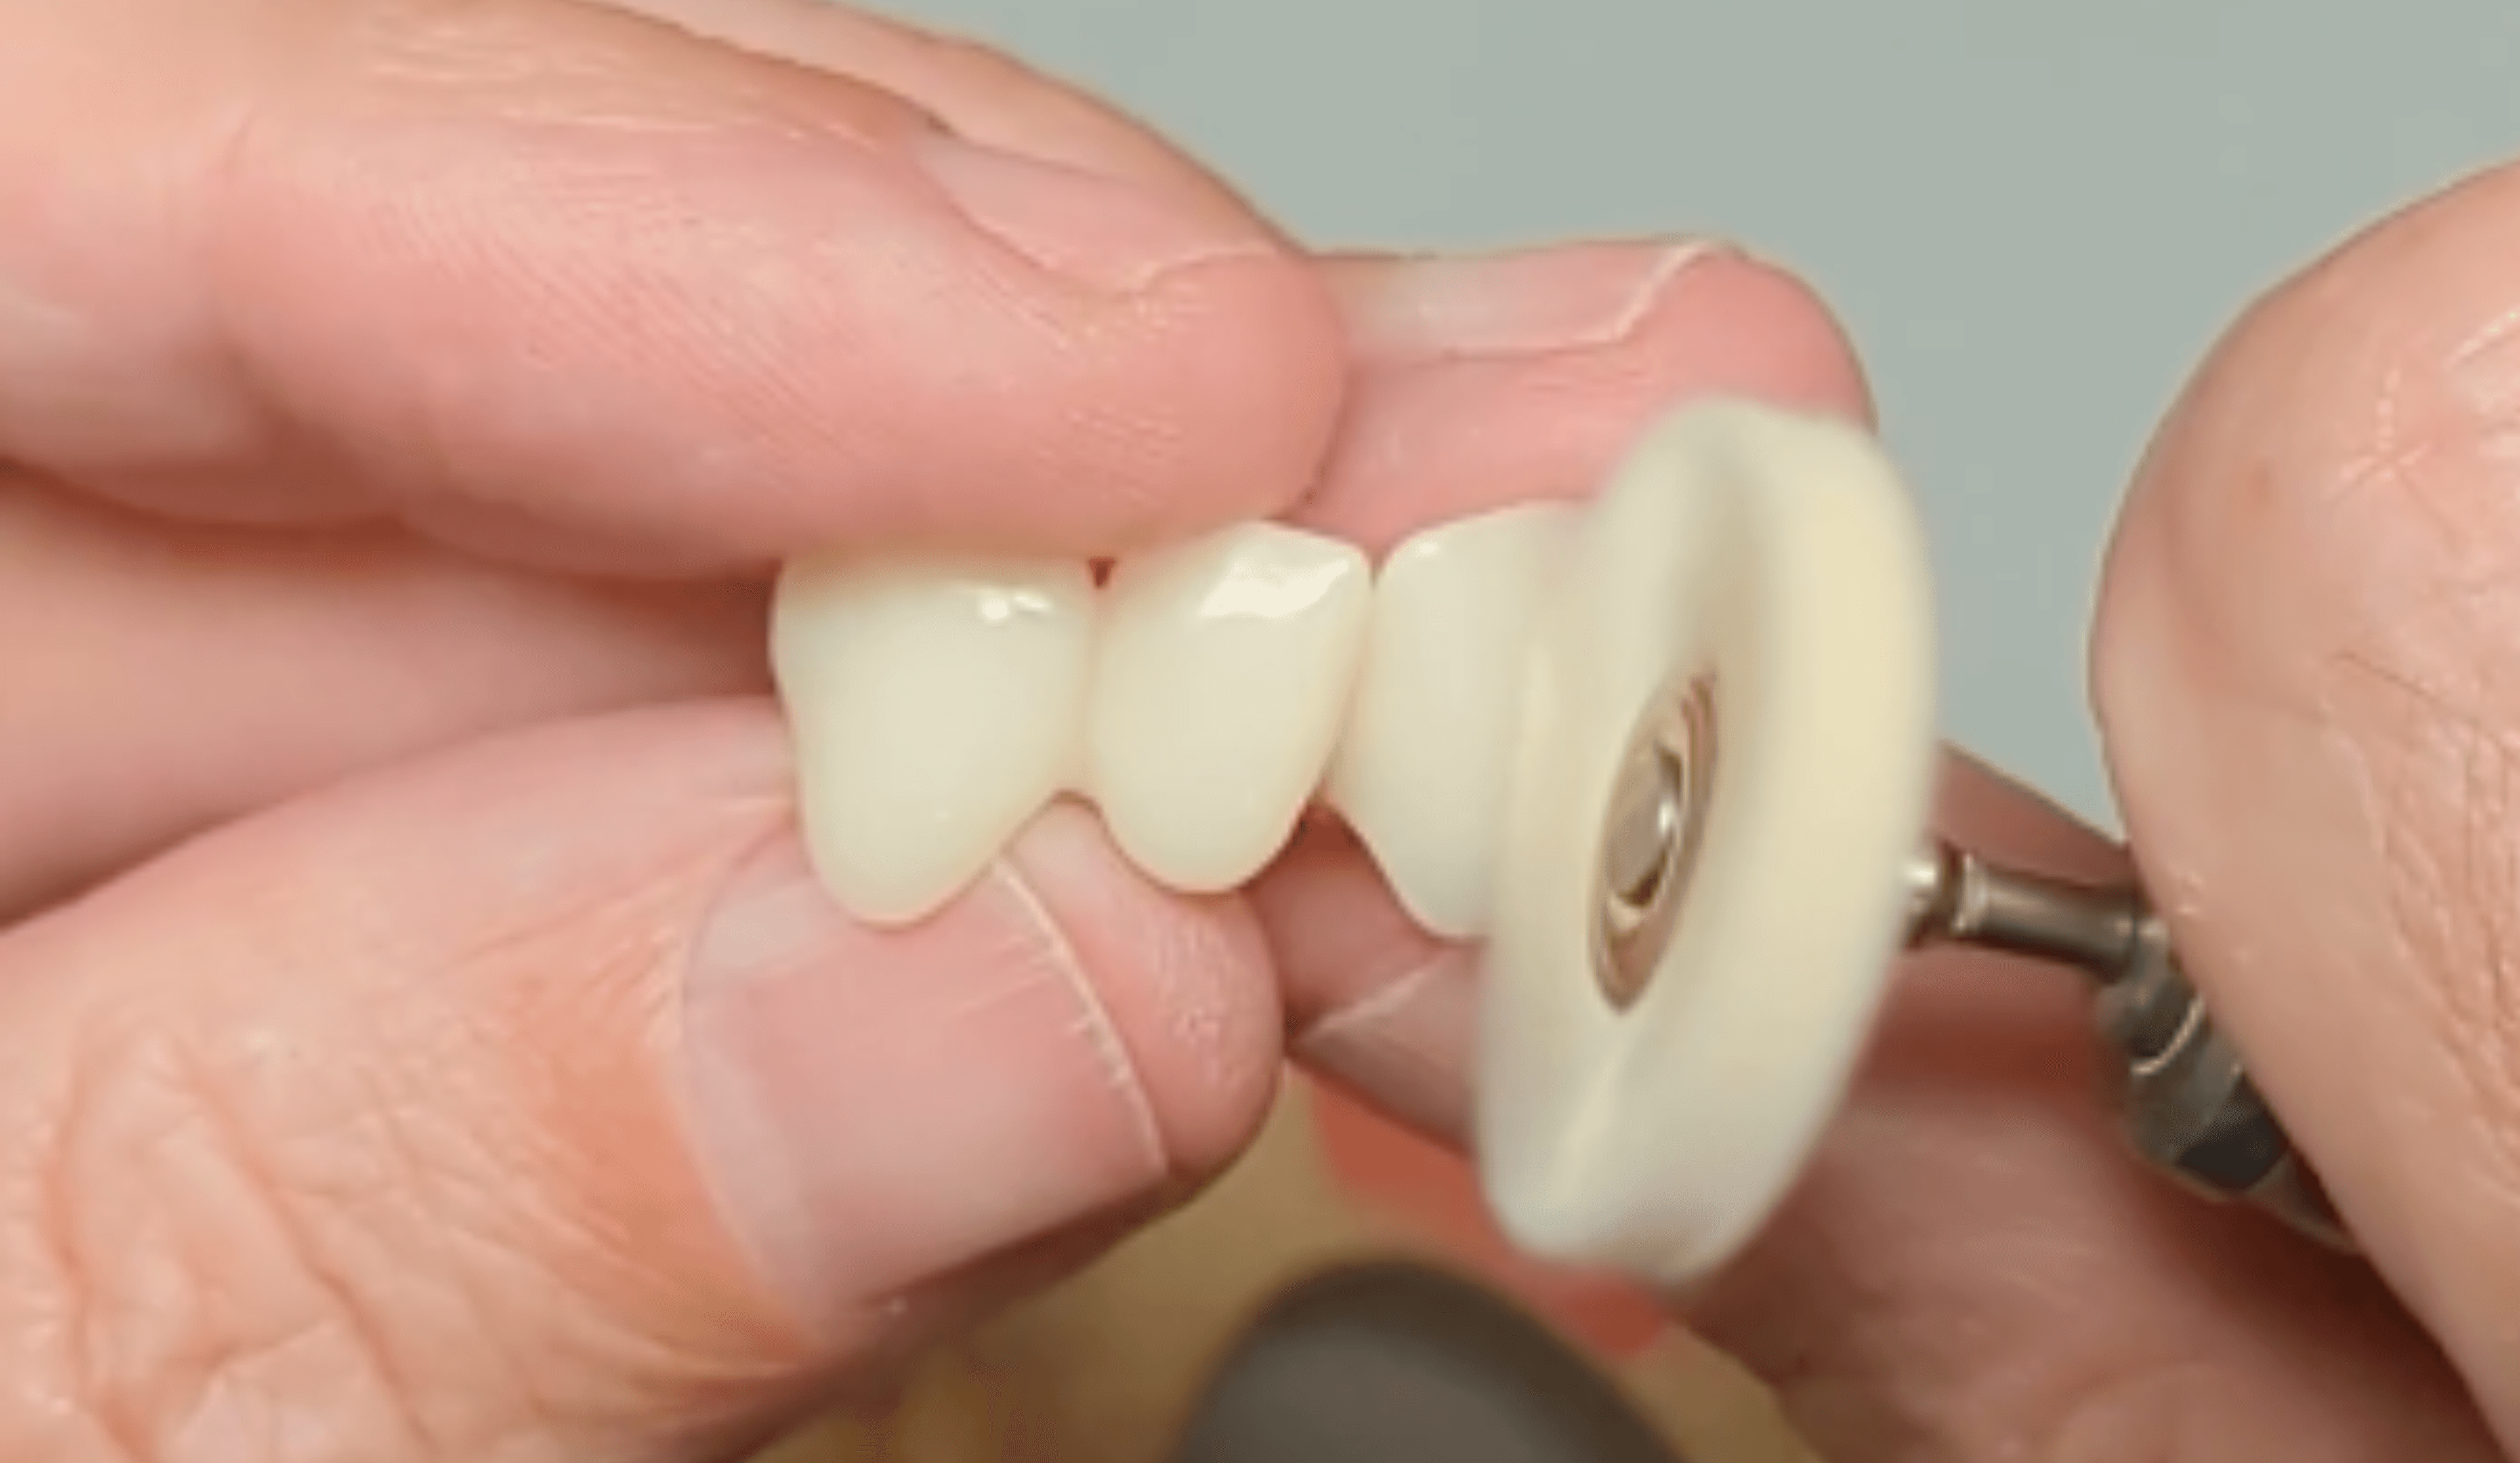
4.3.1 Support removal: Remove support structures with a cutting disc or very carefully use a pair of high-quality precision nippers to trim off support tips as close to the surface as possible. Grind down the touch points with a dual-cut carbide bur.
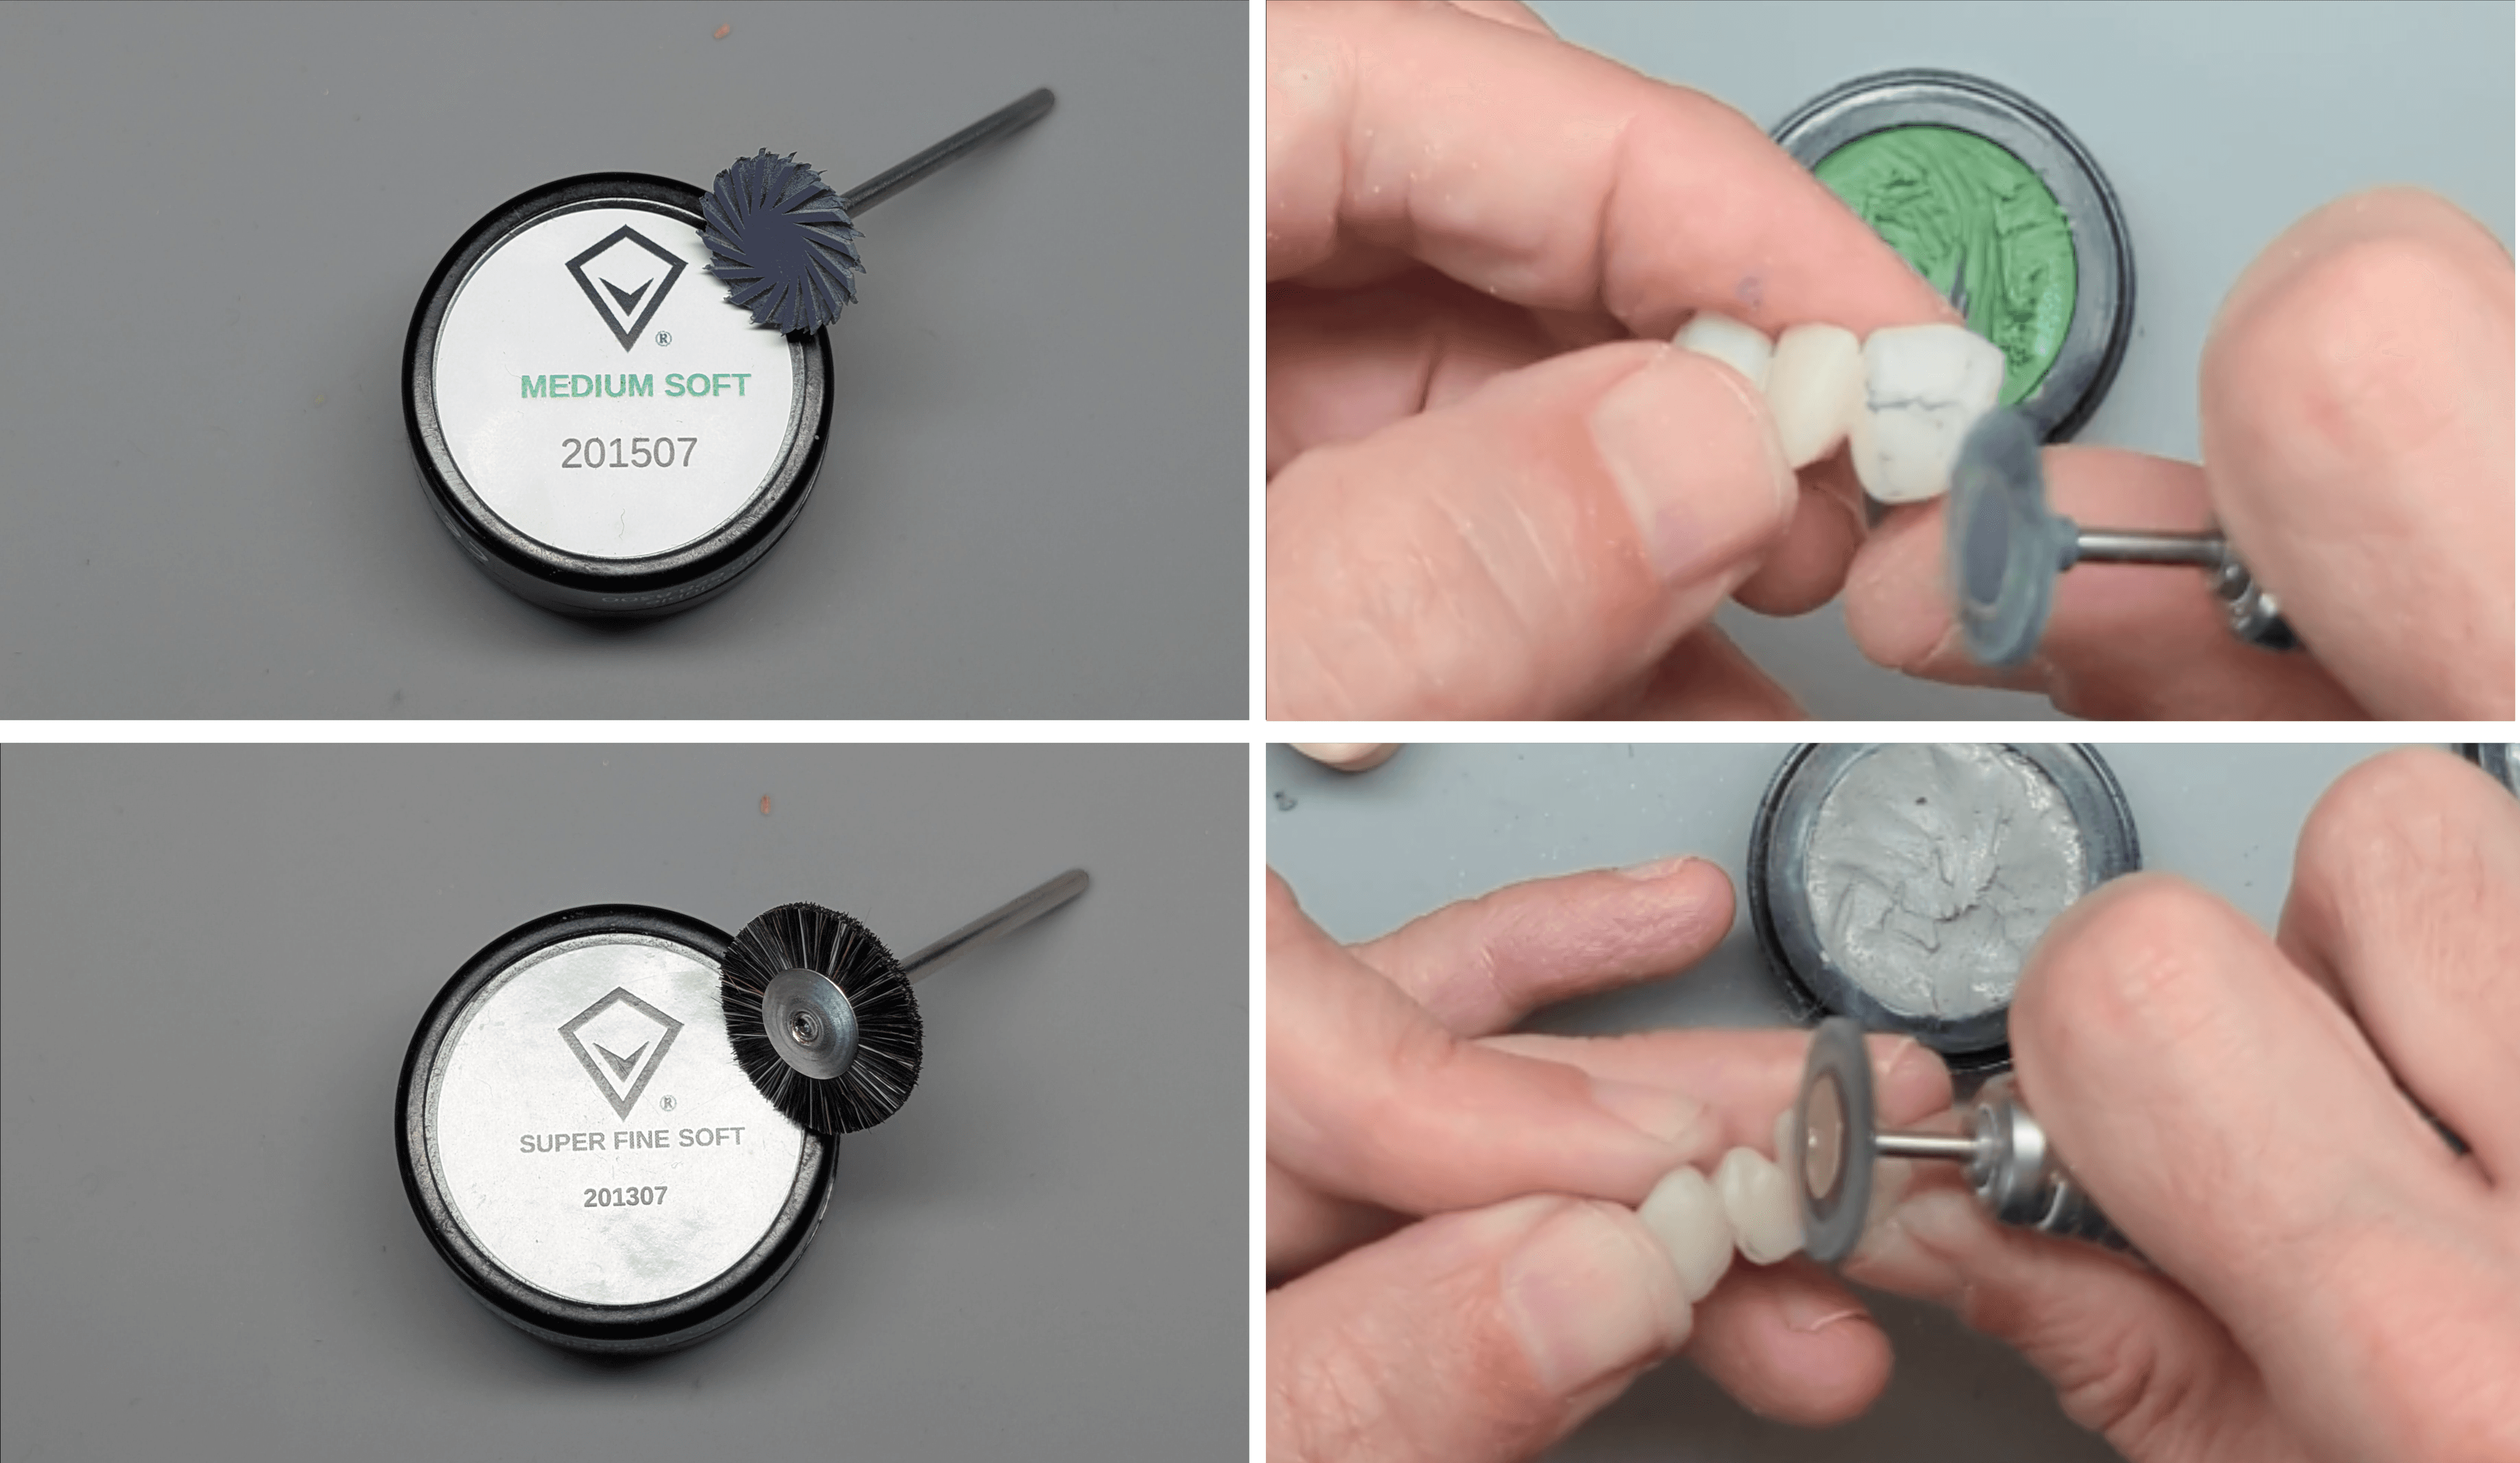
4.3.2 Polishing: The polishability of parts printed with Premium Teeth Resin is one of the nicest features of this material. You can achieve excellent polishing and high gloss with minimum effort.
-
Polish using a flexible diamond disc and Medium polishing paste (e.g. DiaShine®Medium Soft).
-
Achieve a high shine using a bristle brush and a fine polishing paste (e.g. DiaShine®Super Fine Soft) to polish the parts.
-
Clean the part with a clean wool disc for added shine.
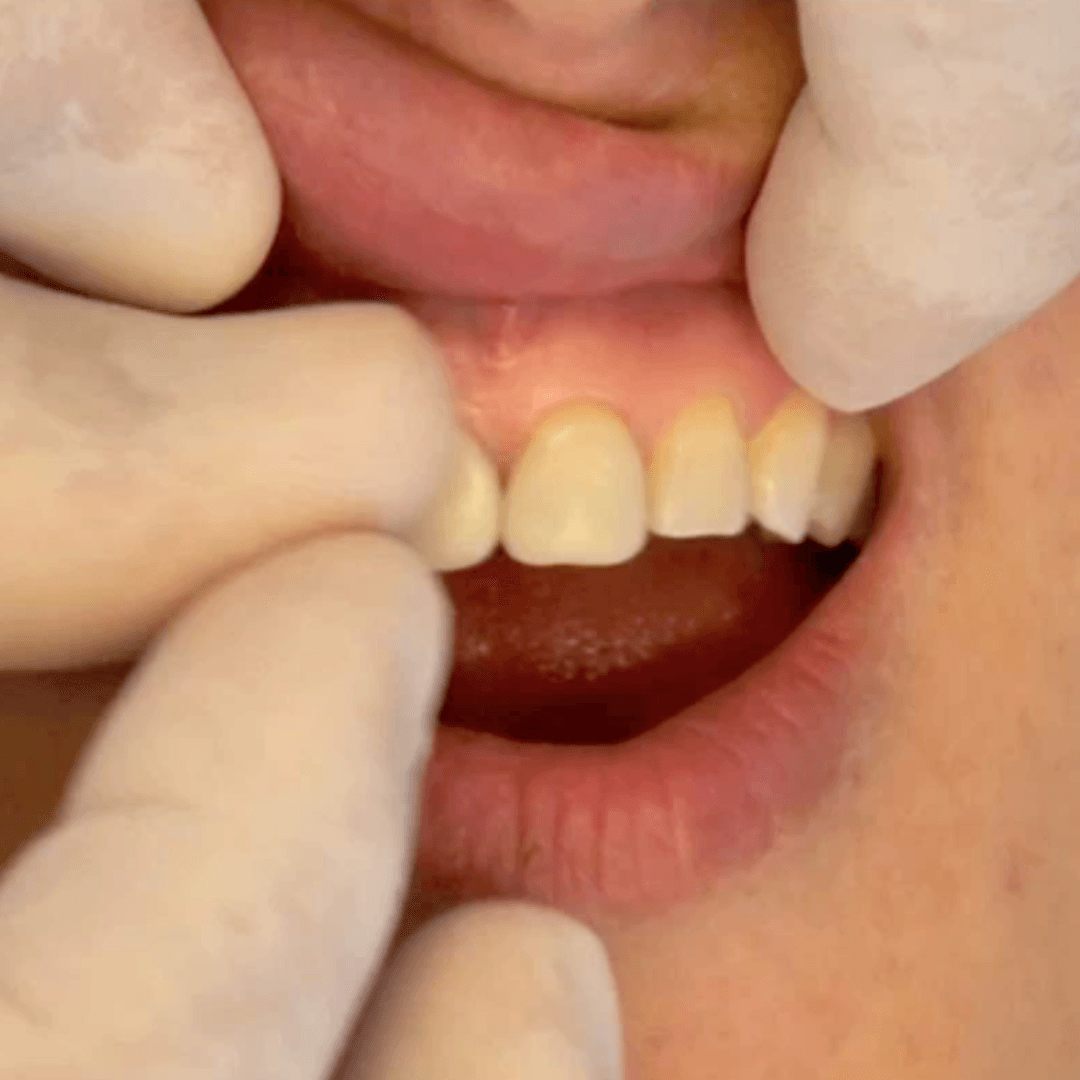
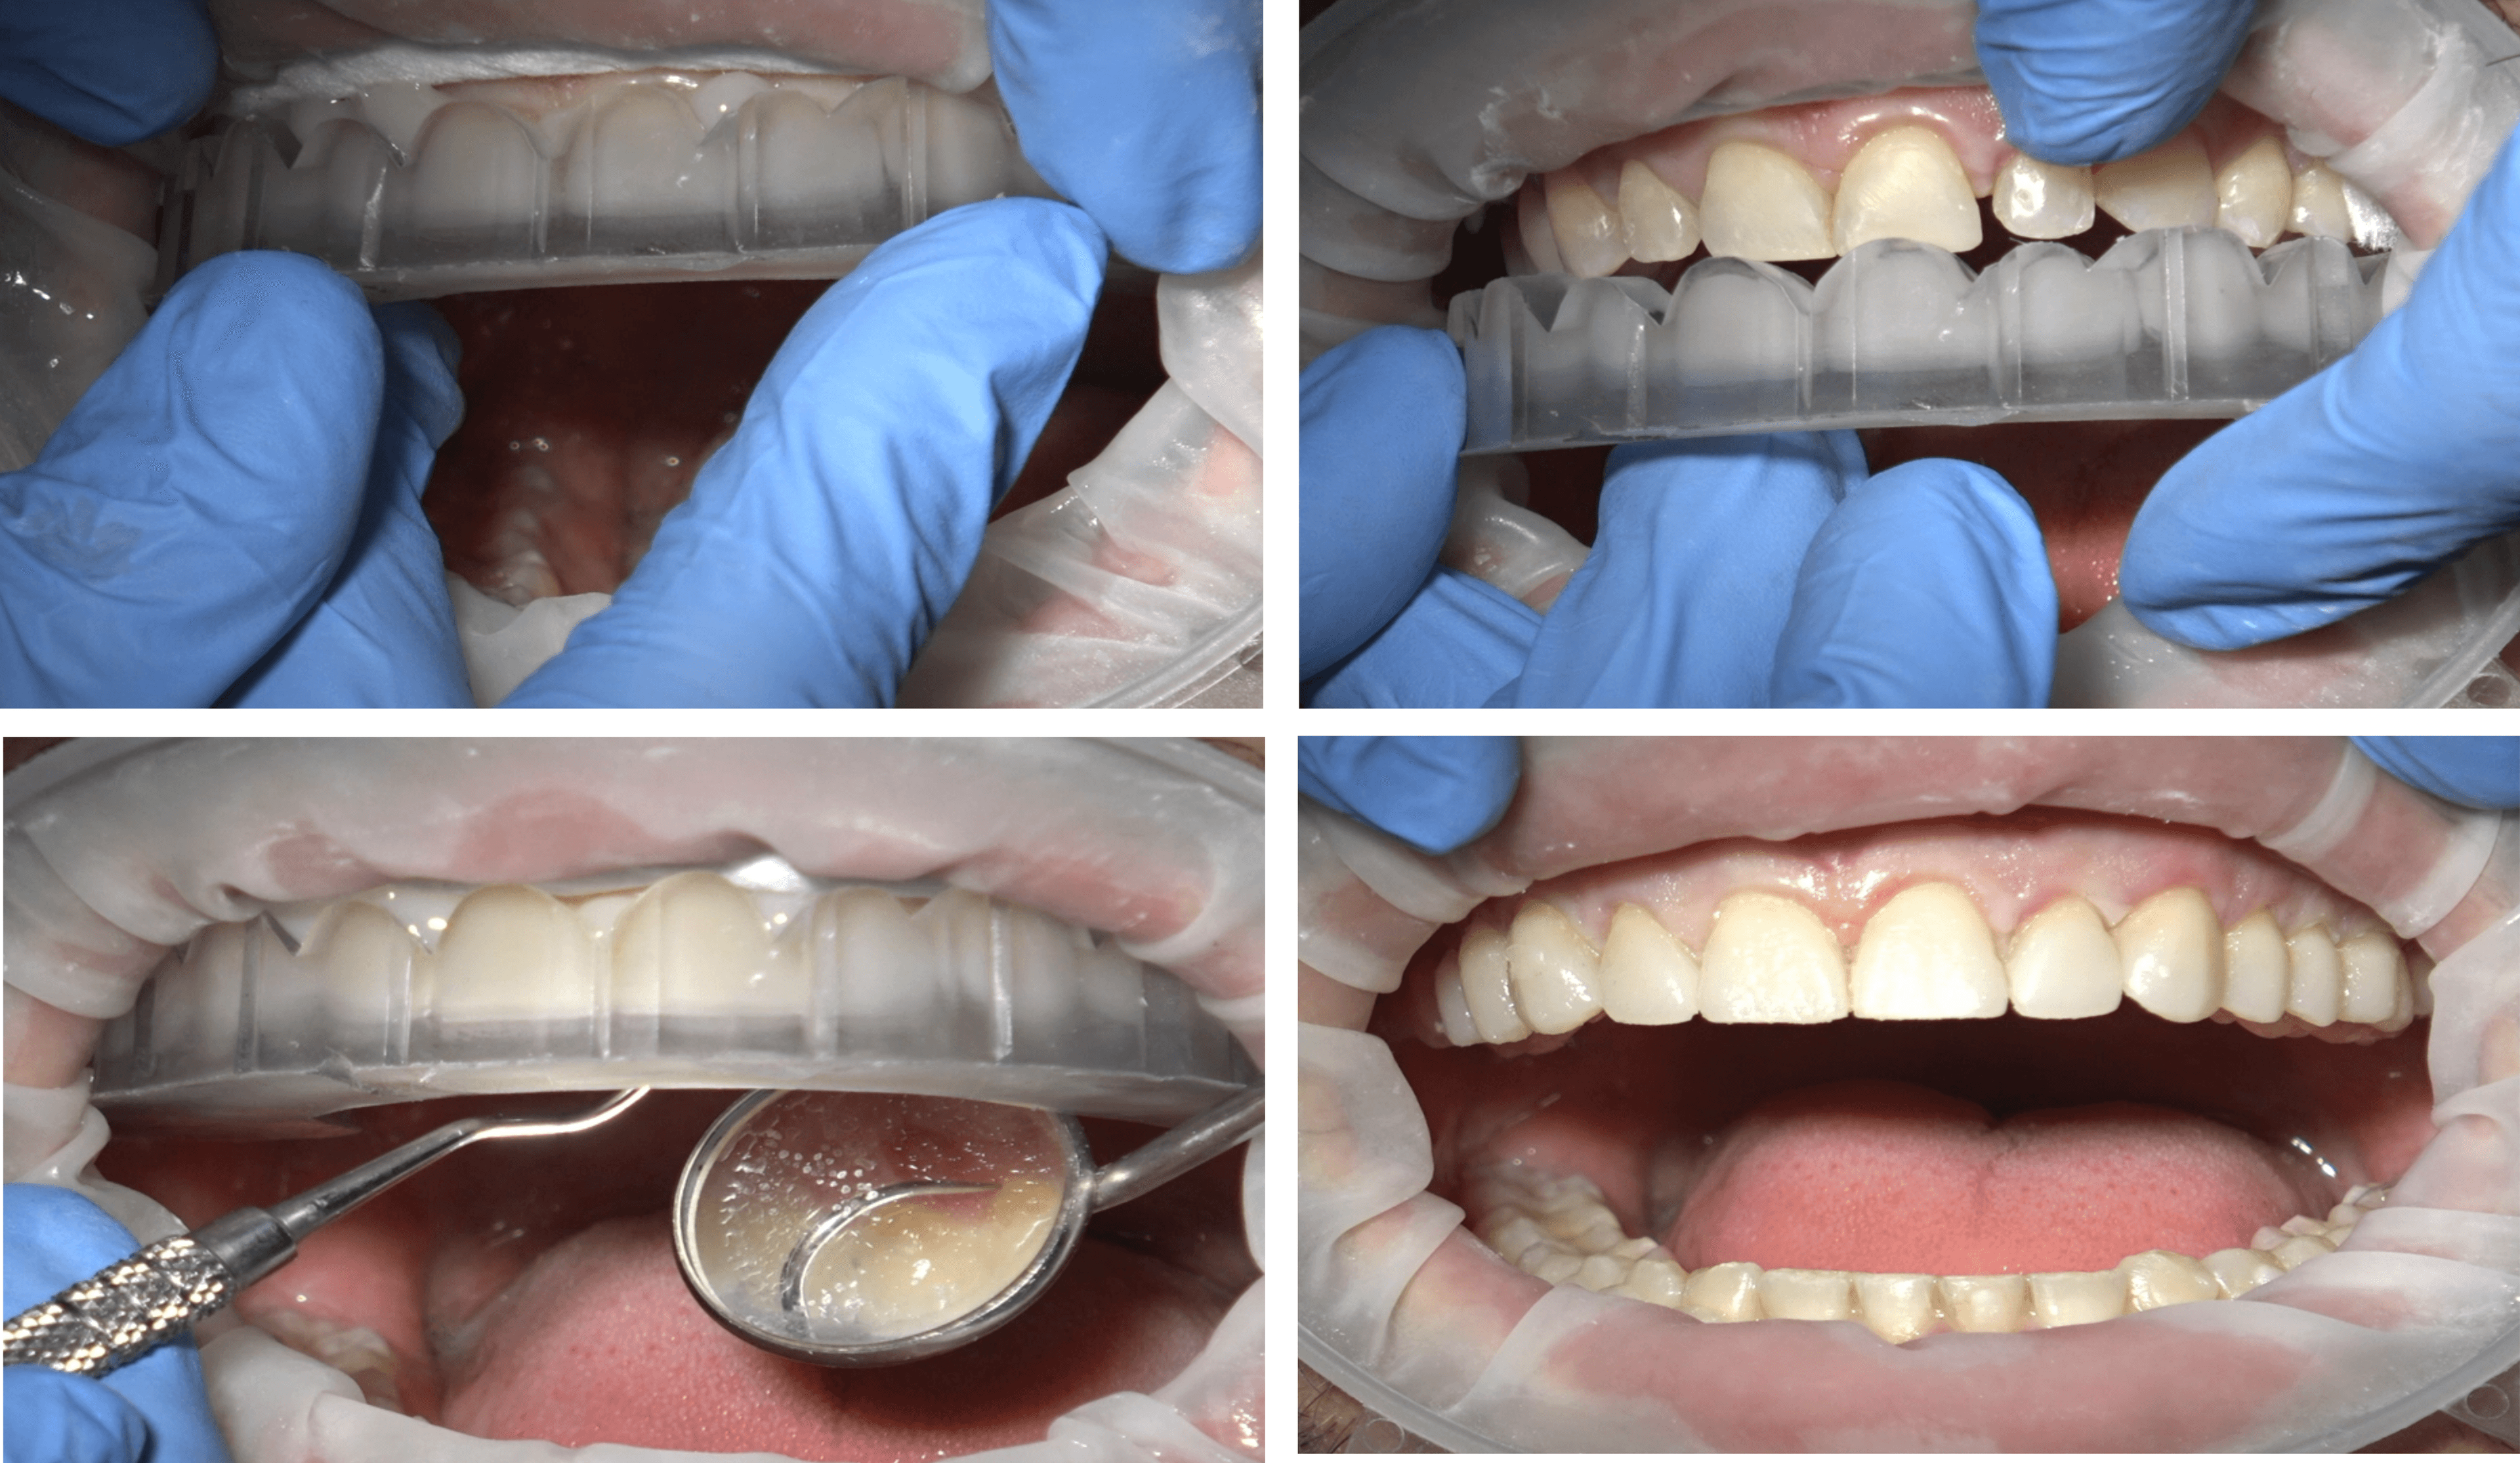
5. Clinical Execution
After polishing, the parts are ready to be used clinically.
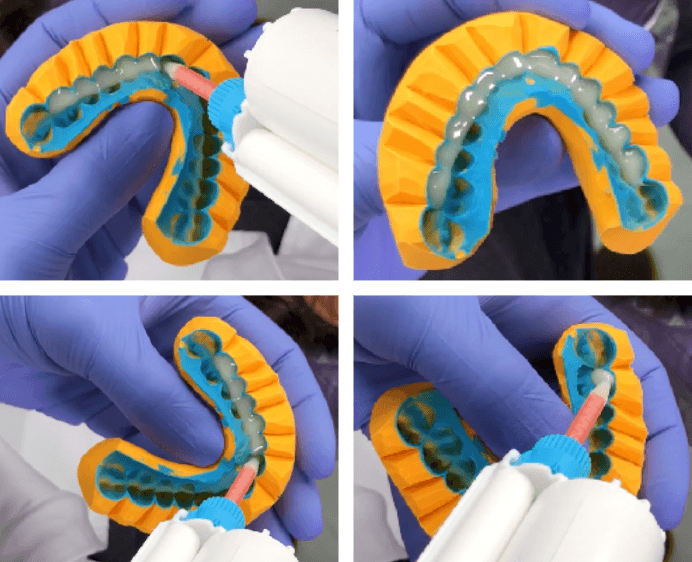
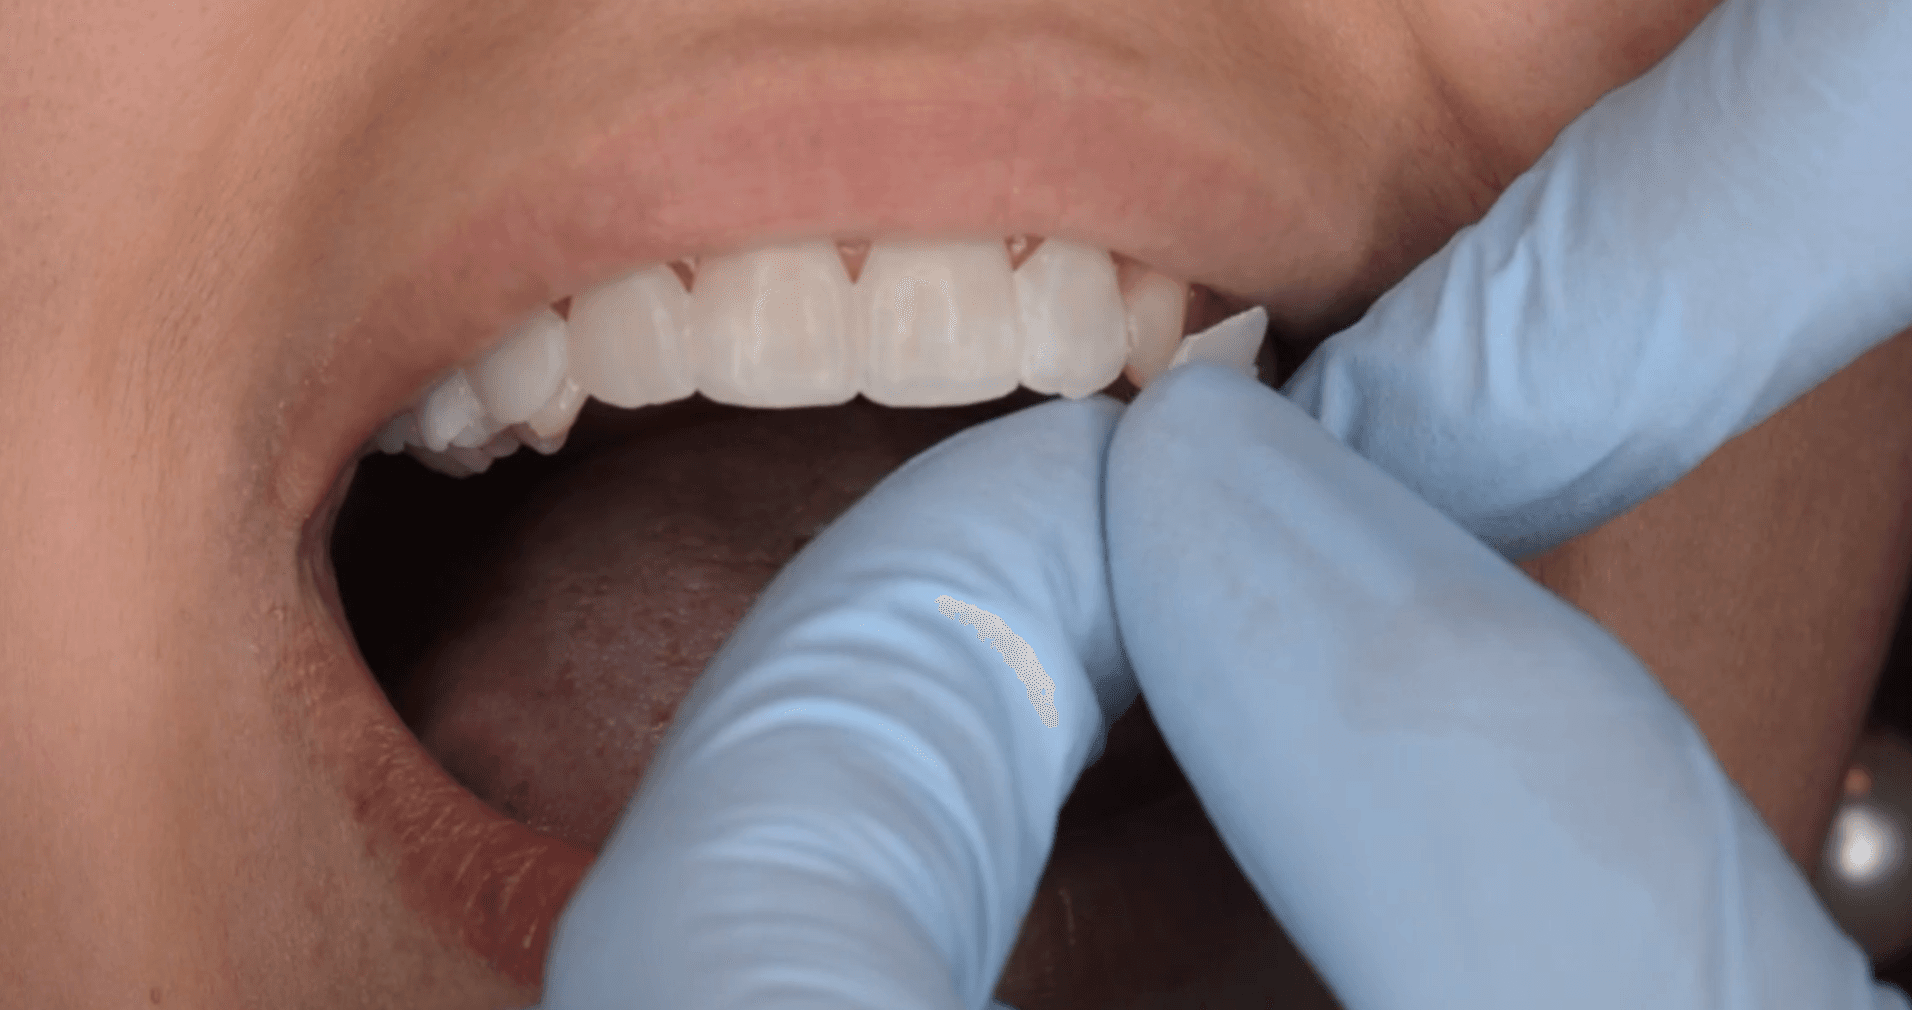
No bonding or etching are needed. Just position the printed shells and use flowable composite to close the gaps.
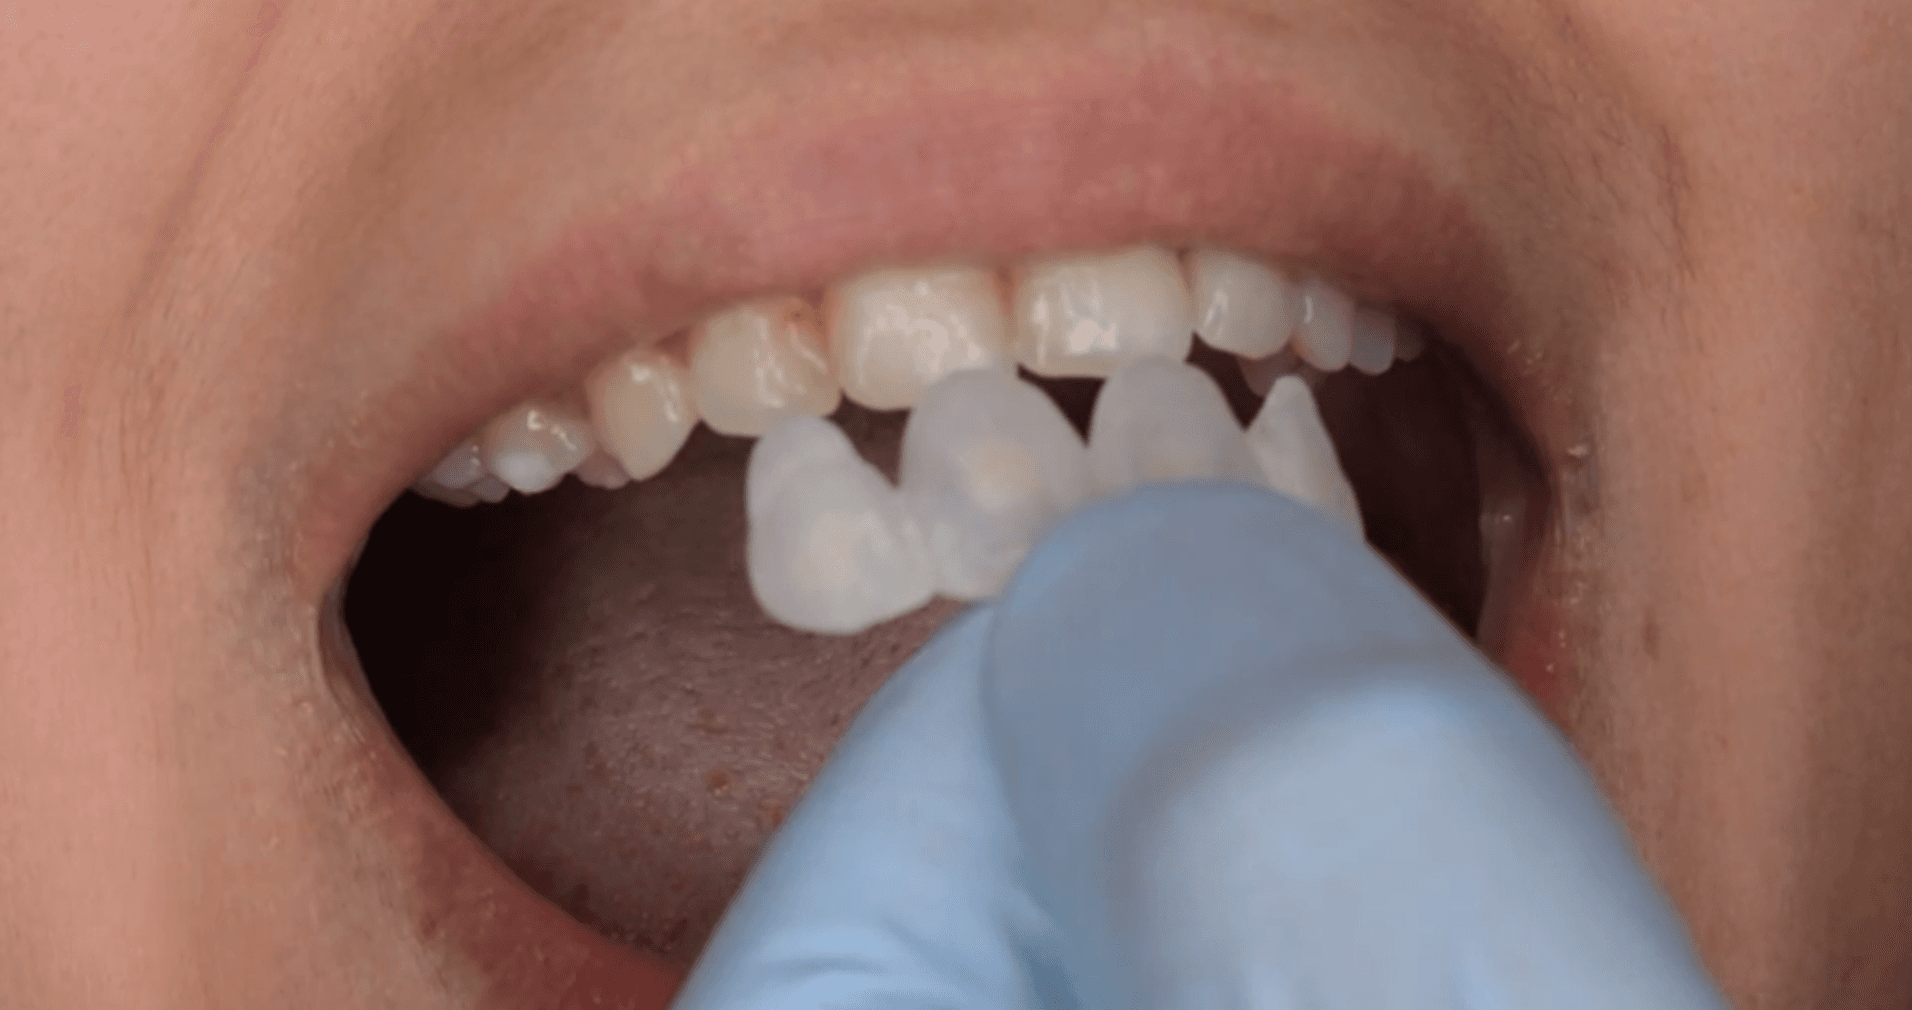
Place the anterior shell and remove any excess material.

Light cure that section.
Next, position one of the lateral shells.
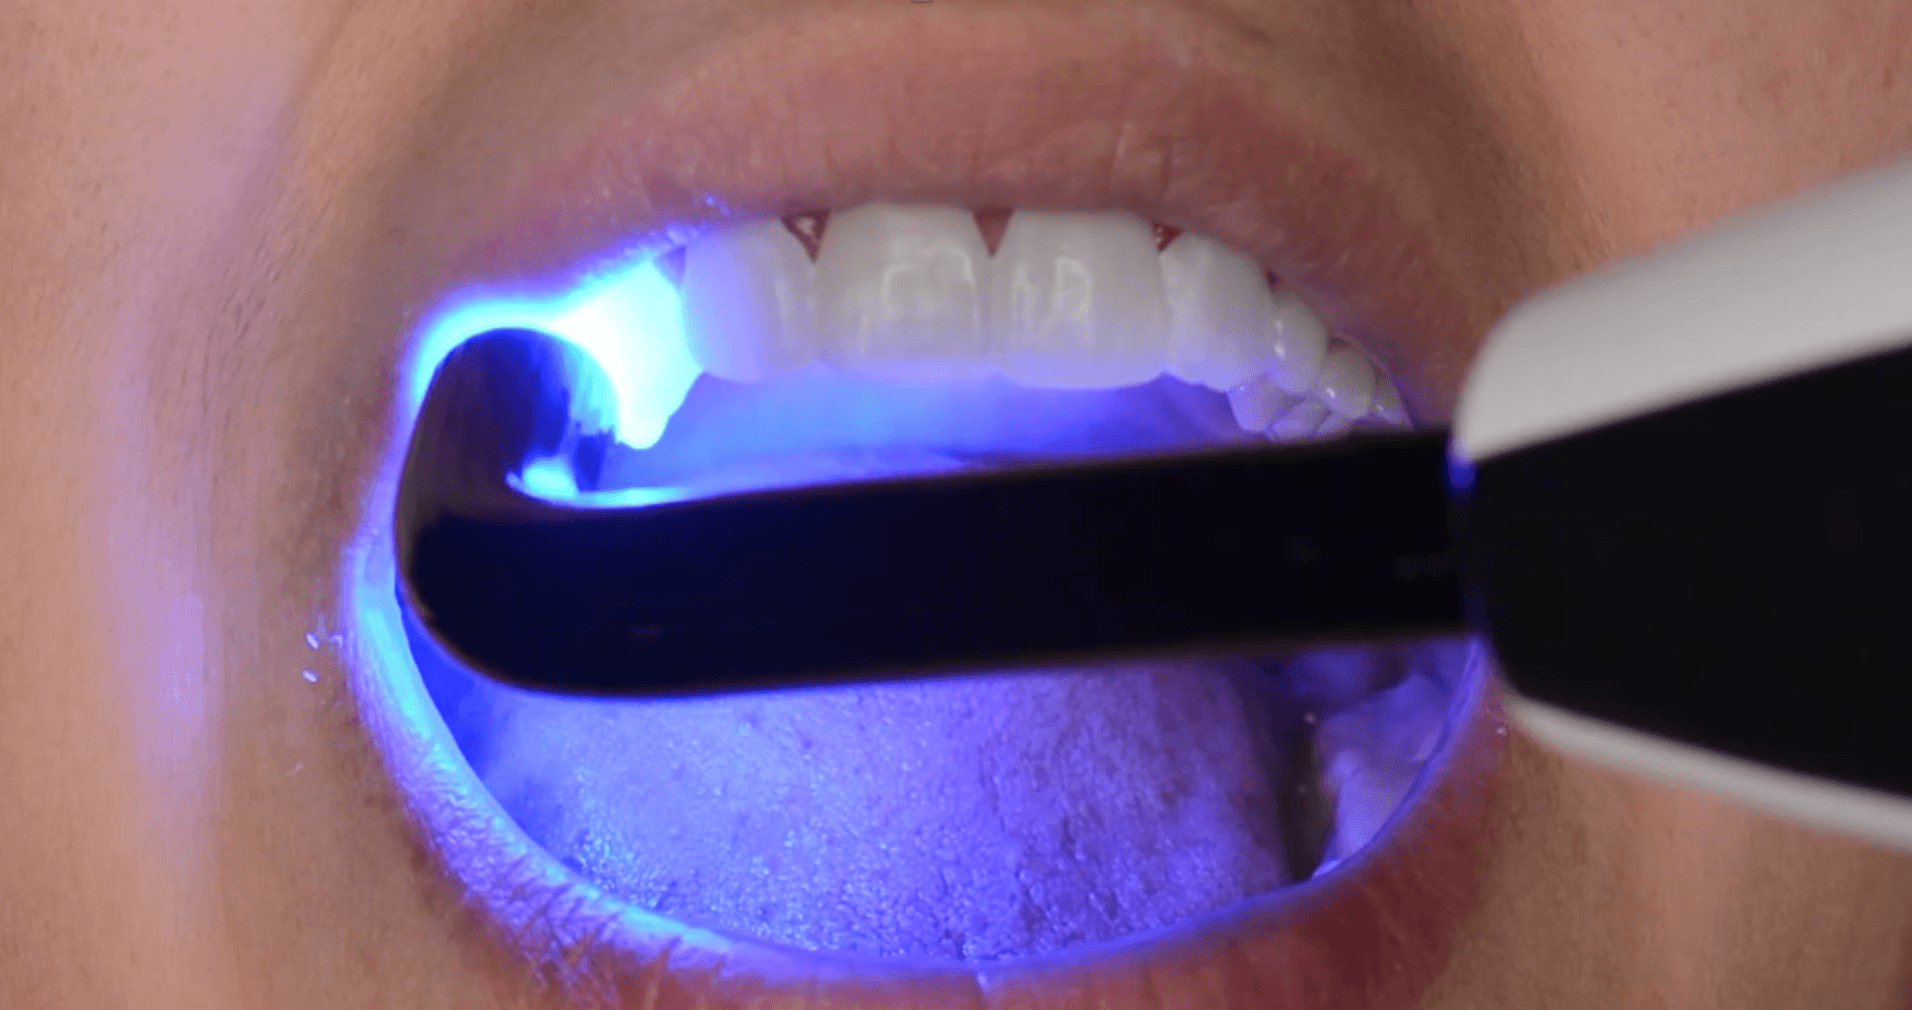
Remove excess material and light cure.
Finally, place the shell on the remaining side.
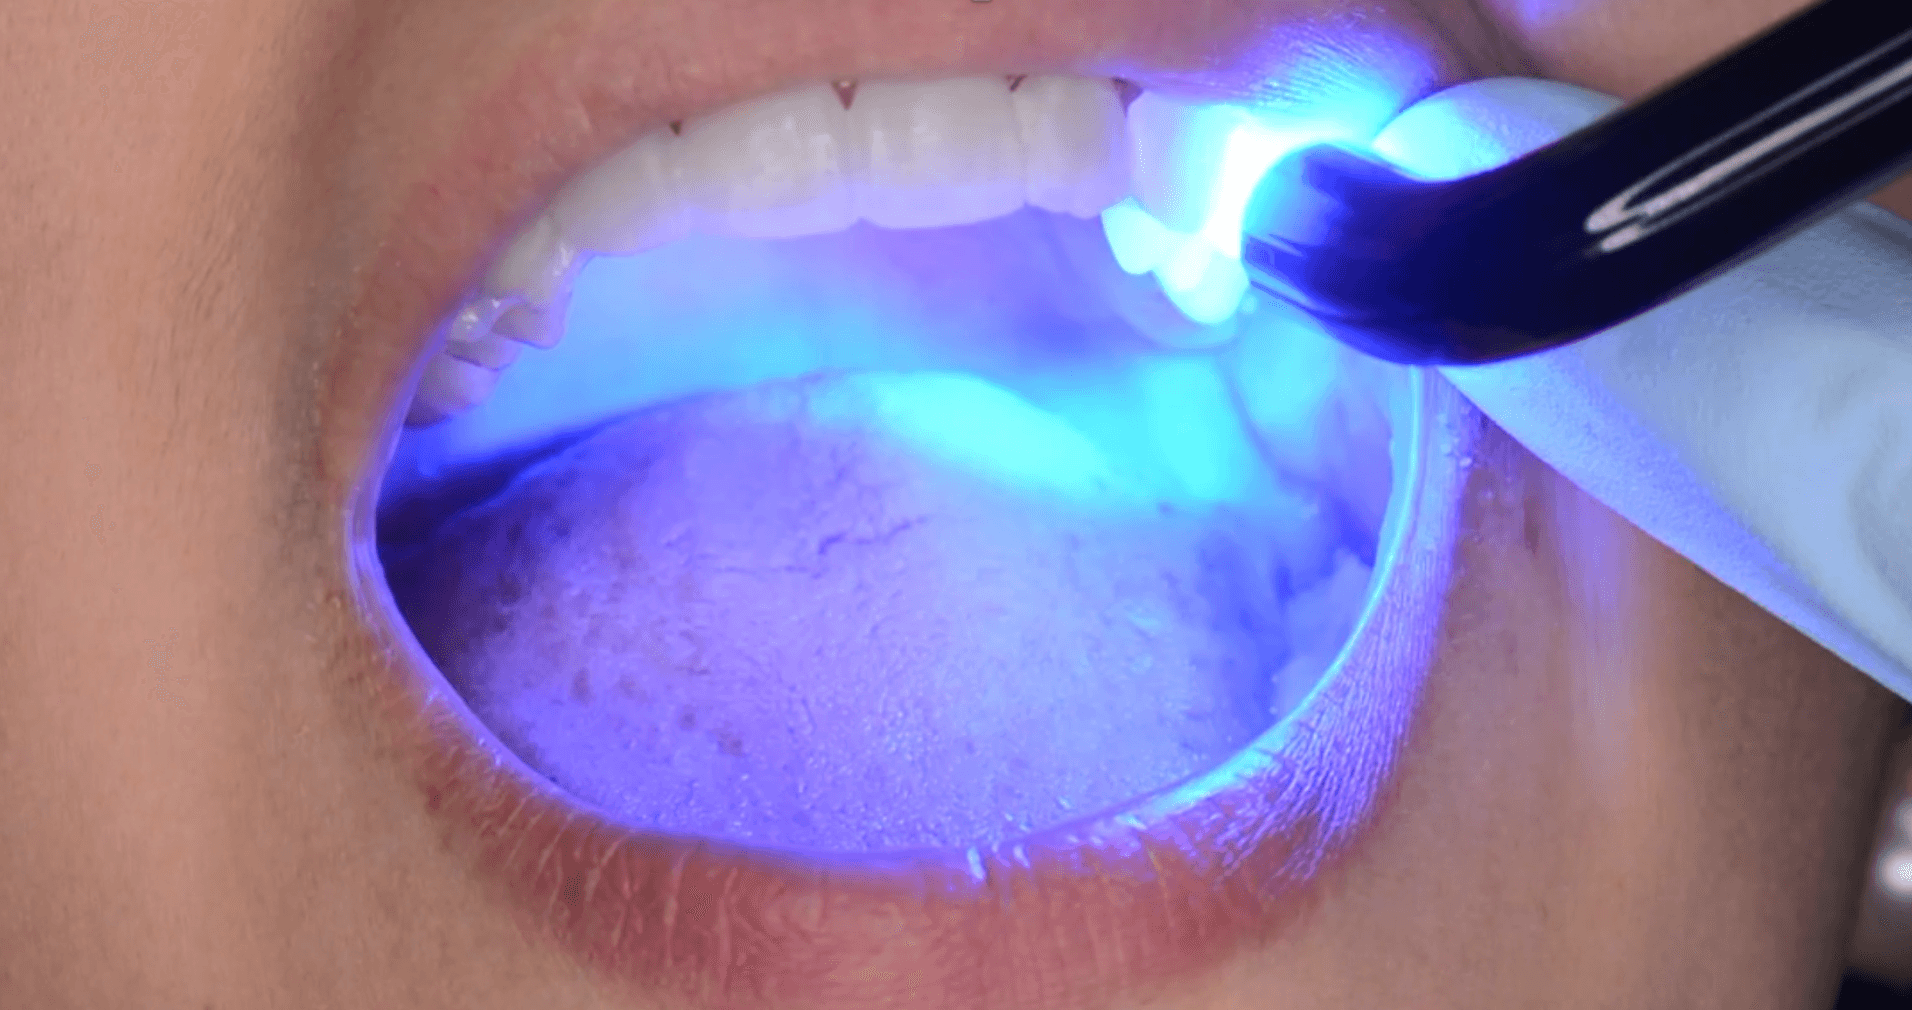
Remove excess material and light cure.
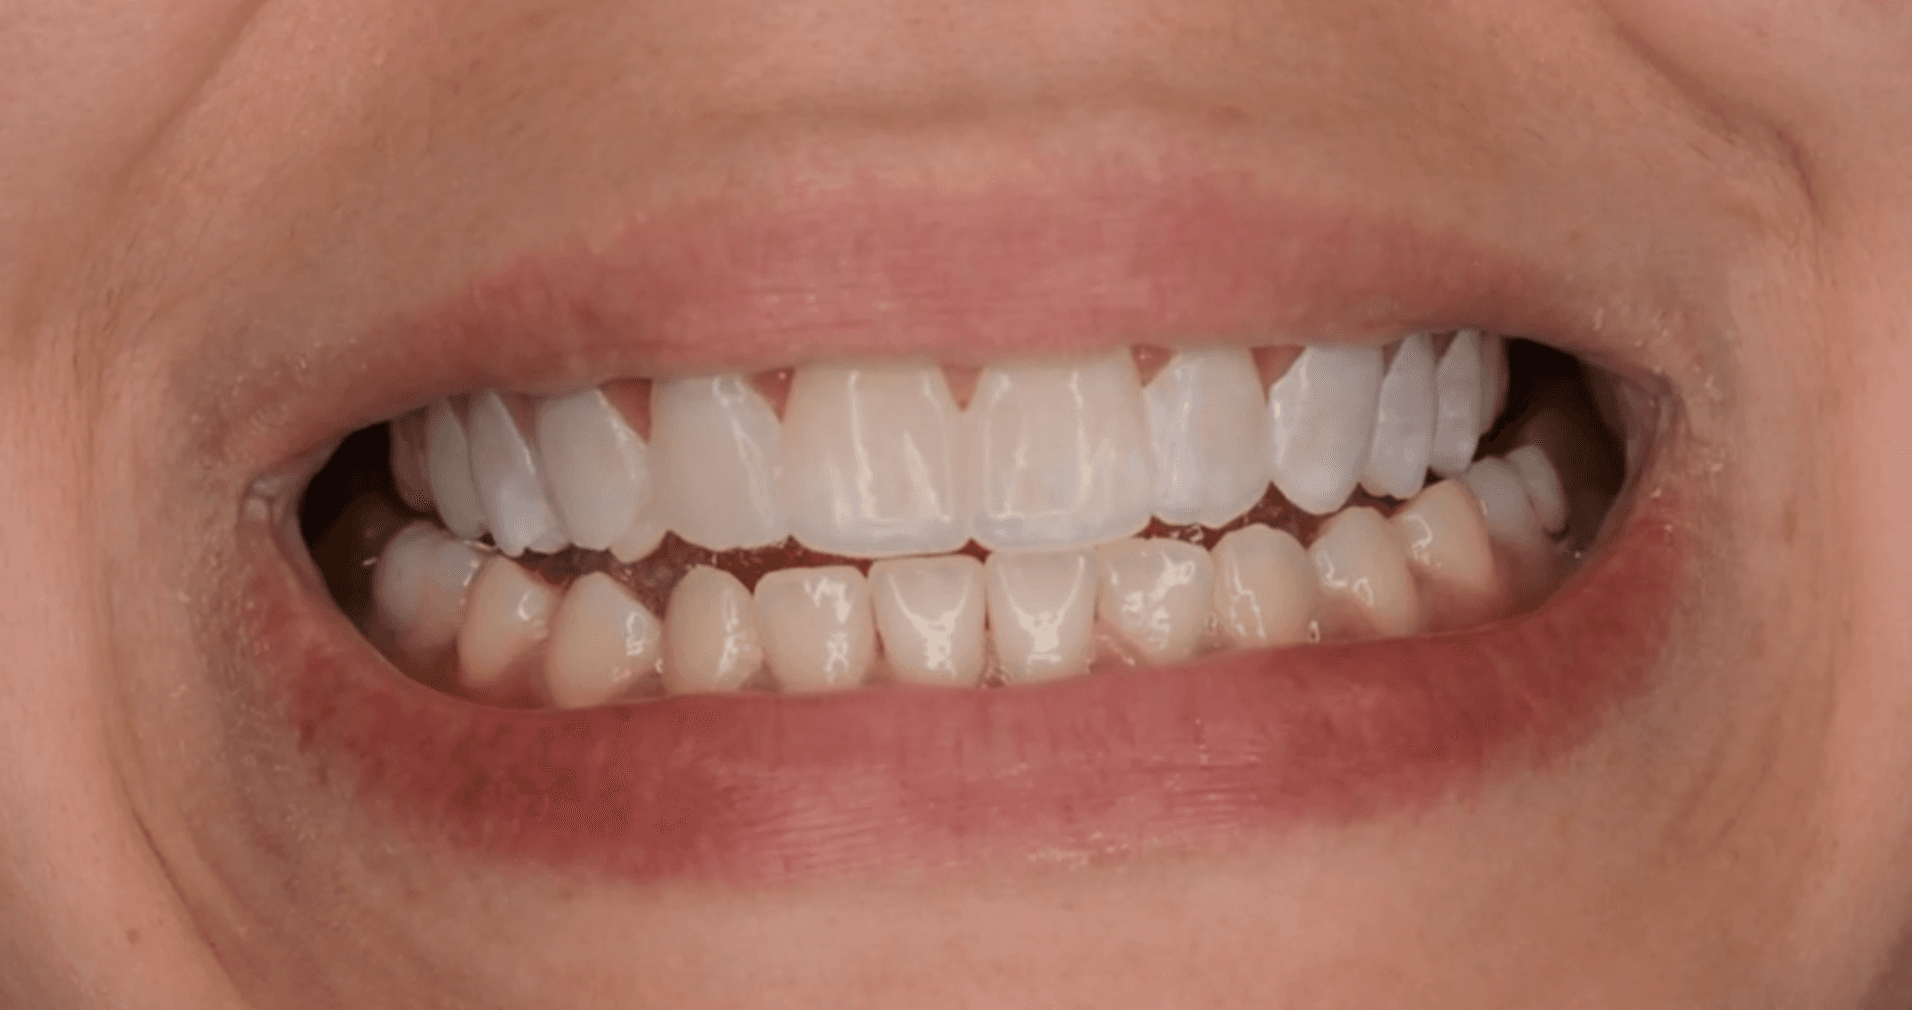
Once the shell is positioned and secured, continue with the photographic and video documentation.
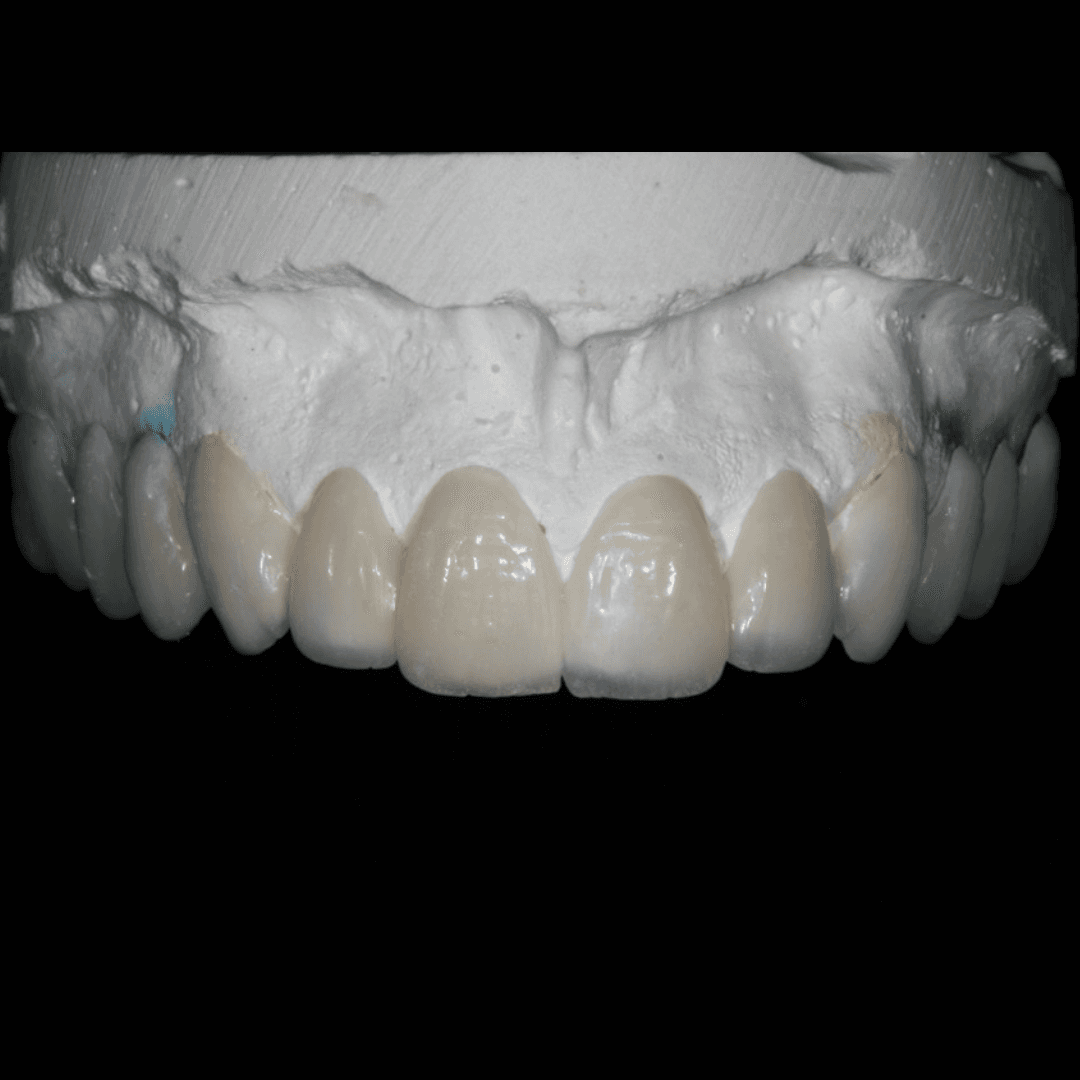
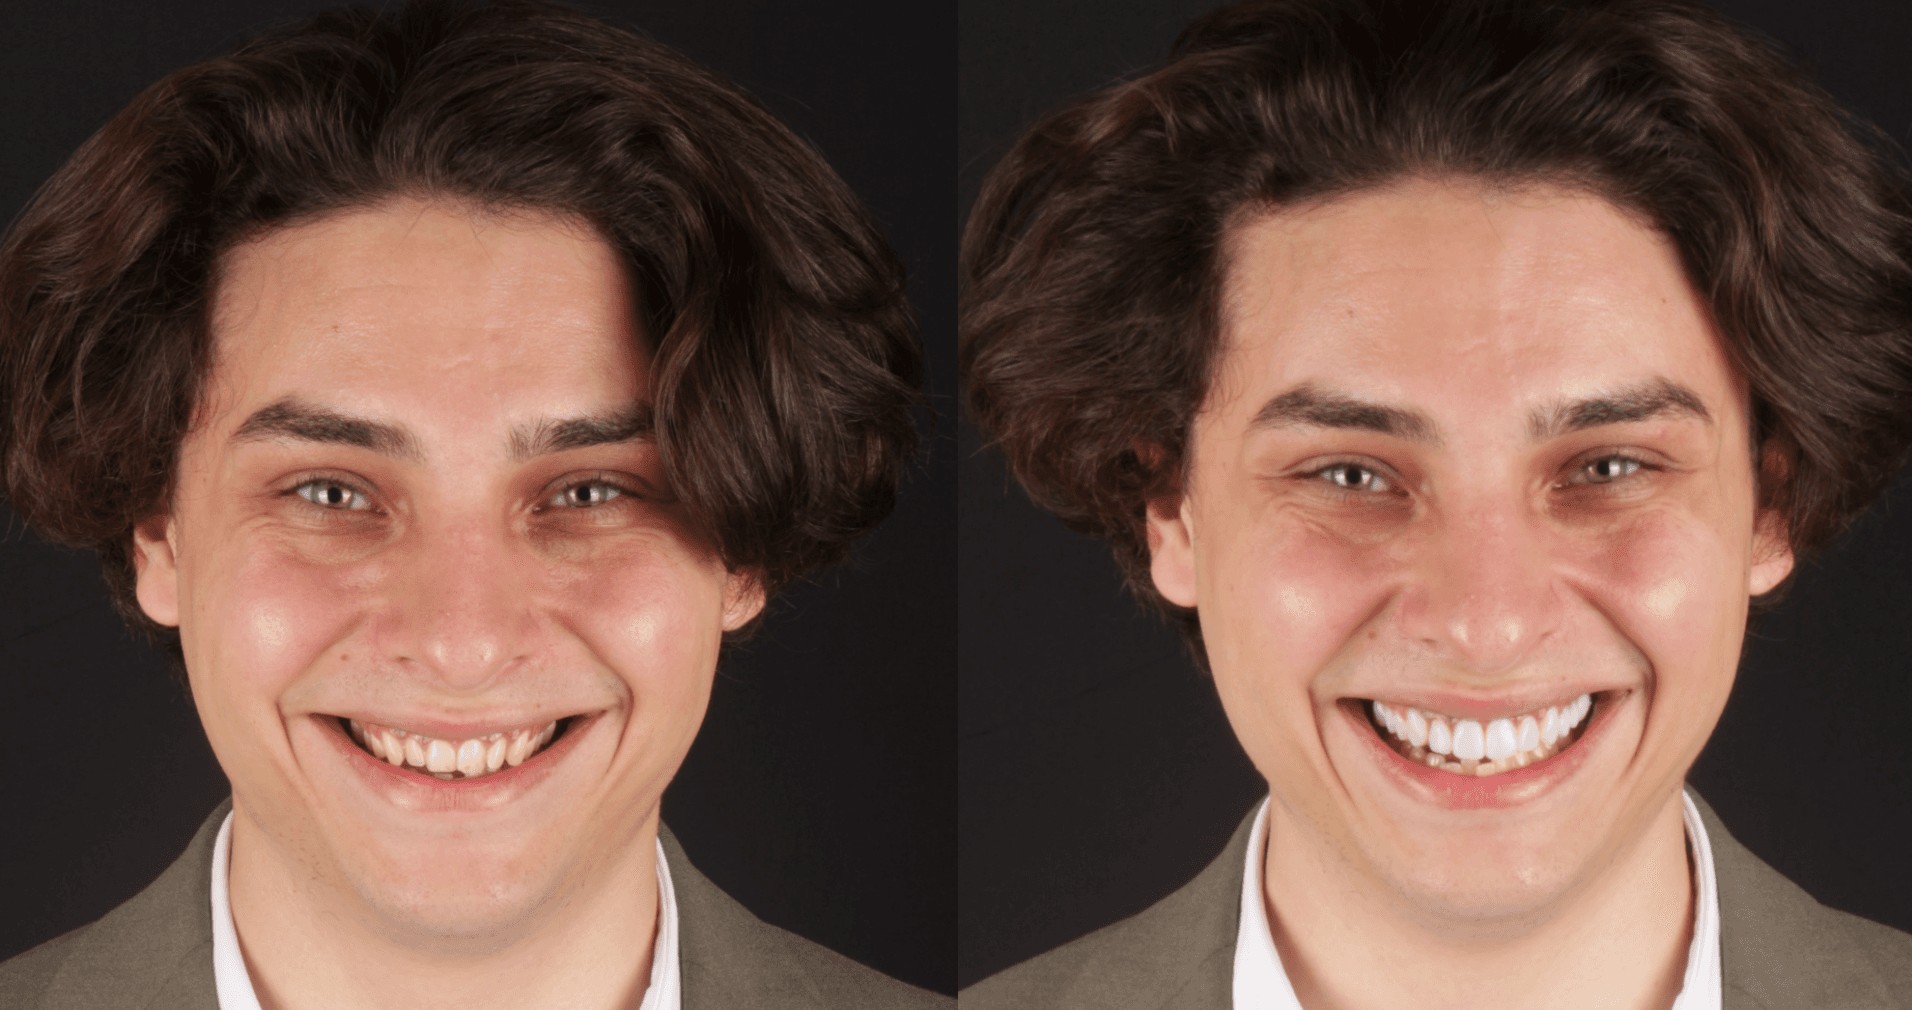
Despite the minimal thickness, the material strength, translucency, and low opacity provide a highly convincing look that patients instantly connect with.
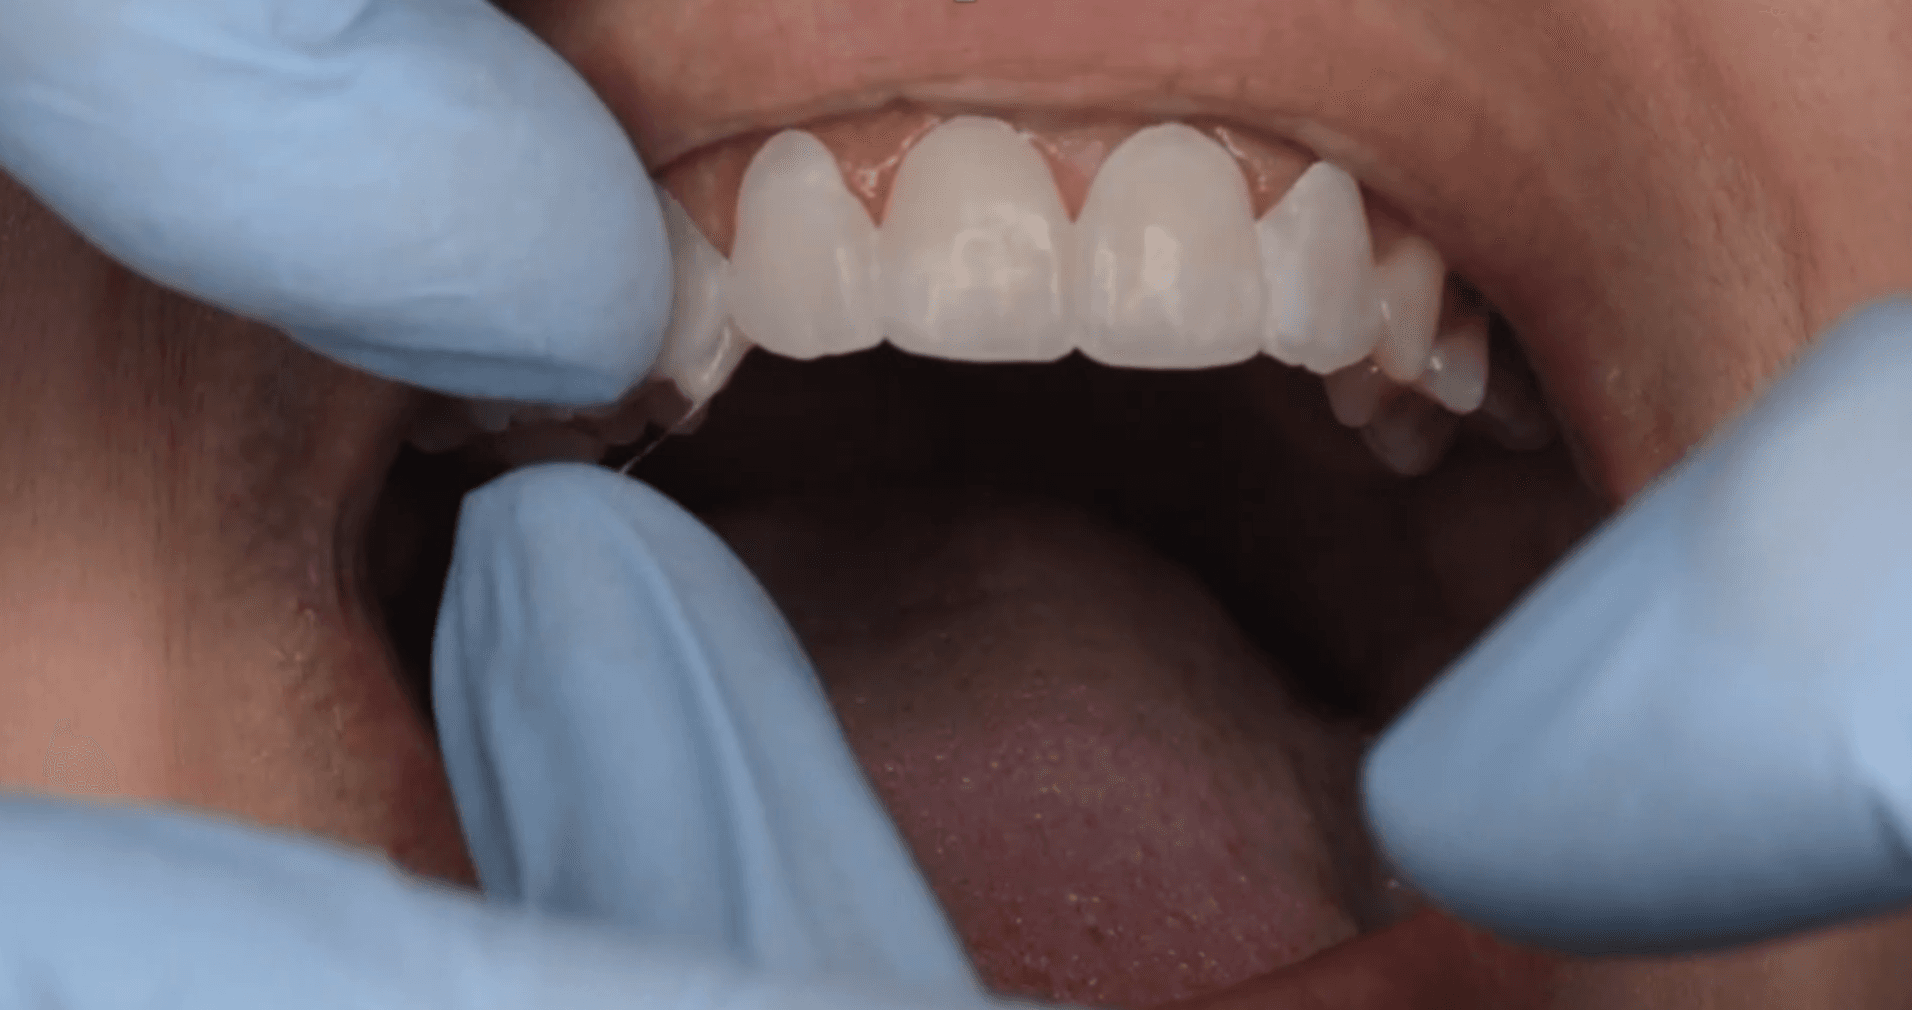
Once the documentation is completed with the motivational mock-up, the printed shell sections can be easily removed with the explorer tool.
This technique is fast to execute, precise, and the most efficient of all three protocols.
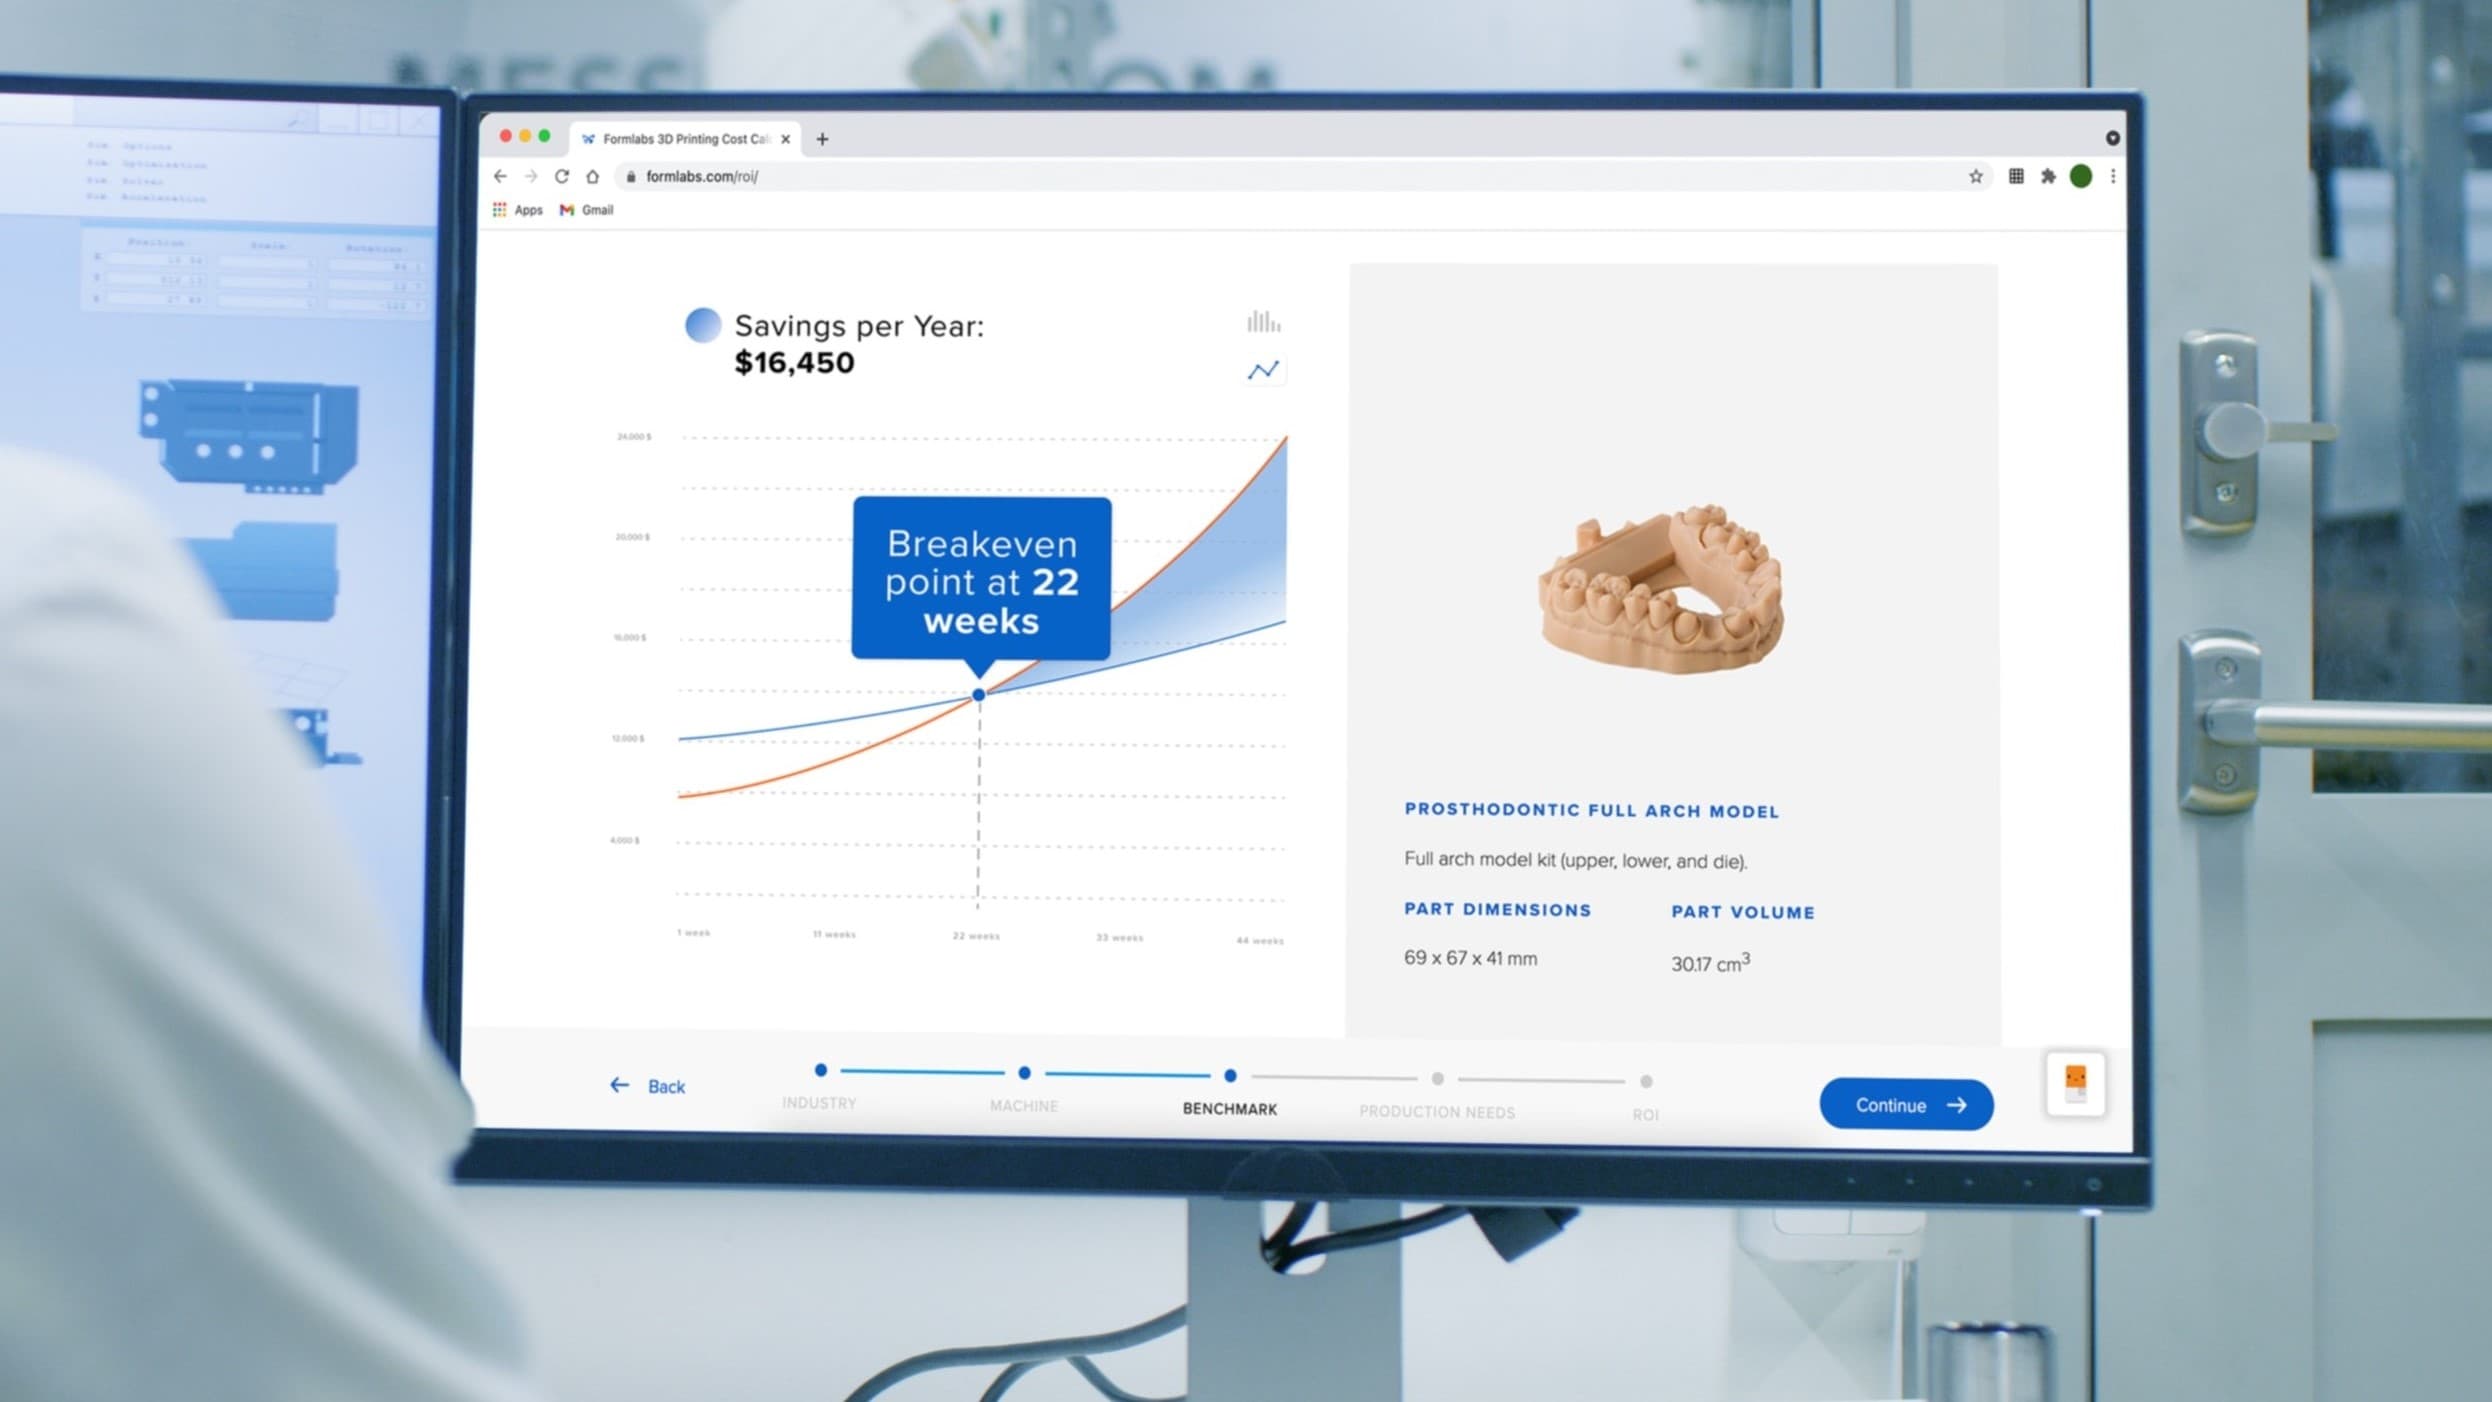
Calculate Your Time and Cost Savings
Try our interactive ROI tool to see how much time and cost you can save when 3D printing on Formlabs dental 3D printers.
Conclusion
3D printing has removed the barriers that once made mock-up fabrication complex, time-consuming, or inconsistent. With the ability to choose from three streamlined protocols, dental professionals now have full control over materials, time, and workflow — whether it’s selecting the right model resin, or deciding to skip bis-acryl altogether in favor of a high-precision 3D printed shell. The technology is here, it’s accessible, and it’s proven. Today, there’s no reason not to leverage digital tools to deliver fast, clean, motivational and technical mock-ups that elevate patient experience and clinical outcomes. The choice is yours — customize your approach, and let 3D printing do the heavy lifting.
Get in Touch
Whether you need to produce occlusal splints in-house, or are looking for high-throughput production of dental models, we're here to help. Get in touch with a dental expert to find the right solution for your business.
Product Demo: Form 4B
Blazing speed meets unmatched accuracy in the next generation of dental 3D printing. Explore the latest innovations in our on-demand webinar.
Request a Free Sample Part
See and feel Formlabs quality firsthand. We’ll ship a free 3D printed sample part printed on the Form 4B to your office.